Crochet Flower Corsage Pattern – Beautiful Layered Pink Flower Brooch
There’s something special about adding a handmade flower to your favorite outfit. A simple jacket, dress, or cardigan can instantly feel more elegant with...
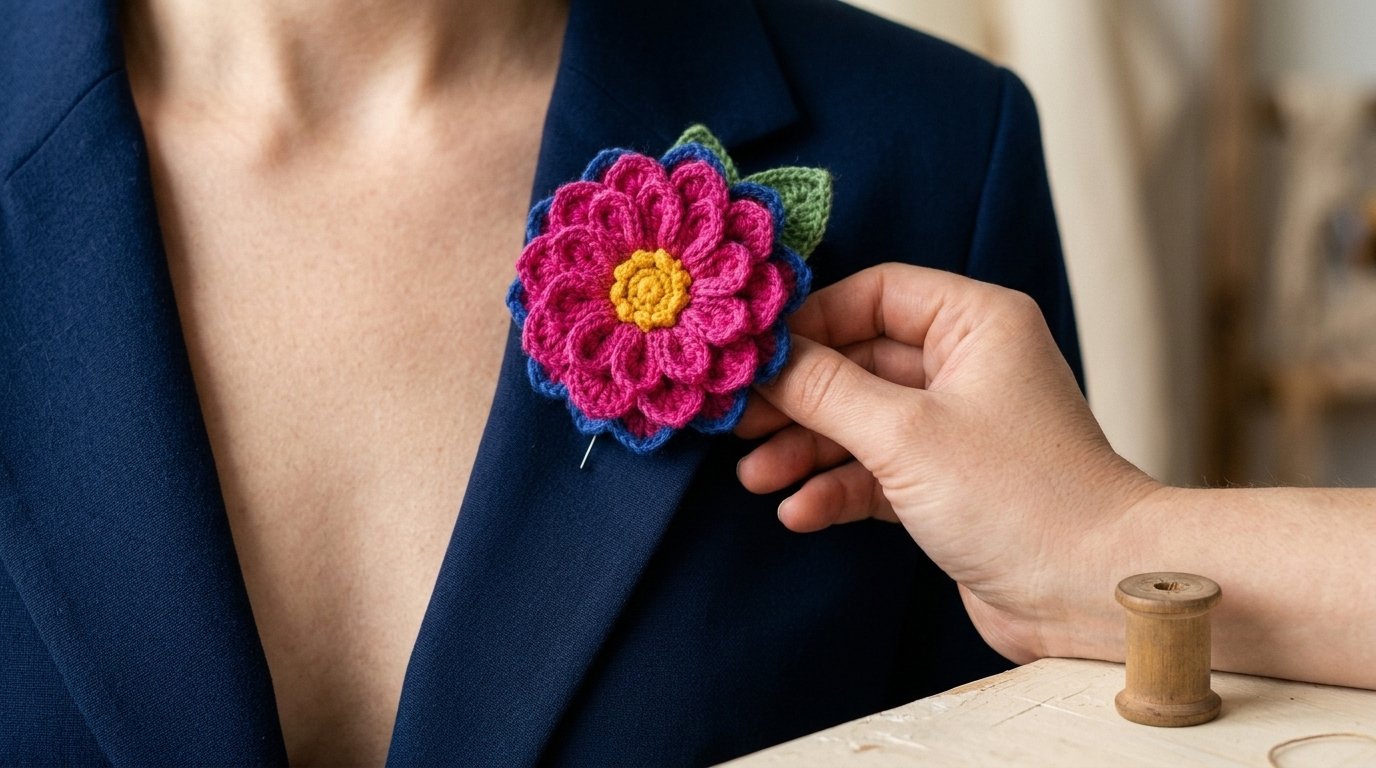
There’s something special about adding a handmade flower to your favorite outfit. A simple jacket, dress, or cardigan can instantly feel more elegant with one colorful crochet accessory.
This crochet flower corsage pattern features a beautiful layered pink blossom, a cheerful golden-yellow center, deep blue scalloped petals, and soft green leaves. The finished flower has a lovely three-dimensional appearance, making it perfect for wearing as a brooch, decorating a jacket lapel, or giving as a thoughtful handmade gift.
Inspired by traditional floral corsages, this design combines several easy crochet pieces into one eye-catching accessory.
It’s a wonderful project for confident beginners who want to practice crocheting flowers, shaping petals, and assembling decorative accessories.
You can make the entire corsage with small amounts of leftover yarn, making it a satisfying project for an afternoon of crafting.
Quick Pattern Details
| Detail | Information |
|---|---|
| Skill level | Confident beginner |
| Project type | Crochet flower corsage or brooch |
| Finished diameter | Approximately 3–4 inches |
| Estimated time | 2–3 hours |
| Yarn weight | DK weight #3 |
| Crochet hook | 3.5 mm (E/4) |
| Main stitches | Sc, hdc, dc, slip stitch |
| Construction | Layered flower pieces |
| Crochet terminology | US terms |
The flower’s finished size will vary depending on your yarn and crochet tension.
Materials and Supplies
The rich color combination is what makes this flower corsage so beautiful.
Yarn Colors
Bright Fuchsia Pink Yarn
Choose a vivid raspberry or deep fuchsia shade for the main flower petals.
Estimated amount: 20–30 yards.
Royal Blue Yarn
A deep royal blue creates the decorative outer petal layer, adding contrast and depth.
Estimated amount: 10–15 yards.
Golden Yellow Yarn
Use warm golden-yellow yarn for the raised flower center.
Estimated amount: 5–8 yards.
Sage Green Yarn
A soft, muted green works beautifully for the two decorative leaves behind the flower.
Estimated amount: 10–15 yards.
Additional Supplies
- 3.5 mm crochet hook
- Yarn needle
- Scissors
- Stitch markers
- Measuring tape
- Small brooch pin or pin-back finding
- Small piece of felt, optional
- Strong sewing thread
- A tiny amount of fiberfill, optional
Yarn tip: Cotton yarn is especially good for crochet flower corsages because it creates defined stitches and helps the petals maintain their shape.
A soft cotton-acrylic blend also works well if you prefer a slightly more flexible flower.
Crochet Abbreviations
This pattern uses standard US crochet terminology.
| Abbreviation | Meaning |
|---|---|
| MR | Magic ring |
| ch | Chain |
| sc | Single crochet |
| hdc | Half double crochet |
| dc | Double crochet |
| sl st | Slip stitch |
| inc | Increase: 2 sc in one stitch |
| st(s) | Stitch or stitches |
| rnd | Round |
| rep | Repeat |
Magic ring: An adjustable starting loop that you pull closed after crocheting the first stitches.
Single crochet: Insert your hook into the stitch, yarn over and pull up a loop, then yarn over and pull through both loops.
Half double crochet: Yarn over, insert your hook into the stitch, pull up a loop, yarn over again, and pull through all three loops.
Double crochet: Yarn over, insert your hook into the stitch, pull up a loop, yarn over and pull through two loops, then yarn over and pull through the remaining two loops.
Crochet Flower Corsage Pattern: Step-by-Step Instructions
We’ll create the corsage in six sections:
- Crochet the large pink flower layer.
- Make the smaller pink petals.
- Create the royal blue backing.
- Crochet the golden-yellow center.
- Make the green leaves.
- Assemble the flower and attach the brooch pin.
Working the pieces separately makes the pattern easier to follow and allows you to arrange the layers before sewing them together.
Step 1: Crochet the Large Pink Flower Layer
The larger pink petals form the main body of the flower.
We’ll create a circular base with ten rounded petals around the outside.
Using fuchsia pink yarn and your 3.5 mm hook:
Round 1: Make a magic ring and work 10 sc into the ring. Pull the ring closed and join with a slip stitch. (10 stitches)
Round 2: Chain 1, then work 2 sc into every stitch around. Join with a slip stitch. (20 stitches)
Round 3: Chain 1, repeat 1 sc, inc ten times. Join with a slip stitch. (30 stitches)
You should now have a small circular base.
Make the Large Petals
For Round 4, repeat this sequence ten times:
- Work 1 sl st into the next stitch.
- Skip the following stitch.
- Work 1 hdc, 5 dc, and 1 hdc into the next stitch.
Each repeat uses three stitches from the previous round and creates one rounded scalloped petal.
Continue until you’ve made ten petals.
Fasten off, leaving a long sewing tail.
Gently spread the petals with your fingers.
The finished layer should resemble a bright pink flower with broad, slightly overlapping petals.
Beginner tip: If your petals curl upward, don’t worry. A little natural curling adds dimension to the finished corsage.
Step 2: Crochet the Smaller Pink Flower Layer
The second flower layer sits above the first, creating a fuller blossom.
Using the same fuchsia pink yarn:
Round 1: Work 10 sc into a magic ring. Join with a slip stitch. (10 stitches)
Round 2: Chain 1, then work 2 sc into every stitch. Join with a slip stitch. (20 stitches)
Create the Smaller Petals
For Round 3, repeat the following sequence ten times:
- Work 1 sl st into the next stitch.
- Into the following stitch, work 1 hdc, 3 dc, and 1 hdc.
Continue around the circle until you have ten smaller petals.
Fasten off with a long sewing tail.
These petals will sit above the larger pink layer, creating the lush, dimensional appearance seen in the inspiration design.
Arrange the Two Pink Layers
Place the smaller flower on top of the larger one.
Rotate it slightly so the smaller petals sit between the larger petals rather than directly above them.
This arrangement makes the flower look fuller.
Don’t sew the layers together just yet. We’ll add the blue backing first.
Step 3: Crochet the Royal Blue Outer Petals
The royal blue layer creates a beautiful outline around the pink blossom.
It also makes the bright fuchsia petals stand out against dark clothing.
Using royal blue yarn:
Round 1: Work 12 sc into a magic ring. Join with a slip stitch. (12 stitches)
Round 2: Chain 1, then work 2 sc into each stitch. Join with a slip stitch. (24 stitches)
Round 3: Chain 1, repeat 1 sc, inc twelve times. Join with a slip stitch. (36 stitches)
Make the Blue Scalloped Edge
For Round 4, repeat this sequence twelve times:
- Work 1 sl st into the next stitch.
- Skip the following stitch.
- Work 1 hdc, 5 dc, and 1 hdc into the next stitch.
You should have twelve rounded scallops.
Fasten off, leaving a long tail.
Lay the blue layer flat and gently shape the petals.
Position the large pink layer on top.
The blue petals should peek out around the outside, creating a contrasting border.
Helpful tip: If the blue layer is curling too much, lightly dampen it and gently shape it flat. Allow it to dry before assembling the corsage.
Step 4: Crochet the Golden-Yellow Flower Center
The bright yellow center gives the flower a cheerful focal point.
We’ll make a small raised circle with a slightly rounded shape.
Using golden-yellow yarn:
Round 1: Make a magic ring and work 6 sc into it. (6 stitches)
Round 2: Work 2 sc into every stitch. (12 stitches)
Round 3: Work 1 sc into each stitch. (12 stitches)
Fasten off, leaving a long sewing tail.
The center should look like a shallow, rounded cup.
If you want a more dimensional center, add a tiny pinch of fiberfill.
Place the yellow center on top of the smaller pink flower layer.
Use your yarn needle to stitch around the outer edge, securing it neatly in place.
Keep your stitches small so they blend into the yellow yarn.
The finished center should look slightly raised, similar to the inspiration flower.
Step 5: Crochet the Sage Green Leaves
The soft green leaves give the corsage a natural botanical appearance.
We’ll make two pointed oval leaves to position behind the flower.
Using sage green yarn:
- Chain 10.
- Work 1 sc into the second chain from your hook.
- Work 1 hdc into the next chain.
- Work 1 dc into each of the next 5 chains.
- Work 1 hdc into the next chain.
- Work 3 sc into the final chain to form the leaf tip.
- Rotate your work to crochet along the opposite side of the foundation chain.
- Work 1 hdc into the next chain.
- Work 1 dc into each of the next 5 chains.
- Work 1 hdc into the next chain.
- Work 1 sc into the final chain.
- Join with a slip stitch.
Fasten off, leaving a long sewing tail.
You should have a slightly pointed oval leaf.
Repeat the pattern to make a second leaf.
Add the Leaf Veins
Using a yarn needle and a strand of green yarn, embroider a short line along the center of each leaf.
You can add two or three smaller diagonal stitches extending outward from the center.
These simple details make the leaves look more realistic.
Gently pinch the base of each leaf to create a slightly curved shape.
Beginner tip: The leaves don’t need to be identical. Small differences can make the finished flower look more natural.
Step 6: Assemble the Layered Crochet Flower
Now it’s time to bring everything together.
Place the royal blue flower layer on a flat surface.
Position the large pink flower on top, centering it over the blue backing.
Rotate the pink layer slightly so the blue scallops remain visible around the outside.
Next, place the smaller pink flower layer on top.
Adjust the petals so they overlap naturally.
Sew the Flower Layers Together
Thread a yarn needle with one of the long sewing tails.
Pass the needle through the center of all three flower layers.
Make several secure stitches, keeping the layers centered.
Avoid sewing down the outer petals.
Leaving them free helps create the raised, dimensional appearance that makes this flower so attractive.
Once the layers are secured, gently lift and shape the pink petals.
Attach the Green Leaves
Turn the flower over.
Position one green leaf behind the upper-left side of the blossom.
Place the second leaf behind the upper-right side.
Allow the pointed ends to extend beyond the flower.
Sew the leaf bases securely to the back of the blue layer.
The leaves should remain visible without covering too much of the flower.
Step 7: Attach the Brooch Pin
To turn your crochet flower into a wearable corsage, attach a small brooch pin to the back.
A metal pin-back finding works well because it allows the flower to be attached to clothing and removed easily.
Prepare the Back
If you’d like a neat finish, cut a small circle of felt approximately 1.5 inches across.
Position it at the center of the flower’s back.
Sew the felt securely to the crochet backing using matching thread.
This creates a stable surface for the brooch pin.
Sew on the Pin
- Position the closed pin horizontally across the felt.
- Make sure the pin is centered.
- Sew through the attachment holes using strong thread.
- Reinforce the stitches several times.
- Tie the thread securely on the back.
- Check that the pin opens and closes smoothly.
Avoid stitching through the moving parts of the pin mechanism.
Safety tip: Use a proper locking brooch finding when possible. The pin should be securely attached and its sharp point fully covered when closed.
Your crochet flower corsage is now ready to wear!
Finishing and Shaping Your Crochet Flower Corsage
Take a few minutes to adjust the flower’s shape.
Gently lift the smaller pink petals so they stand slightly above the larger layer.
Spread the blue outer petals so they form a visible scalloped border.
Arrange the green leaves behind the blossom.
Check that the yellow center sits neatly in the middle.
If the flower looks a little uneven, use your fingers to reshape the petals.
You can also lightly steam-block suitable yarn, keeping the steam source at a safe distance and following the yarn’s care instructions.
Avoid flattening the layers completely.
The raised petals are part of the flower’s charm.
How to Wear Your Crochet Flower Corsage
One of the nicest things about this project is how easily it can transform an outfit.
On a Blazer or Jacket
Pin the flower to the lapel of a navy, black, or cream blazer.
The fuchsia petals and royal blue border create a striking contrast against dark fabric, just like the inspiration image.
This is a lovely way to add handmade personality to a simple outfit.
On a Dress
Attach the flower near the neckline or shoulder of a plain dress.
It can create an elegant finishing touch for celebrations, parties, or family gatherings.
On a Cardigan
A crochet flower brooch looks especially charming on a soft knitted or crocheted cardigan.
Choose a contrasting cardigan color to make the flower stand out.
On a Bag
Attach the corsage to a fabric tote bag or handbag.
The layered flower adds a playful handmade detail without changing the bag permanently.
As a Wrist Corsage
You can also turn this design into a wrist corsage.
Instead of using a brooch pin, attach the flower to a soft ribbon or comfortable elastic band.
Make sure the band fits comfortably and isn’t too tight.
This variation is lovely for parties, handmade gifts, and special occasions.
Make This Crochet Flower Corsage Your Own
Once you’ve learned the basic construction, try experimenting with different colors and styles.
1. Romantic Pastel Flower Corsage
Use blush pink for the main petals, pale lavender for the outer layer, and soft cream for the center.
Add sage green leaves for a gentle, romantic appearance.
This version would look lovely on a spring dress or light cardigan.
2. Elegant Burgundy Flower Brooch
Choose deep burgundy yarn for the petals, dark plum for the backing, and muted gold for the center.
The darker color combination creates a sophisticated accessory for autumn and winter outfits.
3. Bright Summer Flower Corsage
Use coral pink, turquoise blue, sunny yellow, and fresh green.
This colorful version is perfect for casual outfits, craft fairs, or cheerful handmade gifts.
You can also add a third pink flower layer if you’d like an especially full blossom.
Tips for Beautiful Crochet Flower Corsages
A few simple techniques can make your finished accessory look even more polished.
Use consistent tension. Even stitches help the petals maintain a balanced shape.
Choose yarn with good stitch definition. Smooth cotton or cotton-blend yarn makes the decorative layers easier to see.
Stagger the petals. Rotating each flower layer creates a fuller appearance.
Keep the center secure. The yellow center should sit neatly without pulling the surrounding petals inward.
Avoid overblocking. A little natural curling helps the flower maintain its three-dimensional shape.
Use strong sewing stitches. Securely attaching the layers and brooch pin makes the corsage more durable.
Check the finished weight. If the flower feels too heavy for delicate clothing, try lighter yarn or a smaller flower size.
How to Care for Your Crochet Flower Corsage
Because this flower is a handmade accessory, gentle care will help it maintain its shape and color.
- Remove dust with a soft brush.
- Spot-clean with a lightly damp cloth when necessary.
- Avoid soaking the metal brooch pin.
- Allow the flower to dry completely after cleaning.
- Keep it away from prolonged direct sunlight to reduce fading.
- Store it flat in a small box or fabric pouch.
- Check the pin attachment occasionally.
If the petals become slightly flattened during storage, gently reshape them with your fingers.
Frequently Asked Questions
Is this crochet flower corsage pattern beginner-friendly?
Yes! This pattern is suitable for confident beginners who know basic crochet stitches. The flower layers use simple rounds and scalloped petals, while the assembly requires only basic hand sewing.
What yarn is best for a crochet flower corsage?
DK-weight cotton yarn is an excellent choice because it creates defined stitches and helps the petals hold their shape. Acrylic and cotton-blend yarns can also work if you prefer a softer flower.
How do I make my crochet flower look fuller?
Use multiple petal layers and rotate them slightly before sewing. Keeping the outer petals free instead of stitching them completely flat creates a beautiful dimensional effect.
Can I make this crochet flower corsage smaller?
Absolutely! Use thinner yarn and a smaller crochet hook. The finished flower will be more delicate and suitable for smaller accessories or children’s clothing, provided the pin is appropriate for the wearer.
Can I use this crochet flower as a hair accessory?
Yes. Instead of attaching a brooch pin, sew the finished flower to a suitable hair clip or headband. Secure it firmly and make sure the backing feels comfortable against your hair.
Conclusion
This crochet flower corsage pattern is a lovely way to turn a few colorful yarn scraps into a beautiful handmade accessory.
The vibrant fuchsia petals, deep blue scalloped backing, golden-yellow center, and soft green leaves come together to create a flower that’s full of charm and texture.
Whether you wear it on your favorite jacket, attach it to a bag, or make one as a thoughtful gift, this little crochet flower brings a personal touch to any outfit.
Enjoy experimenting with different colors and petal arrangements, and don’t forget to save this flower idea to your Pinterest crochet board for your next creative afternoon!