Crochet Flower Cardigan With Bold Blooms – Beautiful Purple Cardigan With Pink Roses
Some crochet projects are made to keep you warm, while others are designed to make you smile. This crochet flower cardigan with bold blooms...
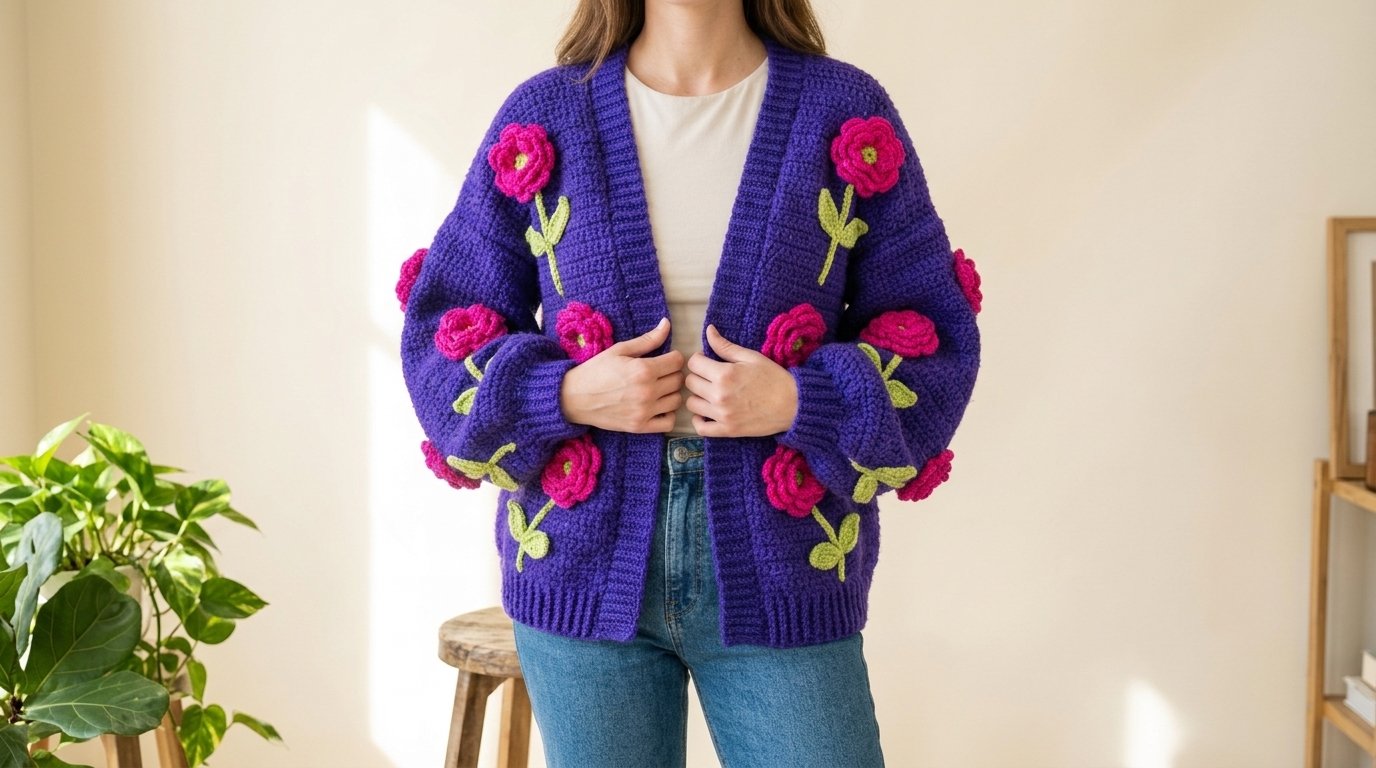
Some crochet projects are made to keep you warm, while others are designed to make you smile. This crochet flower cardigan with bold blooms does both beautifully.
With its rich purple body, oversized sleeves, bright pink crochet roses, and fresh lime-green leaves, this cardigan brings a playful floral touch to everyday fashion. The raised flowers create wonderful texture, while the ribbed cuffs, open front, and relaxed silhouette keep the design comfortable and wearable.
The cardigan is constructed from simple crochet panels, then decorated with handmade flower appliqués. This makes it a lovely project for confident beginners ready to explore crochet clothing.
Whether you pair it with jeans and a simple white top or layer it over a dress, this colorful cardigan is sure to become a standout piece in your handmade wardrobe.
Quick Pattern Details
| Detail | Information |
|---|---|
| Skill level | Confident beginner to intermediate |
| Project | Crochet flower cardigan |
| Style | Oversized, open-front cardigan |
| Suggested size | Adult M/L |
| Finished bust | Approximately 46 inches |
| Finished length | Approximately 24–25 inches |
| Sleeve length | Approximately 20 inches |
| Estimated time | 18–25 hours |
| Yarn weight | Medium weight #4 |
| Main hook | 5 mm (H/8) |
| Construction | Separate panels with sewn-on flowers |
| Terminology | US crochet terms |
The cardigan has a relaxed fit with slightly dropped shoulders and roomy sleeves. Its dimensions can be adjusted to suit your measurements.
Materials and Supplies
The beautiful contrast between deep purple and vibrant pink makes this cardigan particularly eye-catching.
Yarn Colors
Deep Purple Yarn – Main Color
Choose a rich violet or royal purple shade for the cardigan body, sleeves, cuffs, neckline, and ribbed hem.
Estimated amount: 1,000–1,300 yards.
Hot Pink Yarn – Flower Color
Use vibrant fuchsia or raspberry pink for the raised crochet roses.
Estimated amount: 150–220 yards.
Lime Green Yarn – Leaves and Stems
Choose a fresh yellow-green shade for the leaves, embroidered stems, and small flower centers.
Estimated amount: 80–120 yards.
A soft acrylic-wool blend or washable acrylic yarn works well for this project. Choose yarn with comfortable drape so the cardigan doesn’t feel stiff.
Additional Supplies
- 5 mm crochet hook for the cardigan body
- 4 mm hook for ribbing
- 3.5 mm hook for flowers and leaves
- Yarn needle
- Scissors
- Measuring tape
- Stitch markers
- Sewing pins
- Blocking mat, optional
Yarn substitution tip: Cotton blends can also work, but they may produce a heavier garment. Make a gauge swatch before changing yarn types.
Gauge and Sizing
Before starting your cardigan, make a small swatch using half double crochet.
Suggested gauge with a 5 mm hook:
- 13 half double crochet stitches = 4 inches
- 10 rows = 4 inches
Measure your swatch after washing and drying it according to your yarn’s care instructions.
If your stitches are too tight, try a larger hook. If they’re too loose, use a smaller hook.
The cardigan is designed with approximately 4–8 inches of positive ease for a relaxed appearance.
For the most comfortable fit, measure your bust and compare it with the finished garment width before beginning.
Crochet Abbreviations
This pattern uses US crochet terminology.
| Abbreviation | Meaning |
|---|---|
| ch | Chain |
| sc | Single crochet |
| hdc | Half double crochet |
| dc | Double crochet |
| sl st | Slip stitch |
| hdc2tog | Half double crochet decrease |
| sc2tog | Single crochet decrease |
| BLO | Back loop only |
| MR | Magic ring |
| st(s) | Stitch or stitches |
| RS | Right side |
| WS | Wrong side |
Half double crochet: Yarn over, insert your hook into the stitch, pull up a loop, yarn over, and pull through all three loops.
Hdc2tog: Yarn over and pull up a loop in each of the next two stitches, then yarn over and pull through all five loops.
Back loop only: Work through the loop farthest from you instead of inserting your hook under both loops.
Crochet Flower Cardigan Pattern: Step-by-Step Instructions
We’ll make the cardigan in several sections:
- Crochet the purple back panel.
- Make the two front panels.
- Create the oversized sleeves.
- Assemble the cardigan.
- Add the ribbed cuffs, hem, and opening.
- Crochet the pink roses and green leaves.
- Attach the floral decorations.
Let’s begin with the main cardigan.
Step 1: Crochet the Purple Back Panel
The back panel is a simple rectangle worked in half double crochet.
Using purple yarn and your 5 mm hook:
- Chain 74.
- Row 1: Work 1 hdc into the third chain from your hook and across. (72 stitches)
- Row 2: Chain 1, turn, and work 1 hdc in every stitch. (72 stitches)
- Rows 3–55: Repeat Row 2, keeping 72 stitches in each row.
- Fasten off, leaving a long sewing tail.
Your back panel should measure approximately 22 inches wide and 22 inches long before adding the hem.
Beginner tip: Place stitch markers in the first and last stitches of each row to help keep your edges straight.
Step 2: Crochet the Left Front Panel
The front panels are narrower than the back and feature gentle shaping near the neckline.
Using purple yarn:
- Chain 38.
- Row 1: Work 1 hdc into the third chain from your hook and across. (36 stitches)
- Rows 2–39: Chain 1, turn, and work 1 hdc in every stitch. (36 stitches per row)
Shape the Neckline
Beginning at Row 40, decrease one stitch at the edge facing the front opening.
- Row 40: Work hdc2tog at the neckline edge, then hdc across the remaining stitches. (35 stitches)
- Rows 41–42: Work evenly. (35 stitches)
- Row 43: Decrease one stitch at the neckline edge. (34 stitches)
- Continue working hdc, decreasing one stitch at the neckline edge on Rows 46, 49, 52, and 55.
After Row 55, you should have 30 stitches remaining.
Fasten off with a long sewing tail.
The gentle slope creates the beginning of the cardigan’s open neckline.
Step 3: Crochet the Right Front Panel
Repeat the instructions for the left panel, mirroring the neckline shaping.
The decreases should face inward when both front panels are laid beside each other.
After Row 55, the right panel should also have 30 stitches.
Helpful tip: Lay the two panels flat before assembling. Their shaped edges should mirror one another.
Step 4: Crochet the Oversized Purple Sleeves
The roomy sleeves are an important feature of this design.
Their relaxed shape allows the cardigan to drape comfortably over the arms while the ribbed cuffs create a gently gathered effect.
Make two identical sleeves.
Using purple yarn:
- Chain 62.
- Row 1: Work 1 hdc into the third chain from your hook and across. (60 stitches)
- Row 2: Chain 1, turn, and work 1 hdc into every stitch. (60 stitches)
- Rows 3–45: Repeat Row 2. (60 stitches per row)
- Fasten off, leaving a long tail for sewing.
Each sleeve panel should measure approximately 18.5 inches wide and 18 inches long before adding the cuff.
Repeat for the second sleeve.
The sleeves are intentionally wide, giving them the soft, slightly balloon-shaped appearance shown in the design.
Step 5: Assemble the Cardigan
Lay the back panel flat with the right side facing upward.
Position the two front panels on top, with right sides together.
Align the upper outer corners.
Join the Shoulders
- Sew the 30 stitches along the upper edge of the left front panel to the outer 30 stitches of the back.
- Repeat with the right front panel.
- Leave the center 12 stitches of the back unseamed for the neckline.
Use mattress stitch or whip stitch for neat seams.
Attach the Sleeves
Fold one sleeve panel to locate its center along the upper edge.
Match this center point to the shoulder seam.
Leave approximately 23 body rows open on each side of the shoulder seam.
Sew the upper sleeve edge evenly around this armhole opening.
Repeat with the second sleeve.
Close the Side and Sleeve Seams
Fold the cardigan with right sides together.
Sew each side seam from the lower edge toward the underarm, joining the lower 32 rows.
Continue sewing along the underside of each sleeve.
Turn the cardigan right side out.
Try it on to check the fit before adding the ribbing.
Step 6: Crochet the Purple Ribbed Hem
The ribbed hem gives the cardigan a structured finish.
Using purple yarn and your 4 mm hook:
- Chain 10.
- Row 1: Work 1 sc into the second chain from your hook and across. (9 stitches)
- Row 2: Chain 1, turn, and work 1 sc in the back loop of every stitch. (9 stitches)
- Repeat Row 2 until the ribbing stretches comfortably across the full lower edge of the cardigan.
Fasten off with a long sewing tail.
Pin the ribbing along the cardigan’s bottom edge.
Sew it evenly into place, keeping the ribbing relaxed.
The finished hem should measure approximately 2 inches high.
Step 7: Make the Ribbed Sleeve Cuffs
The cuffs create the gathered effect that makes the sleeves look cozy and slightly oversized.
Using purple yarn:
- Join yarn at the wrist opening.
- Work 1 sc into each of the 60 stitches around the opening. (60 stitches)
- Round 2: Repeat 3 sc, sc2tog twelve times. (48 stitches)
- Round 3: Repeat 2 sc, sc2tog twelve times. (36 stitches)
Fasten off.
Now make a separate ribbed cuff.
- Chain 10.
- Work 9 sc across.
- Chain 1, turn, and work 9 sc in BLO.
- Repeat until the ribbed strip fits comfortably around your wrist.
- Sew the short ends together.
- Attach the cuff evenly to the gathered sleeve opening.
Repeat for the second sleeve.
Beginner tip: Make sure the cuff stretches comfortably over your hand before attaching it.
Step 8: Crochet the Front Opening and Neckline Band
The cardigan features a wide purple ribbed edging that frames the open front.
Using purple yarn and your 4 mm hook:
- Chain 9.
- Work 1 sc into the second chain from your hook and across. (8 stitches)
- Chain 1, turn, and work 1 sc in BLO across. (8 stitches)
- Repeat until the strip is long enough to extend up one front edge, across the back neckline, and down the opposite front edge.
Pin the band around the opening.
Sew it securely, gently easing it around the neckline.
The ribbed edging should lie flat without pulling the cardigan inward.
This version is designed to remain open, so buttons aren’t necessary.
Step 9: Crochet the Bold Pink Roses
Now comes the most colorful part of the project!
The bright pink roses create a beautiful raised texture against the deep purple cardigan.
We’ll make ten layered flower appliqués, each with two petal layers.
Large Outer Rose Layer
Using hot pink yarn and your 3.5 mm hook:
Round 1: Make a magic ring and work 12 sc into it. Join with a slip stitch. (12 stitches)
Round 2: Chain 1 and work 2 sc into every stitch. Join. (24 stitches)
Round 3: Repeat the following sequence six times:
- Slip stitch into the next stitch.
- Skip the following stitch.
- Work 1 hdc, 5 dc, and 1 hdc into the next stitch.
- Slip stitch into the following stitch.
You should have six rounded petals.
Fasten off with a long sewing tail.
Smaller Inner Rose Layer
Using the same pink yarn:
Round 1: Work 10 sc into a magic ring. Join. (10 stitches)
Round 2: Work 2 sc into each stitch. Join. (20 stitches)
Round 3: Repeat the following five times:
- Slip stitch into the next stitch.
- Skip the next stitch.
- Work 1 hdc, 3 dc, and 1 hdc into the following stitch.
- Slip stitch into the next stitch.
Fasten off with a long tail.
You should have five smaller petals.
Assemble the Rose
Place the smaller flower layer on top of the larger one.
Rotate it slightly so the petals overlap naturally.
Sew the layers together through their centers, leaving the outer petals free.
For the tiny light-green center, work 5 sc into a magic ring using lime-green yarn.
Pull the ring closed and sew the small circle to the center of the rose.
Repeat until you have ten completed flowers.
Beginner tip: Gently lift the petals with your fingers to create a fuller, dimensional flower.
Step 10: Crochet the Lime-Green Leaves
The bright green leaves and stems give the cardigan its charming botanical appearance.
We’ll make two leaves for each flower.
Using lime-green yarn:
- Chain 9.
- Work 1 sc into the second chain from your hook.
- Work 1 hdc into the next chain.
- Work 1 dc into each of the next 3 chains.
- Work 1 hdc into the next chain.
- Work 1 sc into the next chain.
- Work 3 sc into the final chain.
- Continue along the opposite side of the foundation chain.
- Work 1 sc into the next chain.
- Work 1 hdc into the next chain.
- Work 1 dc into each of the next 3 chains.
- Work 1 hdc into the next chain.
- Work 1 sc into the final chain.
- Join with a slip stitch.
Fasten off, leaving a sewing tail.
Make approximately 20 leaves.
Gently shape each leaf into a pointed oval.
Step 11: Add the Green Flower Stems
The inspiration cardigan features bright green stems beneath several of the pink roses.
You can create these using surface crochet or embroidery.
Embroidered Stem Method
Using lime-green yarn and a yarn needle:
- Mark the desired stem position on the cardigan.
- Bring the needle through the fabric near the base of the flower.
- Make a short stitch downward.
- Continue with small connecting stitches to form a gentle curved stem.
- Secure the yarn on the inside.
Keep the stitches slightly relaxed so the cardigan fabric can stretch.
Position two small crochet leaves along each stem and sew them securely to the cardigan.
Some flowers can have shorter stems, while others can feature longer curved stems for a natural arrangement.
Step 12: Attach the Pink Flowers to the Cardigan
Lay the completed cardigan flat.
Before sewing, arrange all ten flowers across the front and sleeves.
For a look similar to the image, try this placement:
- Two flowers near the upper front and shoulders
- Four flowers across the lower front panels
- Two flowers on each sleeve
You can adjust the arrangement to your preference.
Pin the flowers into position before sewing.
Sew the Flowers Securely
Thread a yarn needle with matching pink yarn.
Stitch through the flower center and the cardigan fabric.
Make several secure stitches, then lightly tack down selected petal bases.
Leave the outer petal edges free to maintain their raised appearance.
Repeat for each flower.
Add the lime-green stems and leaves beneath the blossoms.
Helpful tip: Keep the flowers away from the sleeve seams and inner underarm areas, where raised decorations may feel uncomfortable.
Finishing Your Crochet Flower Cardigan
Once the flowers are attached, take time to inspect the entire garment.
Weave in loose yarn ends.
Check the seams and decorative attachments.
Gently shape the pink roses so the petals sit naturally.
Straighten the green leaves and stems.
Blocking the Cardigan
Follow the care instructions for your yarn.
If appropriate, gently dampen the cardigan and lay it flat on a clean towel or blocking mat.
Smooth the body panels, sleeves, and ribbed edging.
Avoid flattening the flowers too much, since their raised texture is part of the design.
Allow the cardigan to dry completely before wearing it.
How to Customize Your Crochet Flower Cardigan
There are plenty of ways to make this colorful cardigan your own.
1. Pastel Floral Cardigan
Replace the deep purple yarn with lavender.
Use soft pink roses and sage-green leaves for a gentle spring-inspired design.
2. Romantic Rose Cardigan
Choose cream yarn for the cardigan body and deep red for the flowers.
This creates a beautiful contrast that works especially well with neutral outfits.
3. Colorful Garden Cardigan
Make flowers in several shades, including pink, coral, yellow, and lilac.
Keep the green stems and leaves consistent to tie the design together.
Styling Your Crochet Flower Cardigan
This cardigan makes a beautiful statement piece, so simple clothing works especially well underneath.
Casual everyday look: Pair it with a white top, blue jeans, and comfortable sneakers.
Cozy autumn outfit: Wear it over a cream turtleneck with dark trousers.
Creative weekend style: Layer it over a simple dress with ankle boots.
The deep purple background allows the bright pink flowers to stand out beautifully, while the relaxed silhouette makes the cardigan easy to style.
Tips for a Beautiful Crochet Cardigan
Maintain consistent tension. Even stitches help the body panels fit together neatly.
Check your gauge. Small differences in stitch size can noticeably change garment measurements.
Pin flowers before sewing. This helps you create a balanced arrangement.
Keep the petals dimensional. Avoid sewing the entire flower flat against the fabric.
Use strong attachment stitches. Secure each rose carefully so it stays in place during wear.
Try on the cardigan during assembly. Check the sleeves and body length before adding the ribbing.
How to Care for Your Crochet Flower Cardigan
A little gentle care will help preserve the colorful flowers and soft texture.
- Wash according to your yarn label.
- Use cool water and a mild detergent when suitable.
- Turn the cardigan inside out to help protect the flower appliqués.
- Avoid twisting or wringing the garment.
- Lay the cardigan flat to dry.
- Gently reshape the flowers while damp.
- Store folded rather than hanging for long periods.
Check the flower attachments occasionally, especially after washing.
Frequently Asked Questions
Is this crochet flower cardigan pattern beginner-friendly?
It’s best for confident beginners who already know basic crochet stitches and simple garment construction. The body panels are straightforward, while the flowers provide a fun opportunity to practice decorative crochet techniques.
What yarn is best for a crochet flower cardigan?
Soft medium-weight acrylic or wool-blend yarn works well for the cardigan body. Cotton yarn is also a good choice for the flower appliqués because it helps the petals hold their shape.
Can I make this cardigan without the flowers?
Absolutely! The plain purple cardigan works beautifully on its own. You can also add fewer roses for a simpler decorative style.
How do I keep crochet flowers attached to clothing?
Use strong yarn or thread to stitch the flower centers and bases securely to the garment. Avoid attaching them only through a single stitch, especially if the flowers are large or dimensional.
Can I make this cardigan in a larger size?
Yes. Adjust the panel widths using your gauge and body measurements, then modify the sleeve and armhole dimensions to match. Adding length to the body panels also creates a longer cardigan.
Conclusion
This crochet flower cardigan with bold blooms combines cozy handmade style with colorful, eye-catching details.
The rich purple body, vibrant pink roses, and lime-green stems create a playful garden-inspired design that’s perfect for adding personality to your wardrobe.
Enjoy making each section, experimenting with the flower placement, and adding your own creative touches.
Whether you wear it with jeans for a casual day or give it as a thoughtful handmade gift, this floral cardigan is a beautiful project to be proud of.
Save this crochet flower cardigan pattern to your favorite Pinterest crochet board so you can return whenever you’re ready to create another colorful handmade sweater!