Crochet Flower Cardigan Pattern with 3D Pink Blossoms
Introduction A crochet flower cardigan is a lovely way to combine wearable handmade fashion with colorful botanical details. This original design features a soft...
Introduction
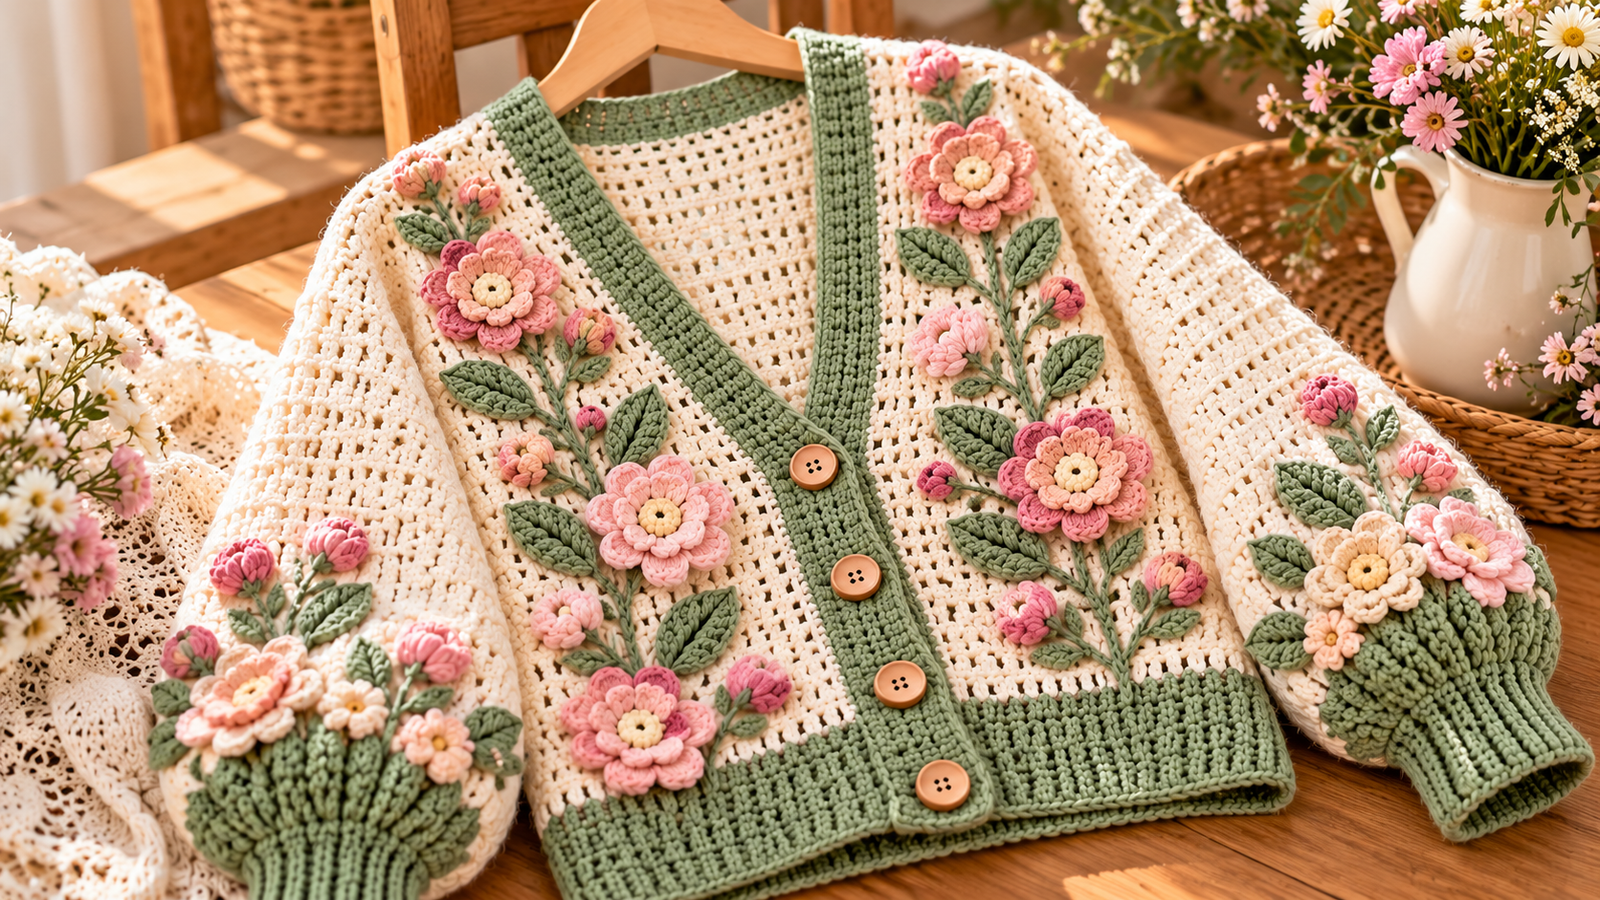
A crochet flower cardigan is a lovely way to combine wearable handmade fashion with colorful botanical details. This original design features a soft cream crochet body decorated with raised pink and peach blossoms, delicate sage green leaves, and trailing floral vines.
Its relaxed shape, softly gathered balloon sleeves, textured edging, and wooden buttons create a romantic cottagecore look that works beautifully for spring, autumn, or everyday layering.
The cardigan is constructed from simple crochet panels, with the floral decorations made separately and attached after assembly. This approach allows you to complete the wearable garment before concentrating on the more detailed embellishments.
This tutorial presents an original draft interpretation of the AI-generated cardigan design. The pattern has not been physically tested, and some details in the photograph may require individual adjustment to reproduce accurately.
Why You’ll Love This Crochet Project
This crochet floral cardigan combines familiar stitches with creative decorative work.
- Beautiful botanical details: Raised flowers, buds, and leaves create an attractive dimensional design.
- Soft feminine colors: Cream, sage green, blush pink, and peach work together naturally.
- Customizable decoration: Add fewer flowers for a minimalist look or more for a fuller floral arrangement.
- Practical construction: Simple body panels provide an approachable foundation.
- Comfortable layering: Relaxed sleeves and a button-front opening make the cardigan versatile.
- Creative learning opportunity: Practice garment assembly, crochet appliqués, ribbing, and finishing techniques.
The design is especially appealing to crocheters who enjoy handmade clothing with decorative embellishments.
Project Overview
| Detail | Recommendation |
|---|---|
| Project | Crochet flower cardigan |
| Skill level | Intermediate |
| Construction | Flat panels and sewn appliqués |
| Estimated time | 25–40 hours |
| Sample size | Relaxed adult medium |
| Finished bust | Approximately 44 inches |
| Finished length | Approximately 23 inches |
| Yarn weight | Worsted weight (4) |
| Main hook | 5.0 mm (H/8) |
| Decorative hook | 4.0 mm (G/6) |
| Terminology | US crochet terms |
The pattern features a rectangular back, two front panels, separately crocheted sleeves, attached ribbing, and handmade flower-and-leaf appliqués.
The estimated dimensions depend on achieving the suggested gauge. Since the decorative work is extensive, the time required may vary considerably.
Materials and Supplies Needed
Yarn
Choose soft worsted-weight yarn in the following colors:
| Color | Estimated amount | Purpose |
|---|---|---|
| Warm cream | 900–1,100 yards | Main cardigan |
| Sage green | 350–450 yards | Trim, leaves, stems |
| Dusty pink | 120–180 yards | Flower petals |
| Peach pink | 80–120 yards | Flower petals |
| Pale yellow | 30–50 yards | Flower centers |
Yarn quantities are estimates for the sample size, with decorative quantities depending on the final number of flowers.
Crochet Tools
- 5.0 mm crochet hook.
- 4.0 mm crochet hook.
- Yarn needle.
- Scissors.
- Stitch markers.
- Flexible measuring tape.
- Four wooden buttons, approximately 20 mm.
- Matching sewing thread.
- Blocking supplies, if suitable for your yarn.
Choose buttons that are lightweight enough not to distort the front band.
Choosing the Right Yarn and Hook
The main garment should be comfortable, breathable, and able to support the weight of the attached flowers.
A soft acrylic blend or a lightweight wool blend is a reasonable choice for the cream body. Both can provide a cozy fabric, depending on the specific yarn.
For the flowers and leaves, choose yarn with good stitch definition. Cotton blends can create crisp petals but may add extra weight.
Using worsted-weight yarn throughout helps maintain consistent proportions.
The main garment uses a 5.0 mm hook to create flexible fabric. A 4.0 mm hook produces slightly firmer decorative motifs.
Always compare your gauge with the pattern before crocheting the full garment.
Crochet Stitches and Abbreviations
All abbreviations follow US crochet terminology.
| Abbreviation | Meaning |
|---|---|
| ch | Chain |
| sc | Single crochet |
| hdc | Half double crochet |
| dc | Double crochet |
| tr | Treble crochet |
| sl st | Slip stitch |
| st / sts | Stitch / stitches |
| BLO | Back loop only |
| RS | Right side |
| WS | Wrong side |
The cardigan body primarily uses double crochet. The flowers combine shorter and taller stitches to create rounded petals.
For a treble crochet, yarn over twice before inserting the hook, pull up a loop, then yarn over and pull through two loops three times.
Before You Start
Gauge
Using the 5.0 mm hook, aim for:
14 double crochet stitches and 8 rows = 4 × 4 inches (10 × 10 cm).
Make a swatch larger than four inches square and measure the central area after allowing the fabric to relax.
Adjust your hook size if necessary.
Sample Measurements
| Piece | Approximate measurement |
|---|---|
| Back panel | 22 × 20 inches |
| Each front panel | 11 × 20 inches |
| Sleeve rectangle | 18 × 16 inches |
| Lower ribbed band | 3 inches deep |
| Sleeve cuff | 3 inches deep |
The sample cardigan has approximately 44 inches of body circumference before accounting for button-band overlap.
To determine suitable ease, compare the finished circumference with your actual bust measurement.
Construction Preparation
Before starting, identify the right and wrong sides of the fabric.
Place stitch markers at the shoulders, underarms, and center back.
Keep the decorative flowers separate until the body has been assembled and checked for fit.
This prevents the appliqués from interfering with adjustments.
Step-by-Step Crochet Instructions
Crochet the Back Panel
With cream yarn and a 5.0 mm hook:
Foundation: Ch 79.
Row 1: Work 1 dc in the fourth chain from the hook and in every remaining chain. You should have 77 dc, counting the turning chain as the first stitch.
Row 2: Ch 3, turn. Skip the first stitch and work 1 dc in every remaining stitch. Maintain 77 dc.
Rows 3–40: Repeat Row 2.
Fasten off, leaving a long tail for joining.
The back panel should measure approximately 22 inches wide and 20 inches long at the suggested gauge.
Crochet the Front Panels
Make two identical rectangular panels.
With cream yarn:
Foundation: Ch 40.
Row 1: Dc in the fourth chain from the hook and across, counting the turning chain as a stitch. You should have 38 dc.
Rows 2–40: Ch 3, turn. Skip the first stitch and work dc across, maintaining 38 stitches.
Fasten off.
These rectangular fronts provide a simple open-front neckline. They do not reproduce the exact deep V shaping shown in the photograph.
For a deeper V, decrease gradually along the inner upper edge of each panel and recalculate the neckline edging.
Join the Shoulder Seams
Lay the back panel flat with its right side facing upward.
Place the front panels on top, right sides together, aligning the outer edges.
Sew approximately 5 inches inward from each outer shoulder corner.
Leave the center neckline open.
Use a mattress stitch or a loose whipstitch to prevent the shoulder seams from becoming overly stiff.
Repeat on the opposite shoulder.
Create the Side Seams
With the panels still facing right sides together, align the side edges.
Starting from the bottom, sew upward for approximately 12 inches.
Leave about 8 inches open at the top for the armholes.
Repeat on the other side.
Try the cardigan on and evaluate the shoulder and armhole fit before proceeding.
Crochet the Balloon Sleeves
Make two sleeves.
Using cream yarn:
Foundation: Ch 65.
Row 1: Work dc in the fourth chain from the hook and across. You should have 63 dc, including the turning chain.
Rows 2–32: Ch 3, turn, skip the first stitch, and dc across.
Each rectangle will measure approximately 18 inches wide by 16 inches long at the suggested gauge.
Fold the rectangle lengthwise, joining the two long edges to form a sleeve tube.
Sew the long seam securely.
Leave the upper and lower sleeve openings free.
Attach the Sleeves
Turn the cardigan inside out.
Position a sleeve inside an armhole, aligning the sleeve seam with the side seam.
Distribute the sleeve fabric evenly around the armhole.
Because the sleeve opening is slightly fuller than the armhole, ease the fabric into place without forming large, irregular gathers.
Pin or mark the joining points before sewing.
Repeat for the second sleeve.
Crochet the Sage Green Cuffs
Use sage green yarn and the 4.0 mm hook.
Work a round of approximately 32 sc evenly around the wrist opening, drawing in the fullness without making the opening too tight for your hand.
Join with a slip stitch.
For the ribbing:
- Ch 13 from the cuff base.
- Sc in the second chain from the hook and across for 12 sc.
- Sl st into the next two cuff-base stitches.
- Turn and work 12 sc BLO back toward the outer rib edge.
- Ch 1, turn, work 12 sc BLO toward the cuff base.
- Attach to the next two available cuff stitches with slip stitches.
Repeat the ribbing rows around the cuff, adjusting the last attachment if necessary.
Join the ends of the ribbing.
Repeat for the second sleeve.
Crochet the Bottom Ribbing
Attach sage green yarn to one lower corner.
Use a similar applied ribbing technique.
For a band approximately three inches deep, begin with ch 13 and work 12 sc BLO in alternating rows, attaching each rib section to the bottom of the cardigan with slip stitches.
Continue around the lower edge until reaching the opposite front corner.
Keep the attachments evenly distributed so the band lies flat rather than puckering.
Crochet the Front Button Bands
Using sage green yarn, work sc evenly along each front opening and neckline.
Work approximately four to six additional rows of sc to create a substantial border.
For the buttonhole side, mark four evenly spaced buttonhole positions.
At each marked position, replace two sc with ch 2, skipping two stitches beneath the chain space.
On the next row, work two sc into each chain space.
Test each buttonhole size against the intended button.
Sew the wooden buttons to the opposite band.
Crochet the 3D Flower Centers
Use pale yellow yarn and a 4.0 mm hook.
Round 1: Make a magic ring. Work 6 sc into the ring and join with a slip stitch.
Round 2: Work 2 sc in each stitch around for 12 sc. Join.
Fasten off, leaving a sewing tail.
Make one center for each flower.
Crochet the Raised Flower Petals
Attach dusty pink or peach yarn to any stitch on a finished flower center.
For each petal:
- Ch 2.
- Work 3 dc into the next stitch.
- Ch 2.
- Sl st into the following stitch.
Repeat around the flower to create six petals, using two center stitches per petal.
Fasten off.
For a fuller blossom, add a second round of slightly larger petals behind the first, working around accessible back loops or a separately made base.
Make approximately 12–16 larger flowers.
Vary the proportions of blush, peach, and dusty rose to create natural-looking color differences.
Make the Small Flower Buds
Using pink yarn:
Round 1: Make a magic ring and work 5 sc into it.
Round 2: Work 2 sc in each stitch for 10 sc.
Round 3: Work 1 sc in each stitch.
Fasten off, leaving a long tail.
Gather the opening slightly and shape the piece into a small rounded bud.
Make approximately 10–14 buds.
Crochet the Green Leaves
With sage green yarn:
Foundation: Ch 10.
Work along the first side of the chain:
- Sc in the second chain from the hook.
- Hdc in the next chain.
- Dc in the next five chains.
- Hdc in the next chain.
- Work 3 sc in the last chain.
Work along the opposite side:
- Hdc in the next chain.
- Dc in the next five chains.
- Hdc in the next chain.
- Sc in the final chain.
Fasten off, leaving a long tail.
Make approximately 20–26 leaves.
The finished leaves should have an elongated shape and can be lightly blocked to emphasize their pointed ends.
Arrange the Floral Vines
Lay the completed cardigan flat.
Arrange the flowers and leaves along the two front panels, beginning near the shoulders and extending toward the lower hem.
Place the larger flowers at irregular intervals, alternating dusty pink and peach.
Use smaller buds between the large flowers.
Position the leaves so they follow two gently curved vertical stems.
Temporarily pin the decorations in place and inspect the arrangement from a distance.
Add Floral Details to the Sleeves
Arrange several small flowers, buds, and leaves on the lower part of each sleeve above the sage green cuff.
Use fewer decorations than on the body to avoid excessive weight around the wrists.
Check the sleeve placement while wearing the cardigan to make sure the motifs do not gather awkwardly around the inner arm.
Sew the decorations securely using the matching yarn tails.
Assembly and Finishing
After attaching the floral motifs, use sage green yarn to create connecting stems with surface slip stitches or simple embroidery.
Follow the curves of the vines rather than forcing the stems into perfectly straight lines.
Sew each leaf and flower securely enough to withstand normal movement.
Avoid pulling the yarn too tightly, which can distort the surrounding cream fabric.
Check all seams, buttons, and sleeve joins.
Weave in the remaining yarn ends.
If the yarn allows, gently block the cardigan to even out the body panels and ribbing.
Let it dry completely before wearing.
Tips for Best Results
Make all flowers before arranging them. Having the complete collection of blossoms available makes it easier to create a balanced design.
Keep decorative tension consistent. Changes in tension may make the petals noticeably different in size.
Do not overcrowd the front panels. Leave some cream fabric visible so the botanical elements remain distinct.
Use firm stitches for attaching appliqués. Secure the flower centers carefully while leaving the outer petals slightly raised.
Try the cardigan on before final assembly. Adjustments are easier before the decorations are attached.
Choose lightweight decorative yarn. Heavy flowers can cause the front panels to stretch.
Common Mistakes and Troubleshooting
The Flowers Look Flat
Try making a second petal layer or using a smaller hook to create firmer stitches.
You can also gently shape the petals with your fingers after blocking.
The Front Panels Stretch
Large flowers may add unnecessary weight.
Reduce the number of decorations or use lighter-weight yarn for the appliqués.
The Sleeves Feel Too Tight
Recheck the cuff opening and sleeve circumference.
The cuff must stretch or open enough to pass comfortably over the hand.
The Ribbing Looks Uneven
Count the rib stitches consistently and avoid stretching the border while attaching it.
The Cardigan Does Not Fit Properly
Compare the garment’s finished dimensions with your body measurements.
If the gauge differs from the sample, the pattern may need to be recalculated.
Creative Variations
Lavender Garden Cardigan
Replace the pink and peach blossoms with lavender, mauve, and soft violet flowers.
Use muted forest green leaves for contrast.
Autumn Floral Cardigan
Choose rust orange, golden mustard, and burgundy for the blossoms.
Pair them with warm cream and olive green trim.
Minimalist Botanical Cardigan
Use only four to six flowers on each front panel and omit the sleeve decorations.
This produces a lighter, less elaborate garment.
Cropped Flower Cardigan
Shorten the body panels while keeping the relaxed sleeves.
Adjust the flower placement to suit the shorter length.
Open-Front Flower Cardigan
Omit the buttons and buttonholes.
Work a simple continuous border around the front opening for a relaxed layering piece.
How to Use or Style Your Crochet Project
The cardigan’s floral accents make it particularly suitable for soft, romantic outfits.
Pair it with high-waisted jeans and a fitted white top for an everyday look.
For cottagecore styling, wear it over a cream linen dress or a flowing skirt.
The pink blossoms also complement blush, ivory, sage green, and light denim clothing.
For spring outings, combine the cardigan with neutral accessories and simple shoes.
Because the floral vines provide substantial decorative detail, the cardigan usually looks best with solid-colored clothing underneath.
Care and Maintenance
The raised flowers require more careful handling than a plain crochet garment.
Follow the care instructions for the yarn used.
When appropriate, wash gently in cool water using a mild detergent.
Avoid rubbing or twisting the flower appliqués.
Press out excess moisture with a towel rather than wringing the cardigan.
Lay the garment flat to dry, reshaping the sleeves, cuffs, petals, and leaves while damp.
Store the cardigan folded to reduce stretching.
Check the buttons, flower centers, and attached leaves periodically for loose stitching.
Frequently Asked Questions
Is this crochet flower cardigan beginner-friendly?
The garment panels use straightforward stitches, but the balloon sleeves, ribbed edging, and many appliqués make the project better suited to intermediate crocheters.
How many flowers should I crochet?
For the sample design, approximately 12–16 large flowers and 10–14 small buds provide a decorative arrangement.
You may use fewer flowers for a simpler appearance.
Can I use cotton yarn?
Yes, but cotton can make the garment heavier. Choose a soft, suitable cotton blend and test the finished fabric before starting.
Can I make the cardigan in different sizes?
Yes. Adjust the panel widths and lengths according to the desired finished measurements and your stitch gauge.
The sample is not a fully graded multi-size pattern.
Can I remove the flowers for washing?
Not if they are permanently sewn on. Removable appliqués would require a different attachment method designed to remain secure during wear.
How do I keep the flowers from curling?
Maintain consistent tension and lightly block the flowers if the yarn permits.
Some dimensional curling is intentional for raised petals.
How long does this cardigan take to crochet?
Approximately 25–40 hours is a planning estimate. The amount of decorative work and the crocheter’s experience will affect the time needed.
Has this crochet pattern been tested?
No. It is an original draft inspired by an AI-generated design. The stitch instructions and measurements should be verified through swatching, fitting, and physical testing before publication as a fully tested pattern.
Conclusion
This crochet flower cardigan brings together comfortable garment construction and romantic botanical decorations.
Its soft cream body offers a versatile foundation, while sage green borders, dimensional pink flowers, and delicate leaves provide a distinctive handmade appearance.
The project also offers opportunities to practice stitching, garment assembly, ribbing, and three-dimensional crochet embellishments.
Whether you create a fully decorated floral cardigan or a simpler version with just a few blossoms, the design can become a beautiful addition to a handmade wardrobe.