Crochet Flower Bouquet in a Vase Pattern for Beginners
Introduction A crochet flower bouquet is a lovely way to bring color and handmade charm into your home without worrying about watering or wilting...
Introduction
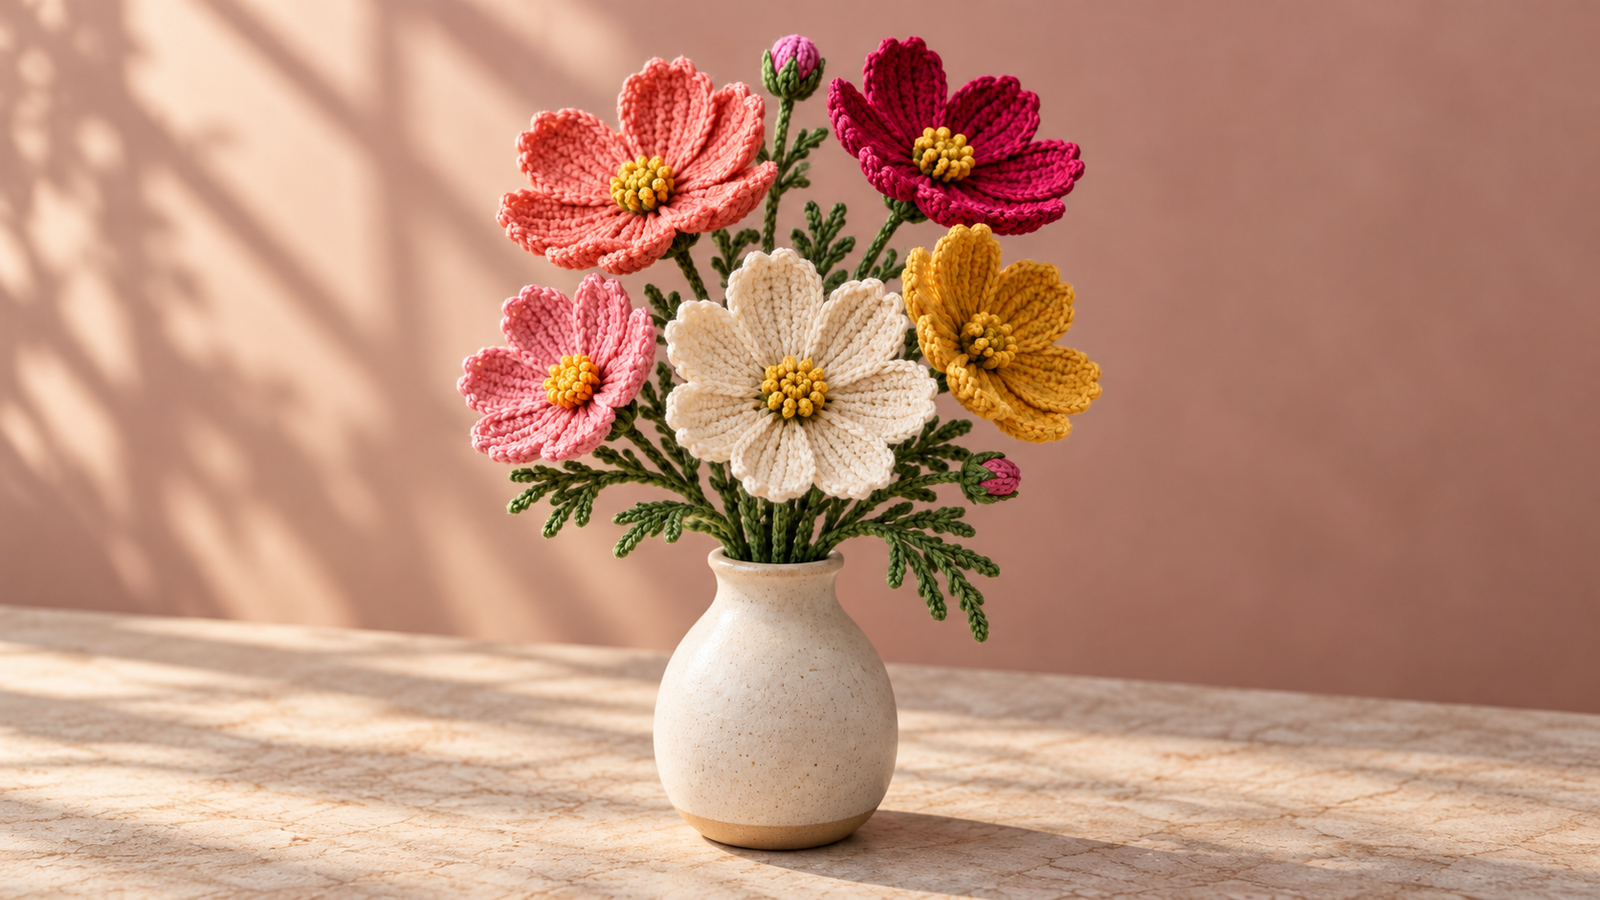
A crochet flower bouquet is a lovely way to bring color and handmade charm into your home without worrying about watering or wilting petals. This design features a soft, elegant arrangement of crochet flowers in several shades, including ivory, coral, pink, raspberry, and mustard, all gathered into a simple vase display with textured green leaves and delicate buds.
This project is a great choice for beginners who want to move beyond flat motifs and make something decorative and giftable. You will learn how to crochet flower centers, shape individual petals, create stems and leafy sprigs, and assemble everything into a finished bouquet. The final result is ideal for shelf decor, table styling, or a thoughtful handmade gift.
This pattern was developed from an original AI-generated design image for inspiration. The written pattern below is an original draft pattern and has not been physically tested, so it is best to read through the steps before starting and adjust your tension if needed.
Why You’ll Love This Project
This crochet flower bouquet has plenty of appeal for beginners and experienced crocheters alike.
- It uses mostly basic stitches and simple shaping.
- The flowers look detailed and realistic without requiring advanced techniques.
- You can customize the colors to suit your decor or the season.
- The project works well as home decor, a gift, or a craft fair item.
- Individual flowers can be used separately on wreaths, bags, or other projects.
- You can make the bouquet as full or as minimal as you like.
- It is a practical stash-busting project for small yarn amounts.
Project Overview
This project is a crochet flower bouquet arranged in a small vase.
- Project type: Crochet home decor / floral arrangement
- Difficulty: Beginner to advanced beginner
- Approximate time: 6 to 10 hours, depending on speed and bouquet size
- Suggested finished size: About 10 to 14 inches tall when arranged
- Yarn weight: DK or light worsted
- Crochet hook: 3.25 mm to 4.0 mm
- Main techniques: Working in rounds, working into chains, basic increases, shaping petals, crocheting around a stem support
- Construction approach: Flowers, buds, leaves, and stems are crocheted separately and then assembled into one bouquet
- Terminology: US crochet terms
These measurements are estimates and may vary based on yarn choice, hook size, and tension.
Materials and Supplies Needed
To make a bouquet similar to the one shown, gather the following supplies:
- DK or light worsted yarn in:
- Ivory or cream
- Coral
- Soft pink
- Raspberry or deep magenta
- Mustard or golden yellow
- Green for stems and leaves
- Small amount of golden yellow for flower centers
- Crochet hook, size 3.5 mm recommended
- Yarn needle
- Scissors
- Stitch markers
- Polyester fiberfill or yarn scraps for light bud shaping if desired
- Floral wire, craft wire, or pipe cleaners for stems
- Floral tape or green yarn for wrapping stems if needed
- Small vase or narrow container
- Optional pebbles, stuffing, or scrap yarn to help support the bouquet inside the vase
Estimated yarn amounts are modest. Most flowers use small amounts, so this is an excellent project for leftover yarn.
Choosing the Right Yarn and Hook
Cotton yarn or a cotton-blend yarn works especially well for crochet flowers because it gives crisp stitch definition and helps petals hold their shape. Acrylic can also work if it has a smooth finish and enough body. Avoid overly fuzzy yarns because they can hide stitch definition and make the petals look less clean.
A DK or light worsted yarn gives a good balance between structure and softness. If you use thinner yarn, the flowers will be more delicate. If you use thicker yarn, the bouquet will be bolder and fuller.
A 3.5 mm hook is a solid starting point for this project. If your petals feel floppy, try a slightly smaller hook. If the fabric feels too stiff or hard to work, try going up one hook size.
If you substitute yarn, expect the final flower size and stem thickness to change slightly.
Crochet Stitches and Abbreviations
The pattern uses the following US crochet abbreviations:
- ch — chain
- sl st — slip stitch
- sc — single crochet
- hdc — half double crochet
- dc — double crochet
- tr — treble crochet
- st — stitch
- sts — stitches
- inc — increase
- dec — decrease
- mr — magic ring
- sp — space
- rep — repeat
Special Notes
Petal sequence: Some petals are worked into chain spaces around the center. The pattern gives the full sequence for each petal so you can repeat it evenly.
Crocheting around a stem support: To create a firm stem, you will crochet tightly around a floral wire or pipe cleaner.
Before You Start
Before beginning, take a few minutes to prepare your materials and plan your bouquet.
- Decide which flower colors you want in your bouquet.
- Cut your stem supports in advance. Lengths of 8 to 12 inches work well.
- Keep your tension fairly even so petals on different flowers look balanced.
- If you want a stiffer finish, you may use a smaller hook than usual.
- Use stitch markers when working around small rounds or when attaching repeated petals.
- If you are new to crochet flowers, make one practice flower first before crocheting the full bouquet.
You do not need a formal gauge swatch for this decorative project, but consistency matters. If one flower comes out much larger than another, check whether your tension changed.
Step-by-Step Crochet Instructions
Flower Center
Start each full flower with the center.
Round 1
With golden yellow yarn, make a mr, ch 1, work 8 sc into the ring. Pull ring closed. Join with a sl st to the first sc.
Stitch count: 8
Round 2
Ch 1, work 2 sc in each st around. Join with a sl st.
Stitch count: 16
Fasten off for a flatter center, or continue with the petal round if you prefer. Leave a tail for sewing.
For a more textured center, you may substitute bobble stitches or popcorn stitches on Round 2, but regular sc works well for beginners.
Large Eight-Petal Flower
This flower style is a good match for the ivory, coral, raspberry, and mustard flowers in the bouquet.
Petal Base Round
Join petal-color yarn to any stitch of the center.
Ch 3, skip 1 st, sl st in next st; rep around.
You should create 8 ch-3 spaces around the center.
If needed, adjust slightly so the spaces are distributed evenly.
Petals
Work each petal into one ch-3 space as follows:
(sc, hdc, 3 dc, hdc, sc)
Repeat in each ch-3 space around for a total of 8 petals. Join with a sl st to the first petal.
Fasten off, leaving a tail for shaping or sewing if needed.
Optional Outer Definition Round
For slightly firmer, more sculpted petals, join the same color yarn at the base of any petal and work sl st loosely along the edge of each petal, placing about 1 slip stitch into each stitch. This step is optional but can help define the petal shape.
Smaller Curved Flower
Use this variation for the soft pink flower if you want one bloom to look slightly different.
Round 1
With flower-color yarn, make a mr, ch 1, work 10 sc into the ring. Join.
Stitch count: 10
Round 2
Ch 4, skip 1 st, sl st in next st; rep around.
You should have 5 ch-4 loops.
Round 3
Work into each loop:
(sc, hdc, 4 dc, hdc, sc)
Join and fasten off.
Round 4 for Layered Look
Turn the flower slightly and work behind the first layer. Join yarn at the back of the center and make 5 more ch-4 loops behind the existing petals, anchoring between petal bases.
Work the same petal sequence into each back loop:
(sc, hdc, 4 dc, hdc, sc)
This creates a fuller, layered flower.
Crochet Bud
Make 2 buds for the bouquet.
Bud Base
With pink yarn, make a mr, ch 1, work 6 sc into ring.
Stitch count: 6
Round 2
Work 2 sc in each st around.
Stitch count: 12
Round 3
Work 12 sc around.
Round 4
(sc 1, dec) rep around.
Stitch count: 8
Add a tiny bit of stuffing if desired.
Round 5
Work 8 sc around in back loops only with green yarn.
Round 6
(sc 2, dec) rep around.
Stitch count: 6
Fasten off, leaving a tail.
This creates a rounded bud with a green base.
Leafy Sprig
These leafy green stems help fill out the arrangement and mimic the fern-like foliage in the image.
Foundation
With green yarn, ch 18.
Leaf Edging
Starting in the second ch from hook, work:
- sl st in next 2 ch
- sc in next 2 ch
- hdc in next 2 ch
- ch 3, sl st in second ch from hook, sl st in next ch, sl st in same base ch to form a point
- hdc in next 2 ch
- sc in next 2 ch
- sl st in remaining ch
Fasten off.
Make 8 to 12 leaves.
You can also make smaller leaves by chaining 10 to 12 instead of 18.
Stem
Each flower and bud needs a stem.
Method
Cut a piece of floral wire or pipe cleaner about 8 to 12 inches long.
With green yarn:
- Make a slip knot and place it at one end.
- Hold the yarn and wire together.
- Work tight sc around the wire for the length you want the visible stem to be.
For standard flowers, work about 20 to 28 sc, depending on stem length.
For buds, work about 14 to 18 sc.
Fasten off, leaving a tail for attaching.
If you prefer, you can wrap the wire first and then lightly crochet a chain over it, but single crochet around the wire gives a neater result.
Bouquet Plan
To make a bouquet similar to the image, crochet the following pieces:
- 1 large ivory flower
- 1 large coral flower
- 1 large raspberry flower
- 1 large mustard flower
- 1 smaller pink layered flower
- 2 buds
- 8 to 12 leafy sprigs
- 5 main stems and 2 bud stems
Color Suggestions
- Ivory flower with golden center
- Coral flower with yellow center
- Raspberry flower with golden center
- Mustard flower with yellow-green center
- Soft pink flower with bright yellow center
- Green leaves and stems throughout
Assembly and Finishing
Assembly is where the bouquet comes to life.
Attaching the Flowers to Stems
Sew or firmly attach the back of each flower to the top of a green crocheted stem. If your flower center opening is large enough, you can pass the wire slightly into the back for extra support before sewing.
Make sure each flower sits securely and faces forward.
Attaching Buds
Sew each bud to a shorter green stem. You can pinch the base slightly while sewing to create a natural bud shape.
Adding Leaves
Sew leafy sprigs along the stems or cluster several near the lower half of the bouquet. Vary the placement so the arrangement looks natural and balanced.
Arranging in the Vase
Gather all stems together and place them into a small vase. If the bouquet feels loose, add pebbles, scrap yarn, stuffing, or tissue paper inside the vase for support.
Bend the stems gently to shape the bouquet. Place the largest flower near the center front, then fan the remaining flowers around it. Position the buds slightly higher or lower for visual variety.
Final Touches
- Adjust the angle of petals if needed.
- Spread out the leaves so the bouquet looks full.
- Weave in all ends neatly.
- Lightly steam from a safe distance if your yarn permits it, but always follow yarn care guidance.
Tips for Best Results
A few simple habits will make your bouquet look cleaner and more polished.
- Keep your tension consistent from flower to flower.
- Use a smaller hook if the petals curl too loosely.
- Count petal loops carefully before starting each flower.
- Choose yarn with good stitch definition.
- Use sturdy stem supports so the bouquet holds its shape.
- Place leaves in small clusters instead of attaching them evenly in a straight line.
- Make one sample flower first if you want to test size and texture.
Common Mistakes and Troubleshooting
Beginners often run into small issues when crocheting floral designs. Here are common problems and how to fix them.
Petals Curl Too Much
This usually happens if your tension is tight or your hook is too small. Try loosening your stitches slightly or increasing the hook size.
Petals Look Flat
If the petals are too flat, add the optional edging round or switch to a slightly firmer yarn.
Flower Looks Uneven
Count your chain spaces carefully. Uneven loop placement can make petals different sizes.
Stem Feels Floppy
Use a firmer wire or work tighter sc stitches around the stem support.
Bouquet Looks Sparse
Add extra leafy sprigs or one or two more buds. Small filler pieces make a big difference.
Vase Does Not Hold the Bouquet Well
Place filler material inside the vase to stabilize the stems. You can also tie the stems loosely together near the base before inserting them.
Creative Variations
This crochet flower bouquet pattern is easy to customize.
- Make a monochrome bouquet in shades of cream and ivory for a minimalist look.
- Use bright spring colors for a cheerful seasonal display.
- Turn individual flowers into brooches, gift toppers, or applique accents.
- Make longer stems for a tall vase arrangement.
- Add more buds and leaves for a fuller, garden-style bouquet.
- Use pastel colors for a baby shower or nursery display.
- Create a small bouquet with only three flowers for a quick gift.
Keep any changes structurally simple so the finished arrangement still feels balanced and sturdy.
How to Use or Style Your Crochet Project
A finished crochet flower bouquet can be styled in several beautiful ways.
- Display it on a coffee table, shelf, nightstand, or desk.
- Use it as a handmade centerpiece.
- Give it as a birthday, housewarming, or Mother’s Day gift.
- Place it in a craft room for year-round color.
- Use individual stems in gift wrapping or basket arrangements.
- Add it to a market display if you sell handmade decor.
Because the bouquet is decorative, it works best as an indoor display piece rather than an item intended for rough handling.
Care and Maintenance
Crochet flowers are low-maintenance, but a little care will keep them looking their best.
- Dust gently with a soft cloth or a cool hair dryer on a low setting.
- Spot clean only when possible.
- If washing is necessary, follow the yarn label instructions.
- Reshape petals and leaves while damp if needed.
- Let the bouquet air dry completely before placing it back in the vase.
- Store in a dry place away from heavy moisture.
- Avoid crushing the petals under other items.
If your bouquet contains wire stems, handle it gently to avoid sharp bends or distortion.
Frequently Asked Questions
Can beginners make this crochet flower bouquet?
Yes. The pattern uses basic stitches and simple shaping, so it is suitable for beginners who are ready to try a multi-piece decorative project.
What yarn is best for crochet flowers?
Cotton or cotton-blend yarn is often the best choice because it gives crisp stitch definition and helps the petals hold their shape.
Do I need floral wire for the stems?
A support material such as floral wire or pipe cleaners is very helpful if you want upright stems. Without support, the bouquet will be much softer and harder to arrange.
Can I make just one flower instead of the whole bouquet?
Absolutely. Each flower can be made as a stand-alone embellishment or mini decor piece.
How can I make the flowers larger?
Use thicker yarn and a larger hook, or add extra chains and stitches to each petal. Keep your petal count even around the center.
Can I wash the finished bouquet?
You can gently clean it, but always follow the care instructions for the yarn you used. Avoid aggressive washing, especially if the stems contain wire.
Is this a tested crochet pattern?
No. This is an original written draft inspired by an AI-generated design image. It has been written to be structurally plausible, but it has not been physically tested.
Conclusion
This crochet flower bouquet is a beautiful project for anyone who loves floral decor and handmade details. It combines simple stitches, cheerful colors, and flexible design options in a way that feels approachable and rewarding. Whether you make the full bouquet for your home or crochet a few flowers as gifts, this project offers plenty of room for creativity.
Choose your favorite shades, shape your bouquet in your own style, and enjoy making a lasting arrangement that adds warmth and charm to any space.