Crochet Flower Bouquet Ideas: DIY Peonies & Daisies
Introduction There is something incredibly charming about a bouquet of handmade flowers that never wilts. A beautiful crochet flower bouquet brings together the delicate...
Introduction
There is something incredibly charming about a bouquet of handmade flowers that never wilts. A beautiful crochet flower bouquet brings together the delicate appearance of fresh flowers and the cozy texture of yarn, creating a timeless decoration that can brighten any room.
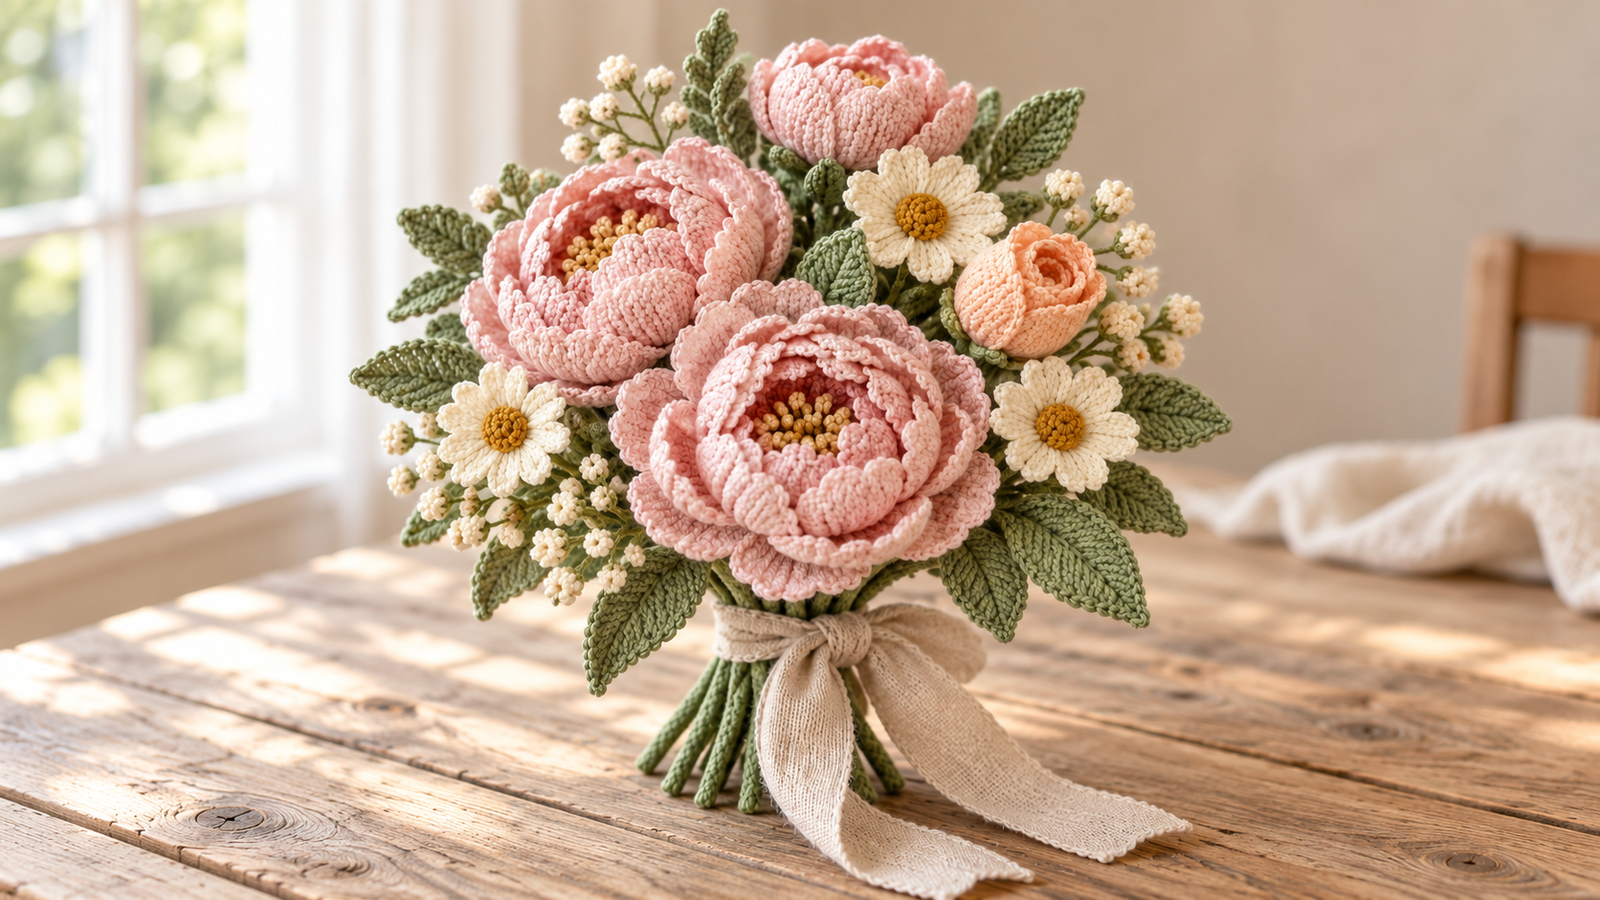
Imagine soft blush-pink peonies with layers of ruffled petals, tiny cream daisies with golden centers, and a delicate peach rosebud surrounded by textured sage-green leaves. Gather them into a bouquet, finish with a natural linen ribbon, and you have a romantic floral arrangement that feels right at home in a cottagecore living room, farmhouse bedroom, or handmade wedding display.
Unlike fresh flowers, crochet flowers do not require watering or sunlight, and their colors can be customized to complement your favorite interior style.
This project focuses on creating a coordinated floral arrangement using several crochet techniques, from layered petals and dimensional centers to structured stems and botanical leaves.
Whether you are making a thoughtful Mother’s Day gift, decorating your home for spring, or exploring more advanced crochet flower ideas, this guide will help you plan and assemble your own beautiful bouquet.
Why You’ll Love This Crochet Flower Bouquet
A handmade crochet flower arrangement offers much more than a pretty decoration. It is also an opportunity to practice shaping, texture, color coordination, and creative assembly.
- Long-lasting beauty: Crochet flowers retain their decorative appearance without the maintenance required by fresh blooms.
- Customizable colors: Choose soft pastels, warm autumn shades, neutral tones, or vibrant floral combinations.
- Beautiful gift potential: Handmade bouquets are thoughtful options for birthdays, anniversaries, weddings, and Mother’s Day.
- Creative stitch practice: Experiment with increasing, decreasing, scalloped edges, layered petals, and dimensional flower centers.
- Scrap yarn friendly: Smaller daisies, buds, and leaves can use relatively small amounts of leftover yarn.
- Flexible decoration: Display your finished flowers in a vase, arrange them on a shelf, or bundle them into a ribbon-tied bouquet.
One particularly appealing aspect of this project is the combination of large statement flowers and smaller supporting details. The oversized peonies attract attention, while the daisies, rosebud, and greenery give the arrangement a softer, balanced look.
Crochet Flower Bouquet Project Overview
The bouquet design combines four floral elements with complementary greenery and a simple ribbon finish.
| Element | Suggested quantity | Color |
|---|---|---|
| Large crochet peonies | 2 | Blush pink |
| Smaller peony | 1 | Soft pink |
| Crochet daisies | 3 | Cream and golden yellow |
| Crochet rosebud | 1 | Soft apricot |
| Small filler buds | 10–16 | Ivory |
| Crochet leaves | 10–14 | Sage green |
| Wrapped flower stems | 7 main stems, plus fillers | Olive green |
| Decorative ribbon | 1 | Natural linen |
The proposed finished arrangement is approximately 10–13 inches tall and 8–10 inches across. Actual dimensions depend on yarn thickness, hook size, petal shaping, and stem placement.
This is best approached as an intermediate project because the flowers require several pieces to be constructed and joined together. Beginners comfortable with basic crochet stitches can still work on individual elements before attempting the full bouquet.
Materials and Supplies Needed
Gather your supplies before beginning to keep your flowers consistent in texture and size.
Yarn
Cotton yarn is an appealing choice because it creates visible stitch definition and can hold the shape of petals more firmly than many soft, loosely spun yarns.
For this bouquet, prepare:
- Blush-pink yarn for the large peonies
- Slightly lighter pink yarn for smaller petals
- Cream or ivory yarn for the daisies
- Golden-yellow yarn for flower centers
- Apricot or peach yarn for the rosebud
- Sage-green yarn for leaves
- Olive-green yarn for stems and foliage
- A small amount of additional ivory yarn for filler buds
As a planning estimate, allow 250–400 yards of flower colors combined and 100–180 yards of green yarn. Actual consumption may differ substantially depending on the construction methods you choose.
Crochet Hooks
A 2.5 mm to 3.5 mm hook is a reasonable starting range for lightweight cotton yarn.
Choose a hook that produces a firm fabric without making the stitches uncomfortable to work.
Additional Tools
You will also need a yarn needle, scissors, removable stitch markers, measuring tape, and optional sewing pins for positioning petals before joining them.
For sturdy decorative stems, use appropriately sized, securely covered floral wire or commercial craft stems, along with floral tape. If you prefer to avoid wire, consider flexible crocheted stems supported inside a vase instead.
A piece of natural linen ribbon approximately 1–1.5 inches wide can finish the bouquet.
Safety: This design is intended for decorative use, not as a toy. Wire ends must be fully enclosed, and all small pieces should be securely attached. Keep the arrangement away from babies and young children, who could pull off small components.
Choosing the Best Yarn and Crochet Hook
The texture of your crochet flowers plays a major role in the finished appearance.
Cotton yarn produces well-defined stitches that resemble the structured surfaces of botanical petals. It also makes it easier to create decorative ridges and gently scalloped edges.
Lightweight Cotton Yarn
Sport-weight cotton yarn is especially useful for delicate flowers, small daisies, and detailed leaves.
Because the strands are relatively thin, you can create several petal layers without producing an excessively bulky flower.
DK-Weight Cotton Yarn
DK-weight cotton is a good alternative if you prefer fuller flowers with visible texture.
It can make larger peonies look especially dimensional, although the final bouquet may be slightly heavier.
Color Coordination
For the romantic floral style shown in this project, avoid using too many competing colors.
Try maintaining a palette of three flower shades, two supporting colors, and one primary greenery shade.
Blush pink, cream, soft apricot, golden yellow, and sage green work well together because they share a gentle, muted appearance.
For a more natural arrangement, use slight variations of the same pink yarn rather than making every petal identical.
Crochet Stitches and Abbreviations
The project uses common crochet techniques alongside several shaping methods.
| Abbreviation | Meaning |
|---|---|
| ch | Chain |
| sl st | Slip stitch |
| sc | Single crochet |
| hdc | Half double crochet |
| dc | Double crochet |
| tr | Treble crochet |
| inc | Increase |
| dec | Decrease |
| st(s) | Stitch(es) |
| BLO | Back loop only |
| FLO | Front loop only |
| MR | Magic ring |
Essential Techniques
A magic ring is helpful when creating compact flower centers.
Single crochet produces tight surfaces for stems, buds, and structural sections.
Half double crochet and double crochet are especially useful when shaping petals because they add height and gentle curvature.
Treble crochet can create taller outer petals or softly scalloped edges.
Slip stitches help join rounds, secure decorative details, and finish petal edges neatly.
You should also be comfortable working multiple stitches into one stitch to create increases and using decreases to narrow a leaf or bud.
Preparing Your Crochet Flower Pieces
Before assembling the complete arrangement, create a simple construction plan.
Begin by deciding which flowers will be the focal point. In this design, the two largest blush-pink peonies should occupy the most prominent positions.
Place the third peony slightly behind the main pair to create visual height.
The daisies, rosebud, leaves, and filler buds will help fill the spaces between the larger flowers.
Make a Small Swatch
Work a few rows of single crochet using your chosen yarn and hook. Check whether the fabric has enough structure to support shaped petals.
If the stitches look loose or the fabric collapses too easily, try a slightly smaller hook.
Organize Your Components
Keep your finished petals and leaves in separate groups by size and color.
This makes it easier to compare their proportions and prevents small components from being misplaced during assembly.
Plan the Bouquet Height
A pleasing floral arrangement usually has a slightly uneven upper silhouette.
Avoid making every flower stem exactly the same length.
For example, position one partially closed peony near the top and keep two larger flowers slightly lower toward the front.
This creates an arrangement that appears more natural and less rigid.
How to Crochet the Pink Peony Flowers
The pink peonies are the visual centerpiece of this project.
Peonies are known for their dense layers of overlapping petals, which makes them an especially interesting subject for dimensional crochet.
Rather than working one flat flower motif, construct each bloom from a compact center surrounded by multiple petal layers.
Step 1: Create the Peony Center
Start with golden-yellow or warm apricot yarn.
Use a magic ring and work a small, firm circular base using single crochet stitches.
For additional texture, you can create tiny raised loops, bobbles, or short chain clusters that resemble clustered stamens.
Keep the center relatively compact so the surrounding petals remain the dominant feature.
Step 2: Crochet the Inner Petals
Switch to blush-pink yarn.
Create several small cupped petals using short rows or oval-shaped crochet sections.
One practical construction method is to begin with a foundation chain and work stitches along both sides, increasing near the rounded tip.
Use a combination of single crochet, half double crochet, and double crochet to establish a gradual curve.
Make approximately six to eight small inner petals for the first layer, adjusting the number to suit your chosen flower size.
Step 3: Shape the Middle Petals
Create another set of petals that are slightly taller and wider.
Increase the width near the middle of each petal and use shorter stitches near its base.
This gradual difference in stitch height helps create the rounded appearance of a peony petal.
Aim for approximately eight to ten middle petals.
They should overlap the inner layer enough to hide most of the underlying construction.
Step 4: Make the Outer Petals
The outermost petals should be the largest and most open.
Use taller stitches to create height, then add small groups of increases toward the edge for a gently ruffled finish.
Do not make every outer petal perfectly symmetrical. Slight variation helps a handmade flower feel more botanical.
Depending on the desired fullness, create approximately eight to twelve large petals.
Step 5: Assemble the Peony
Arrange the inner petals around the flower center.
Sew their bases securely to the central foundation, overlapping neighboring petals slightly.
Continue with the middle petals, staggering them to cover the joins beneath.
Finally, attach the outer petals and gently curve them outward with your fingers.
Avoid pulling the yarn too tightly during assembly, as this can flatten the bloom.
Step 6: Create Different Peony Sizes
For the second large flower, repeat the same general construction method.
For the smaller peony, reduce the petal dimensions or omit a few outer petals.
Using flowers of different sizes gives the bouquet a more attractive silhouette than using identical blossoms throughout.
How to Crochet Cream Daisy Flowers
The cream daisies introduce a lighter, simpler flower shape that contrasts beautifully with the dense peonies.
For this project, aim for compact daisies with rounded petals and raised golden centers.
Step 1: Crochet the Golden Center
Begin with mustard-yellow yarn and make a small circular base.
Work several tight rounds of single crochet, adding increases as needed to keep the center relatively flat.
For a more dimensional center, add textured stitches or work a small raised section before fastening off.
Step 2: Form the Daisy Petals
Attach cream yarn around the outer edge of the center.
Create individual petal shapes using chain spaces, graduated stitch heights, or separately crocheted oval sections.
For example, a petal might begin with a single crochet, rise through taller stitches, and return to a single crochet near its attachment point.
Keep the petal tips softly rounded rather than pointed.
Step 3: Repeat Around the Center
Continue creating evenly spaced petals until the daisy looks balanced.
Eight to twelve petals can work well, depending on the center size and yarn thickness.
Count and space the petals carefully so they do not become overcrowded.
Step 4: Add Structure
If the flower will be displayed on a stem, create a small green backing circle or calyx.
Sew the backing securely behind the flower.
Attach the finished flower head to its prepared stem, ensuring the join is strong enough to keep the daisy upright.
Make three cream daisies for the proposed bouquet.
How to Crochet the Peach Rosebud
A small peach crochet rosebud provides a soft accent among the larger pink flowers.
Its partially closed shape also adds variety to the floral arrangement.
Step 1: Make the Inner Rosebud
Begin with peach yarn and work a short rectangular or slightly curved crochet strip.
Use basic stitches to create a flexible fabric that can be rolled into a compact spiral.
Roll the strip carefully to create the appearance of tightly layered inner petals.
Step 2: Add Outer Petals
Crochet several separate oval or cupped petals.
Position them around the rolled center, overlapping the edges.
Unlike the peonies, the rosebud should remain relatively narrow and closed.
Step 3: Crochet the Green Calyx
Use sage-green yarn to make a small flower base with pointed sepals.
Attach it beneath the peach petals.
The green calyx helps conceal the petal joins and provides a cleaner transition to the stem.
Step 4: Secure the Rosebud
Sew all the layers firmly together.
Attach the rosebud to a wrapped stem and check that it retains its shape when held upright.
For a coordinated bouquet, keep the rosebud smaller than the main peonies.
How to Crochet Realistic Green Leaves
Leaves help make crochet flower bouquets look complete.
They introduce texture, create contrast, and soften the spaces between different flower heads.
Step 1: Create a Foundation Chain
Begin with sage-green yarn.
Make a foundation chain long enough for your preferred leaf size.
For this bouquet, medium leaves can be approximately 2–3 inches long, depending on yarn and gauge.
Step 2: Shape the First Side
Work along the chain using shorter stitches at the narrow tip, taller stitches toward the middle, and shorter stitches again near the base.
This produces a gently tapered shape.
Step 3: Crochet Along the Opposite Side
Turn the work around the foundation chain.
Work into the opposite side, mirroring the general progression of stitch heights.
Place extra stitches around the leaf tip if necessary to maintain a smooth curve.
Step 4: Create a Central Vein
For additional texture, work surface slip stitches along the central spine of the leaf.
Use the same yarn color or a slightly darker shade of green.
A clearly defined central vein gives the leaf a more recognizable botanical appearance.
Step 5: Add Decorative Edges
Finish with a round of slip stitches or single crochet.
If desired, use carefully placed increases or decreases to create a slightly irregular leaf outline.
Make approximately ten to fourteen leaves in different sizes.
Include a mixture of slender leaves, medium oval leaves, and smaller foliage pieces.
How to Make Tiny Crochet Filler Flowers
Small filler buds soften the bouquet and fill the gaps between larger flowers.
Ivory-colored buds are particularly effective because they introduce subtle brightness without competing with the pink peonies.
Create a Small Bud
Start with a magic ring and work a compact circle of single crochet stitches.
Continue with a short round or two to make a tiny cup-shaped form.
Reduce the opening slightly if you want the bud to appear almost closed.
Create a Simple Calyx
Use a small amount of green yarn to form a base beneath the ivory bud.
You may add a few short pointed sections to resemble miniature sepals.
Attach the Buds to Short Stems
Prepare short, covered stems and attach each bud securely.
Group them into small branching clusters.
For the suggested bouquet, make approximately ten to sixteen tiny filler buds.
Position some behind the peonies and others near the outer edges of the arrangement.
These small details help visually connect the larger flowers.
How to Assemble the Crochet Flower Bouquet
Once all the individual pieces are complete, you can begin arranging the bouquet.
Assembly is an important stage because even beautifully crocheted flowers can appear crowded or unbalanced if they are positioned without a plan.
Step 1: Prepare the Flower Stems
Cut or select stems according to your planned bouquet dimensions.
For wire-supported flowers, choose floral craft stems that can support the weight of the flower heads.
Cover exposed wire completely with floral tape or secure yarn wrapping.
Avoid leaving sharp ends accessible.
Step 2: Attach the Main Flowers
Start with the three peonies.
Position the largest open flower near the front center.
Place the second large flower slightly higher and to one side.
The smaller peony should sit toward the rear, where it provides height.
Secure each flower head firmly to its stem.
Step 3: Insert the Daisies
Arrange the cream daisies around the larger flowers.
Try placing one on either side of the main peonies and another near the upper portion of the bouquet.
This distribution helps balance the cream and pink tones.
Step 4: Position the Peach Rosebud
Add the peach rosebud toward one side of the arrangement.
The gentle contrast between apricot and blush pink gives the bouquet warmth without introducing an overly strong accent.
Step 5: Add Green Leaves
Insert your sage-green leaves between the flowers.
Angle some leaves outward to create a natural bouquet silhouette.
Others should remain partially hidden beneath the flower heads.
Avoid arranging all leaves in exactly the same direction.
Step 6: Fill Empty Spaces
Add the miniature ivory buds in small groups.
Concentrate on areas that appear too empty or where stems and flower connections remain visible.
Use enough filler to make the arrangement look full, but not so much that the main flowers disappear.
Step 7: Gather the Stems
Hold the arrangement together and evaluate the silhouette from the front, sides, and above.
Adjust the flower angles as needed.
Secure the stems together using floral tape, yarn wrapping, or another suitable craft fastening.
Step 8: Add the Linen Ribbon
Finish with a natural linen ribbon tied into a loose bow.
A generous ribbon with two trailing ends creates the relaxed, romantic look associated with cottagecore floral arrangements.
Trim the ribbon neatly if the ends look uneven.
Your crochet flower bouquet is now ready for decorative display.
Tips for Making Crochet Flowers Look Realistic
Realistic crochet flowers depend on more than using the correct colors.
Texture, stitch placement, proportions, and assembly all contribute to the finished appearance.
Vary the Petal Sizes
Natural flowers rarely have perfectly identical petals.
Create subtle differences between the inner and outer petal layers to achieve a more believable appearance.
Choose Firm, Defined Stitches
Loose stitches can make flower petals look floppy or stretched.
Using a slightly smaller hook often helps produce a more structured surface.
However, avoid making the stitches so tight that shaping becomes difficult.
Layer Petals Carefully
Overlapping petals is essential for peonies and roses.
Arrange each layer to conceal the attachment points of the previous one.
Use Complementary Colors
Soft pink, peach, cream, and sage green work together because they create a balanced pastel palette.
If you want to introduce a brighter color, consider using it only for a small accent flower.
Make the Bouquet Asymmetrical
A completely symmetrical bouquet may appear stiff.
Slightly uneven flower heights, varied leaf angles, and small gaps between certain blooms can produce a more relaxed arrangement.
Hide Construction Details
Conceal sewing joins, exposed stem ends, and attachment points behind petals, leaves, or small calyx pieces.
A neat finish makes the bouquet look more polished from multiple viewing angles.
Common Crochet Flower Problems and How to Fix Them
Even experienced crocheters sometimes encounter difficulties when making dimensional flowers.
| Problem | Possible cause | Suggested solution |
|---|---|---|
| Petals curl too tightly | Stitch tension is too firm or increases are insufficient | Try a slightly larger hook or adjust increases |
| Peony looks flat | Too few petal layers | Add a middle or outer petal layer |
| Daisy petals overlap too much | Too many petals for the center size | Increase the center diameter or reduce petal count |
| Flower head droops | Stem lacks sufficient support | Use a more suitable covered craft stem |
| Leaves look uneven | Inconsistent stitch placement | Check increases and decreases on both sides |
| Bouquet looks crowded | Too many large flowers at the same height | Vary stem lengths and adjust flower angles |
| Yarn ends are visible | Ends were not woven in securely | Weave ends through several neighboring stitches |
When troubleshooting, adjust one element at a time.
For example, if a peony seems too large for the arrangement, change its outer petal layer before remaking the entire flower.
This approach can help reduce wasted yarn and unnecessary work.
Beautiful Crochet Flower Bouquet Variations
One of the most enjoyable parts of making crochet flowers is experimenting with different floral combinations.
The basic bouquet structure can be adapted to many decorating styles.
Romantic Pink Crochet Bouquet
Keep the blush-pink peonies as the main flowers and combine them with ivory daisies.
Use pale sage greenery and a cream ribbon for a soft, elegant finish.
This version is especially suitable for bedrooms, bridal arrangements, and romantic home decor.
Cottagecore Wildflower Bouquet
Add small lavender-colored flowers, miniature daisies, and delicate leafy branches.
Use a slightly looser arrangement with different stem heights.
Finish with a rustic linen ribbon for a relaxed countryside look.
Autumn Crochet Flower Bouquet
Replace the soft pinks with rust, terracotta, warm cream, and dusty mustard.
Deep olive-green leaves will complement the earthy floral colors.
This variation works beautifully as a seasonal centerpiece.
Minimalist Neutral Bouquet
Create all flowers in ivory, oatmeal, beige, and soft taupe.
Choose simple foliage and avoid using too many filler flowers.
This version can complement Scandinavian-inspired or modern farmhouse interiors.
Handmade Wedding Bouquet
Use coordinated flowers in the wedding color palette.
For example, ivory peonies, pale peach roses, and muted greenery create a gentle bridal-inspired combination.
For an arrangement intended to be carried throughout an event, securely reinforce the stems, test the finished bouquet’s handling and durability, and ensure no exposed wire ends are present.
Creative Ways to Display Crochet Flower Bouquets
Crochet bouquets offer versatile decorating possibilities.
Display in a Ceramic Vase
Place the finished arrangement in a neutral ceramic vase for a timeless look.
A simple ivory or beige vase allows the crochet textures to remain the focal point.
Decorate a Bedroom Shelf
A small bouquet can soften bookshelves, dressers, and bedside tables.
Choose colors that complement the room’s textiles and furnishings.
Make a Handmade Gift
A ribbon-tied crochet bouquet can be a thoughtful gift for birthdays, Mother’s Day, anniversaries, or housewarmings.
Unlike fresh flowers, it can remain on display long after the occasion.
Create a Seasonal Table Centerpiece
Arrange several crochet flowers in a low decorative container.
Use seasonal colors to coordinate with spring, autumn, or holiday decorations.
Add a Romantic Touch to a Craft Room
Display a crochet bouquet near organized yarn baskets, handmade accessories, and other decorative projects.
It can serve as a reminder of different stitch techniques and color combinations you might want to explore.
How to Care for Crochet Flowers
Proper care helps preserve the appearance of handmade crochet decorations.
Keep Them Away From Strong Sunlight
Long-term exposure to direct sunlight can cause some yarn colors to fade.
Place your bouquet where it receives indirect light when possible.
Remove Dust Gently
Use a soft brush or a low-suction vacuum attachment covered with a protective mesh to remove dust.
Support delicate petals while cleaning so they do not lose their shape.
Avoid Excessive Moisture
Cotton yarn can absorb water, and moisture may affect the structure of assembled flowers.
For wire-supported bouquets, avoid soaking or machine washing because water may damage stem components.
Spot-clean carefully according to the yarn manufacturer’s care instructions.
Store Carefully
If you need to store the bouquet, place it in a dry container with sufficient room around the petals.
Avoid pressing heavy items against the flowers.
You can lightly reshape petals with your fingers before displaying the bouquet again.
Frequently Asked Questions About Crochet Flower Bouquets
Are crochet flower bouquets suitable for beginners?
Individual crochet flowers can be beginner-friendly, especially simple daisies and small buds. A complete layered bouquet is more suitable for confident beginners or intermediate crocheters because it involves shaping, assembly, and stem construction.
What is the best yarn for crochet flowers?
Cotton yarn is a popular option because it provides clear stitch definition and relatively firm fabric. Sport-weight or DK-weight cotton can work well, depending on the desired flower size and texture.
How long does it take to crochet a flower bouquet?
A detailed arrangement like this may take approximately 12–20 hours or longer. The actual time varies according to the number of flowers, complexity of the petals, yarn weight, and crocheter’s experience.
Can I make crochet flowers without wire?
Yes. You can create flexible yarn-wrapped stems or place flower heads on suitable non-wire craft supports. For vase arrangements, additional support may be necessary to keep larger flowers upright.
How do I make crochet peonies look fuller?
Use multiple layers of petals in progressively larger sizes. Overlap the petals carefully, placing the smaller pieces toward the center and larger pieces around the outer edge.
What colors look best in a crochet flower bouquet?
Blush pink, cream, peach, sage green, and golden yellow create a romantic pastel arrangement. You can also experiment with brighter wildflower shades, earthy autumn colors, or neutral monochromatic palettes.
Can I use leftover yarn for crochet flowers?
Yes. Small daisies, buds, flower centers, and leaves are excellent projects for leftover yarn. Try to use yarns of comparable thickness when you want consistent flower proportions.
How do I stop crochet flowers from drooping?
Use firm crochet stitches, appropriate yarn, and a supportive stem structure. Larger flowers may require additional reinforcement at the flower base.
Can crochet flower bouquets be used for weddings?
Yes. Crochet flowers can be incorporated into bridal bouquets, table decorations, or wedding keepsakes. For bouquets intended to be carried, carefully test the assembly and strength of the stems before the event.
Do crochet flower bouquets need special maintenance?
They require relatively little maintenance. Keep them dry, remove dust gently, avoid prolonged direct sunlight, and occasionally reshape petals or leaves if necessary.
Final Thoughts
A handmade crochet flower bouquet combines creativity, texture, and timeless floral beauty in one memorable project.
With its layered blush-pink peonies, delicate cream daisies, soft peach rosebud, tiny ivory fillers, and sage-green leaves, this arrangement brings a romantic botanical appearance to everyday home decor.
Although a complete bouquet requires patience, each individual flower offers an enjoyable opportunity to practice crochet shaping and decorative techniques.
You can begin with one daisy, progress to a dimensional rosebud, and gradually build the fuller peony flowers that make the arrangement so striking.
Once the flowers are complete, arranging them into a bouquet is an opportunity to experiment with balance, proportion, and natural-looking foliage.
Whether displayed in a ceramic vase, wrapped as a handmade gift, or used as a decorative centerpiece, crochet flowers are a lovely way to turn yarn into something beautiful and lasting.