Crochet Flower Bouquet Blanket Pattern: Floral DIY Guide
Imagine wrapping yourself in a soft cream-colored blanket decorated with a beautiful bouquet of handmade crochet flowers. Delicate pink roses, cheerful white daisies, textured...
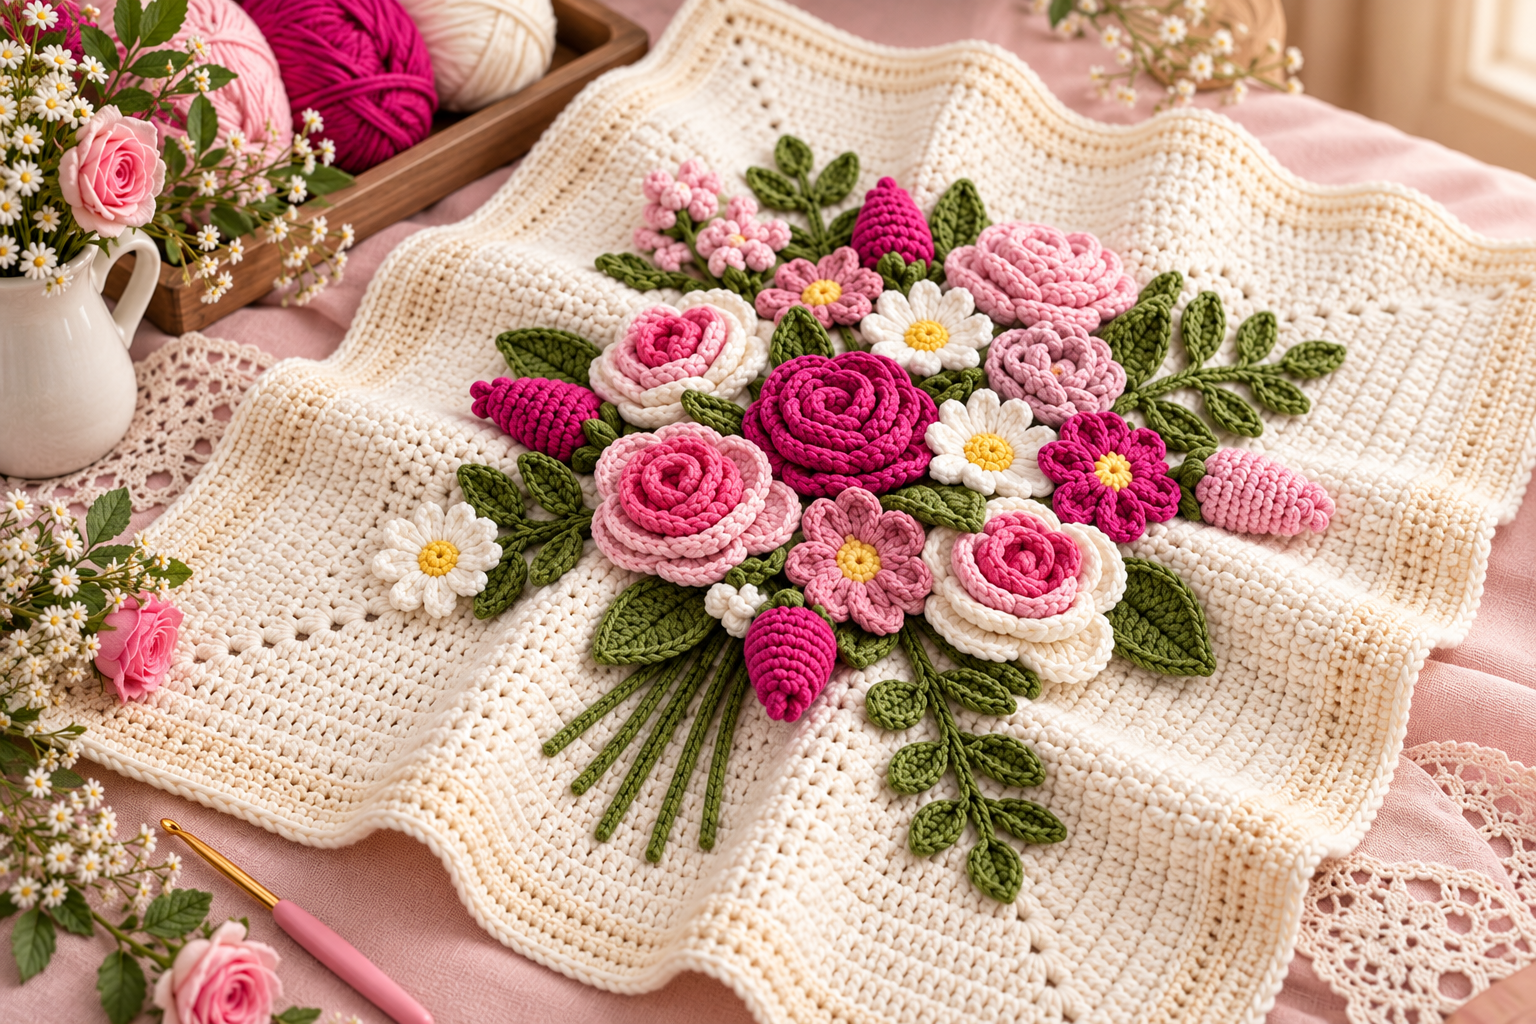
Imagine wrapping yourself in a soft cream-colored blanket decorated with a beautiful bouquet of handmade crochet flowers. Delicate pink roses, cheerful white daisies, textured green leaves, and colorful flower buds come together to create a truly eye-catching piece of crochet art.
This crochet flower bouquet blanket combines the comfort of a traditional blanket with the charm of a floral arrangement. Instead of relying on printed flowers or simple color changes, the design uses dimensional crochet motifs that rise above the blanket’s surface.
The result is a romantic, garden-inspired decoration that looks especially lovely in a cozy bedroom, on a reading chair, or displayed as a handmade gift.
In this guide, you’ll learn how to approach the cream blanket base, create different crochet flowers, arrange a balanced bouquet, and attach decorative elements securely.
You’ll also find practical advice on yarn choices, sizing, finishing techniques, and creative variations to make your own floral blanket unique.
What Is a Crochet Flower Bouquet Blanket?
A crochet flower bouquet blanket is a decorative crocheted blanket featuring a collection of floral motifs arranged to resemble a bouquet.
Unlike an ordinary striped or granny-square blanket, this design combines a relatively simple fabric base with more detailed surface embellishments.
The example shown features an ivory blanket with a textured stitch pattern and gently scalloped edges.
At the center, a bouquet of crochet roses, daisies, leaves, stems, and buds creates a beautiful three-dimensional focal point.
Why Crochet Flower Blankets Are So Appealing
The popularity of floral crochet comes from the combination of traditional craftsmanship and garden-inspired beauty.
Each flower adds a different texture, creating a design that feels carefully arranged rather than repetitive.
A crochet bouquet blanket offers several advantages:
- Opportunities to practice different flower techniques
- Customizable yarn colors and bouquet arrangements
- Beautiful handmade home decoration
- A meaningful gift for special occasions
- Creative ways to use leftover yarn
- A combination of simple and advanced crochet techniques
You can make the arrangement as elaborate or as understated as you prefer.
Skill Level and Time Needed
This project is best suited to intermediate crocheters, although confident beginners can approach it in manageable stages.
The blanket base is relatively straightforward, while the flowers require more detailed shaping.
Roses, in particular, may involve rolling or layering crocheted petals to create their distinctive spiral appearance.
How Long Does It Take?
A crochet flower bouquet blanket is a larger project that may require multiple crafting sessions over several days or weeks.
Your completion time depends on the blanket’s size, yarn weight, and number of decorative flowers.
A smaller display blanket will naturally require less time than a full-sized throw.
Making each component separately allows you to enjoy the process without feeling overwhelmed.
Materials and Tools for Your Floral Blanket
Selecting the right yarn is essential for achieving both comfort and attractive stitch definition.
The reference design uses a cream-colored base with shades of pink, magenta, white, yellow, and green.
Materials Checklist
- Cream or ivory yarn for the blanket base
- Light pink yarn for rose petals
- Dark pink or magenta yarn for accent flowers
- White yarn for daisies and pale roses
- Yellow yarn for flower centers
- Olive or sage green yarn for leaves and stems
- Crochet hooks appropriate for your chosen yarn
- Stitch markers
- Yarn needle
- Scissors
- Measuring tape
- Blocking pins and a suitable blocking surface
- Optional removable clips for arranging flowers
Medium-weight yarn is a practical starting choice.
Cotton blends can provide attractive stitch definition, while soft acrylic yarn is useful for a comfortable blanket.
Choosing Yarn for Dimensional Flowers
Crochet roses and flower buds benefit from yarn that holds its shape.
A smooth yarn makes individual stitches easier to see.
Avoid extremely fuzzy yarn if you want clearly defined petals.
For a cohesive result, choose flower yarns with similar care requirements to the blanket base.
Crochet Stitches and Abbreviations
This project combines basic blanket stitches with decorative techniques used for flowers and leaves.
All abbreviations follow US crochet terminology.
| Abbreviation | Meaning |
|---|---|
| ch | Chain |
| sc | Single crochet |
| hdc | Half double crochet |
| dc | Double crochet |
| tr | Treble crochet |
| sl st | Slip stitch |
| inc | Increase |
| dec | Decrease |
| st | Stitch |
| BLO | Back loop only |
| FO | Fasten off |
Techniques Worth Practicing
Basic double crochet stitches are useful for creating a flexible blanket.
Single crochet provides a firmer fabric for flower centers and leaf details.
Shell stitches can create rounded petals or decorative blanket borders.
Working in continuous rounds is helpful for small buds.
Learning these techniques individually makes the finished assembly much easier.
How to Crochet a Flower Bouquet Blanket Step by Step
The following guide describes an adaptable construction method inspired by the featured blanket.
Because the exact stitch counts and construction details cannot be confirmed from a photograph, adjust your work according to your chosen yarn, gauge, and blanket dimensions.
Step 1: Crochet the Cream Blanket Base
- Begin with cream yarn and create a foundation chain for your desired width.
- Work a foundation row using your preferred basic stitch.
- Continue crocheting evenly across each row.
- Maintain consistent tension to keep the edges straight.
- Measure your work periodically.
- Continue until the blanket reaches your desired length.
- Fasten off and weave in loose ends.
A simple double crochet fabric can provide a soft foundation.
If you want more visible texture, experiment with alternating stitch heights or subtle stitch patterns.
The blanket should remain flexible enough to drape naturally.
Step 2: Create the Decorative Blanket Border
The pictured blanket features a soft, gently shaped edge.
To achieve a similar finish, work one or more rounds around the blanket.
Begin with a simple single crochet border to even out the edges.
Add a decorative round using small shells or a combination of shorter and taller stitches.
Pay attention to the corners.
Working too many stitches into a corner may create unwanted rippling.
Step 3: Crochet the Pink Roses
Roses are among the most prominent flowers in this design.
One approachable method involves crocheting a long strip with rounded petal sections.
Create a foundation chain and work groups of taller stitches along it.
Use increases within selected sections to form gently curved petals.
Once the strip is complete, roll it carefully into a spiral.
Secure the base with a yarn needle.
Make roses in several shades of pink to create depth.
Step 4: Make the White Crochet Daisies
The small daisies provide a lovely contrast against the pink roses.
Begin with yellow yarn and create a circular center.
Attach white yarn and work petal groups around the center.
Use chain spaces and taller stitches to shape the individual petals.
Repeat the same structure until the flower looks balanced.
Fasten off, leaving a tail for attachment.
The daisies can be placed between larger roses to fill small spaces.
Step 5: Crochet the Small Accent Flowers
The bouquet also features smaller magenta and pink flowers.
These motifs help connect the larger flowers visually.
Begin with a central ring and crochet rounded petals around it.
Keep these flowers smaller than the main roses.
You can vary the number of petals or use different stitch heights to create several flower styles.
Use yellow centers for additional contrast.
Step 6: Crochet the Green Leaves
Leaves help frame the bouquet and separate neighboring flowers.
Create a foundation chain using green yarn.
Work along one side with shorter stitches near the tip and taller stitches around the middle.
Continue along the opposite side to form a pointed leaf.
For additional texture, experiment with a slightly raised central vein.
Make leaves in different sizes.
Large leaves work well near the main roses, while smaller leaves suit delicate stems.
Step 7: Add Stems and Flower Buds
The design includes narrow green stems extending beneath the bouquet.
These can be made using foundation chains reinforced with slip stitches.
Attach small leaves at selected points.
For flower buds, crochet compact rounded shapes using pink or magenta yarn.
Small buds can add interest without making the arrangement overly crowded.
Arrange the stems so they appear to gather naturally beneath the central flowers.
Step 8: Arrange and Attach the Bouquet
Lay the finished blanket on a flat surface.
Place the largest roses near the center of your intended arrangement.
Add smaller flowers around them, followed by daisies and buds.
Position green leaves between the flowers.
Extend the stems downward to create the appearance of a gathered bouquet.
Once you’re satisfied with the arrangement, secure the elements using a yarn needle.
Attach each flower carefully without pulling the blanket fabric too tightly.
Sizing, Color Choices, and Yarn Substitutions
The finished blanket can be adapted to several purposes.
A compact blanket may work as a decorative lap throw, while a larger version can cover part of a bed.
Adjusting the Blanket Size
Start by choosing the intended use.
Make a gauge swatch using the same stitch pattern and yarn you plan to use for the base.
Measure the number of stitches and rows within a consistent area.
Use those measurements to estimate the required foundation chain and total rows.
Remember that the attached flowers will add weight.
Choosing a Beautiful Floral Palette
The reference uses ivory, rose pink, magenta, and leafy green.
Other attractive color palettes include:
- Lavender, lilac, and cream
- Peach, blush pink, and sage
- White, pale yellow, and olive green
- Burgundy, dusty rose, and beige
- Soft blue, ivory, and eucalyptus green
Keep the blanket base relatively neutral if you want the bouquet to remain the focal point.
Substituting Yarn
When changing yarn brands or fibers, compare thickness and care instructions.
A heavier yarn may create a larger, denser blanket.
A lighter yarn can produce more delicate flowers but may require additional stitches.
Test a small flower before committing to a complete bouquet.
Common Mistakes and How to Avoid Them
Large decorative crochet projects benefit from careful planning.
Uneven Blanket Edges
Adding or skipping stitches accidentally can cause the blanket to become wider or narrower.
Count stitches regularly and mark row boundaries.
Flowers That Look Too Flat
Loose petal shaping can reduce the dimensional appearance of roses.
Experiment with tighter rolling or layered petals.
Secure the flower base without crushing the upper petals.
An Overcrowded Bouquet
Placing too many flowers together may hide individual details.
Begin with the largest flowers and gradually fill the spaces.
Leave enough room for leaves and stems to remain visible.
Distorted Blanket Fabric
Heavy appliqués or overly tight sewing stitches can pull on the blanket base.
Distribute the attachment stitches across a wider area.
Avoid making the floral section unnecessarily heavy.
Finishing, Blocking, and Caring for Your Blanket
Finishing is especially important when combining flat crochet fabric with dimensional flowers.
Weave in every loose end before attaching the bouquet.
Check each flower for secure seams and attachment points.
Blocking the Blanket
Block the base before adding bulky floral details when possible.
Follow the yarn manufacturer’s instructions for moisture and heat.
Lay the blanket flat and gently shape the edges.
Allow it to dry completely before assembly.
Washing and Storage
A heavily embellished crochet blanket may require gentler care than an ordinary throw.
Spot cleaning is useful when only a small area needs attention.
If the materials permit washing, handle the blanket carefully and avoid aggressive agitation.
Dry flat when appropriate to protect the flower shapes.
Store it loosely folded so the petals are not permanently compressed.
Creative Variations and Styling Ideas
This floral blanket provides many opportunities for personalization.
Romantic Rose Bouquet Blanket
Use several shades of pink and cream.
Make roses the main decorative feature and add only a few daisies.
This creates a soft, romantic appearance.
Wildflower Garden Blanket
Combine small flowers in different shapes and colors.
Add longer stems and a variety of leaves.
The result feels more relaxed and garden-inspired.
Minimalist Floral Blanket
Create a smaller bouquet using fewer flowers.
Place it near one corner instead of the center.
This variation allows the blanket’s texture to remain more visible.
Gifting, Selling, and Display Ideas
A crochet flower bouquet blanket makes a thoughtful handmade gift for someone who appreciates flowers and textiles.
Its decorative appearance is especially suitable for birthdays, anniversaries, and housewarming celebrations.
For gifting, fold the blanket carefully and protect the raised flower motifs.
You can add a simple ribbon and a handwritten care note.
If you plan to sell finished blankets, include accurate measurements, materials, washing recommendations, and original product photographs.
Remember that raised floral embellishments may make the blanket better suited to decorative use than heavy everyday handling.
Avoid using blankets with loose or bulky attached decorations in infant sleep environments.
Frequently Asked Questions
Is a Crochet Flower Bouquet Blanket Beginner Friendly?
The blanket base can be beginner-friendly if you choose a simple stitch. However, the dimensional roses, leaves, and floral assembly require more practice. Confident beginners can approach the project by making individual flowers before attempting the entire arrangement.
What Yarn Is Best for a Crochet Flower Blanket?
Soft acrylic, cotton, and suitable yarn blends can work well. Choose a yarn that feels comfortable against the skin while providing enough stitch definition for the flowers. Similar yarn weights and compatible care instructions make the project easier to finish and maintain.
Can I Use Granny Squares for the Blanket Base?
Yes. A granny-square blanket can provide a beautiful foundation for a crochet flower bouquet. Join your squares first, add a border, and arrange the floral appliqués over the completed surface. Secure the decorations without distorting the joins.
How Do I Attach Crochet Flowers to a Blanket?
Use a yarn needle and matching yarn to sew the flower bases onto the blanket. Work through stable stitches and distribute the attachment points evenly. Avoid pulling too tightly, as this may cause puckering around the flowers.
Can I Make This Blanket in Different Colors?
Absolutely. You can use pastel shades for a romantic look, vivid flowers for a cheerful design, or neutral tones for understated home decor. Choose colors with enough contrast to keep the individual flowers and leaves easy to distinguish.
Create Your Own Crochet Flower Bouquet Blanket
A crochet flower bouquet blanket is a beautiful way to combine traditional crochet techniques with dimensional floral details.
The soft cream base creates a welcoming background, while layered pink roses, white daisies, green leaves, and delicate stems transform the surface into a handmade garden.
Start with the blanket foundation, practice your favorite flower motifs, and arrange the bouquet gradually.
With thoughtful color choices and secure assembly, you can create a memorable decorative blanket for your home or a special handmade gift.
Save this crochet flower bouquet blanket idea and enjoy creating your own floral masterpiece!