Crochet Flower Bag With 3D Blooms
A crochet flower bag with 3D blooms is a cheerful handmade accessory that combines colorful floral details with a practical everyday shoulder bag. Featuring...
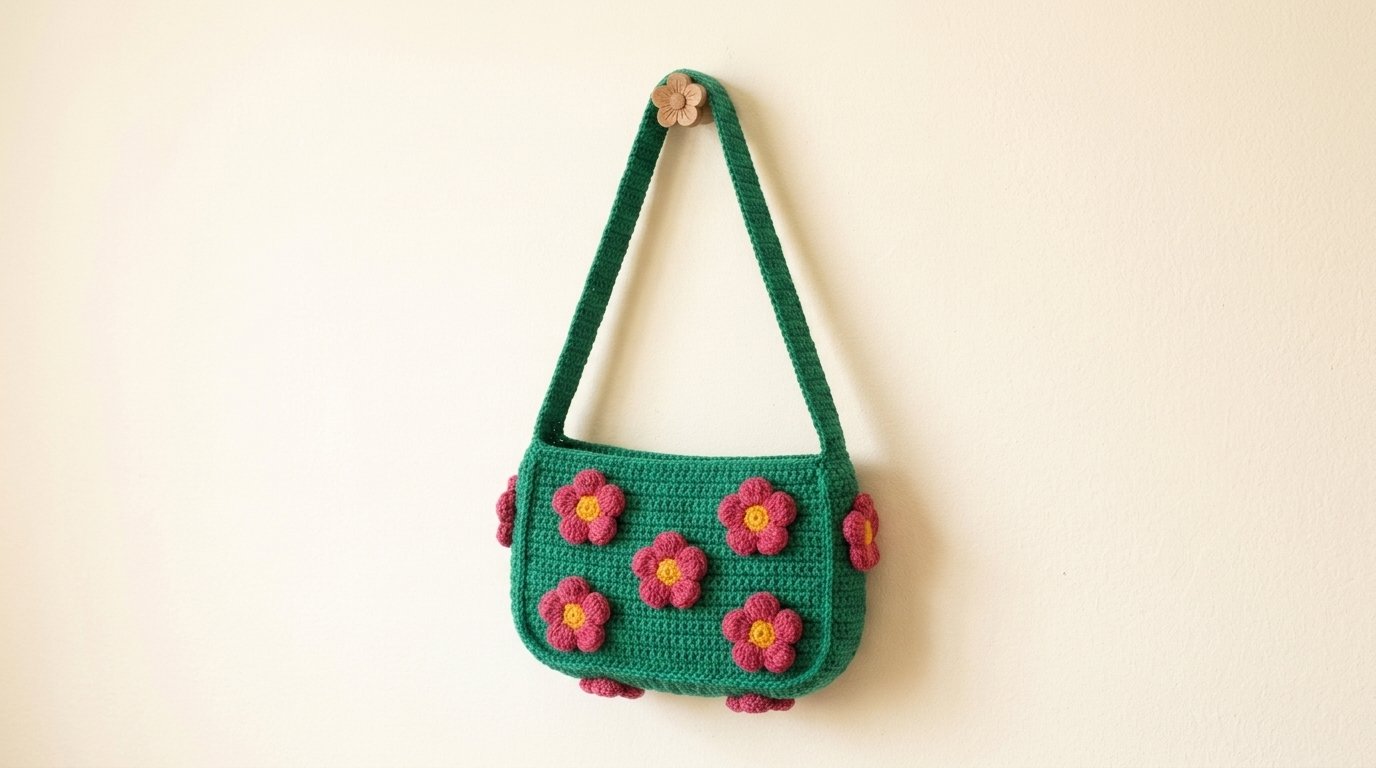
A crochet flower bag with 3D blooms is a cheerful handmade accessory that combines colorful floral details with a practical everyday shoulder bag. Featuring a rich emerald-green body, raised raspberry-pink flowers, and sunny-yellow centers, this crochet design brings a playful botanical touch to a simple, structured bag.
The bag has a softly rounded rectangular shape, a long crocheted shoulder strap, and beautiful three-dimensional flowers arranged across the front. Each flower has five plump petals surrounding a textured yellow center, giving the finished bag a charming, handcrafted appearance.
This project is a lovely choice for spring and summer, but the bold green and pink color combination looks beautiful throughout the year. You can use it for carrying small everyday essentials, styling a casual outfit, or creating a thoughtful handmade gift.
Best of all, the basic construction is straightforward. You’ll crochet the bag panels first, make the flower appliqués separately, and attach everything during the final assembly.
What You Need for This Crochet Flower Bag
Gather your supplies before starting. Cotton yarn is a particularly good choice because it provides stitch definition and helps the finished bag maintain its shape.
Materials and Supplies
- Emerald-green yarn: Approximately 250–350 yards of worsted-weight cotton yarn for the bag body, strap, and edging.
- Raspberry-pink yarn: Approximately 40–60 yards for the raised flower petals.
- Golden-yellow yarn: A small amount for the flower centers.
- Crochet hook: 4 mm (G/6), or the size needed to achieve a firm fabric.
- Yarn needle: For sewing panels together and attaching flowers.
- Stitch markers: For marking important points during assembly.
- Scissors: For cutting yarn.
- Measuring tape: For checking the bag dimensions and strap length.
- Fabric lining: Optional, for extra strength and durability.
- Sewing needle and matching thread: Optional, for attaching the lining.
Skill Level and Finished Size
Skill level: Confident beginner
Estimated time: 5–8 hours
Approximate finished measurements:
- Width: 8–9 inches
- Height: 7–8 inches
- Strap length: 38–42 inches
- Flower diameter: Approximately 1½–2 inches
These measurements are estimates and depend on your yarn and crochet tension.
Crochet Stitches and Abbreviations
This pattern uses US crochet terminology.
- MR: Magic ring
- ch: Chain
- sc: Single crochet
- dc: Double crochet
- sl st: Slip stitch
- st(s): Stitch or stitches
- RS: Right side
- WS: Wrong side
- FO: Fasten off
The main bag uses single crochet stitches, while the raised flowers use double crochet clusters.
How to Crochet the Emerald-Green Bag Panels
The bag is constructed from two matching rectangular panels that are joined along the sides and bottom.
Step 1: Crochet the Front Panel
Using emerald-green yarn and a 4 mm hook:
Foundation: Chain 35.
Row 1: Work 1 sc in the second chain from the hook and in each remaining chain. Turn. (34)
Row 2: Chain 1, work 1 sc in each stitch across. Turn. (34)
Rows 3–32: Repeat Row 2.
Fasten off and weave in the yarn end.
The finished panel should form a firm rectangle with relatively little stretch.
If you want a larger bag, increase the starting chain and work additional rows. Keep track of your changes so the back panel matches.
Step 2: Crochet the Back Panel
Repeat the same instructions to make a second emerald-green rectangle.
Both panels should have the same stitch count and number of rows.
Lay them flat and compare their dimensions.
If one panel is slightly larger, gently adjust its shape before assembly.
Matching panels help create straight seams and a balanced finished bag.
Step 3: Add a Decorative Front Border
The pictured flower bag has a slightly raised edge that helps frame the front panel.
With green yarn, work a round of single crochet around the outside of the front rectangle.
Place stitches evenly along the side edges, adding extra stitches at the corners as needed to keep the border flat.
Work two or three single crochet stitches into each corner area to create a gently rounded shape.
Join with a slip stitch and fasten off.
This decorative border adds texture and helps define the bag’s silhouette.
How to Crochet the 3D Pink Flowers
The raised flowers are the main decorative feature of this bag.
Each flower has a golden-yellow circular center surrounded by five rounded pink petals.
Step 4: Crochet the Yellow Flower Center
Using golden-yellow yarn:
Rnd 1: Work 10 sc into a magic ring. Pull the ring closed and join with a slip stitch. (10)
Fasten off and weave in the yellow yarn end.
This small circle creates the center of the flower.
Keep it reasonably firm so it doesn’t stretch when you attach the petals.
Step 5: Make the Puffy Pink Petals
Join raspberry-pink yarn to any stitch of the yellow center.
You’ll work five petals into alternating stitches around the circle.
For each petal:
- Slip stitch into the next available yellow stitch.
- Chain 2.
- Work a four-double-crochet cluster into that same stitch.
- Chain 2.
- Slip stitch into the same stitch to secure the petal.
- Skip the next yellow stitch.
To make the four-double-crochet cluster, begin four double crochet stitches in the same stitch, leaving the final loop of each unfinished. Yarn over and pull through all five loops remaining on the hook.
Repeat until you have five raised petals.
Join the final petal neatly, fasten off, and weave in the ends.
Gently spread the petals outward with your fingers.
The petals should form a plump, textured flower surrounding the yellow center.
Step 6: Make Additional Flowers
Repeat the flower instructions until you have at least five complete flowers.
For an arrangement similar to the pictured design, make:
- Two flowers for the upper front panel.
- One flower for the center.
- Two flowers for the lower front panel.
You can also make a few additional flowers to decorate the bag’s sides or lower corners.
If you prefer larger flowers, experiment with thicker yarn or a slightly larger hook while keeping the same basic construction.
How to Arrange the Flowers on the Bag
Step 7: Position the Flower Appliqués
Lay the front bag panel flat with the right side facing upward.
Arrange your five pink flowers across the surface.
Position two flowers toward the upper section, one in the center, and two closer to the lower corners.
Leave a little space between each flower so the green background remains visible.
The arrangement should look balanced without becoming too symmetrical.
Once you’re happy with the placement, use stitch markers or removable pins to hold the flowers in position.
Step 8: Sew the Flowers Securely
Thread your yarn needle with matching pink yarn.
Attach each flower by sewing around its center and the bases of the petals.
Keep the stitches small and hidden.
Avoid sewing the petals completely flat against the bag.
Leaving their outer edges slightly raised helps create the beautiful three-dimensional effect.
Repeat until all the flowers are attached.
How to Assemble the Crochet Bag
Step 9: Join the Front and Back Panels
Place the front and back panels together with their wrong sides facing.
Align the side and lower edges.
Using emerald-green yarn and a yarn needle, sew the panels together along both sides and the bottom.
A mattress stitch or neat whipstitch works well.
Leave the upper opening completely unsewn.
For softly rounded bottom corners, ease the fabric around each corner rather than pulling the seam tightly.
Turn and shape the bag with your hands.
The result should be a compact shoulder bag with a slightly rounded rectangular silhouette.
Step 10: Finish the Top Opening
Attach green yarn near one side seam.
Work one round of single crochet around the upper opening of the bag.
Keep the stitches evenly spaced and avoid pulling the yarn too tightly.
This simple edging strengthens the top and gives it a clean appearance.
Join with a slip stitch and fasten off.
You can work a second round if you’d like a thicker opening.
How to Crochet the Long Shoulder Strap
The matching green strap gives the bag its practical everyday shape.
Step 11: Crochet the Strap
Using emerald-green yarn:
Foundation: Chain 8.
Row 1: Work 1 sc in the second chain from the hook and in each remaining chain. Turn. (7)
Row 2: Chain 1, work 1 sc in each stitch across. Turn. (7)
Repeat Row 2 until the strap measures approximately 38–42 inches.
Fasten off, leaving a long yarn tail at each end for sewing.
For a shorter shoulder bag, reduce the strap length. For a crossbody style, measure a comfortable length against your body before fastening off.
Step 12: Attach the Shoulder Strap
Position one end of the strap against the inside of the left side seam.
Overlap the strap and bag by approximately 1½ inches.
Using a yarn needle and green yarn, sew the strap securely to the bag with several rows of small stitches.
Repeat on the opposite side.
Reinforce both attachment points by stitching a square with diagonal stitches through the overlapping fabric.
This helps distribute the weight when the bag is being carried.
Check that the strap isn’t twisted before sewing the second end.
Add a Fabric Lining for Extra Durability
Although the lining is optional, it can help prevent the bag from stretching when carrying everyday items.
Cut two pieces of cotton fabric slightly larger than your finished bag panels, allowing approximately ½ inch for seams.
Place the fabric pieces together with their right sides facing.
Sew along the sides and bottom, leaving the top open.
Turn the fabric pouch right side out and insert it into the crochet bag.
Fold the lining’s upper edge inward and hand-sew it to the inside of the bag opening.
Keep the stitches small so they don’t show through the green crochet fabric.
A lightweight cotton lining works well for a casual handmade bag.
Three Tips for a Beautiful Crochet Flower Bag
1. Choose Firm Cotton Yarn
Cotton yarn provides good stitch definition and helps the bag maintain its shape.
A soft acrylic yarn can also work, but it may stretch more when the bag is filled.
2. Keep the Flowers Raised
The beauty of this design comes from the textured petals.
When attaching the appliqués, sew mainly around their centers and bases.
This allows the petals to remain puffy and three-dimensional.
3. Reinforce the Strap Attachments
Shoulder straps experience repeated pulling when a bag is used.
Attach the ends with strong stitching and check them regularly for loose yarn.
A fabric lining can provide additional support.
Three Creative Crochet Flower Bag Variations
Cream Bag With Pastel Flowers
Use ivory yarn for the bag body and soft pink, lavender, and peach yarn for the flowers.
This combination creates a gentle, romantic accessory.
Sage-Green Floral Shoulder Bag
Replace the emerald-green body with muted sage yarn.
Add cream flowers with golden centers for a fresh botanical appearance.
Retro Daisy Crochet Bag
Make the bag in chocolate brown or burnt orange.
Decorate it with bright yellow and white flowers for a colorful, vintage-inspired look.
Frequently Asked Questions
Is this crochet flower bag suitable for beginners?
Yes. The bag panels and strap use simple single crochet stitches. Confident beginners can complete the main construction, while the puffed flower petals provide an opportunity to practice decorative crochet techniques.
What yarn is best for a crochet flower bag?
Worsted-weight cotton yarn is a practical choice because it creates a firm fabric with clear stitch definition. Cotton blends can also work well, especially when the finished bag has a lining.
How do I stop a crochet shoulder bag from stretching?
Use firm stitches, avoid an oversized hook, and reinforce the strap attachment points. Adding a fabric lining can also help the bag retain its shape during everyday use.
Make a Colorful Crochet Flower Bag With 3D Blooms
A crochet flower bag with 3D blooms is a lovely way to combine practical crochet skills with cheerful floral decoration.
The emerald-green body, long matching strap, raspberry-pink petals, and textured yellow centers create a playful accessory with plenty of handmade charm.
You can customize the size, change the flower arrangement, or experiment with different yarn colors to make the design your own.
Save this crochet flower bag pattern to your Pinterest crochet board, gather your favorite colorful yarn, and enjoy making a handmade accessory filled with bright, beautiful blooms.