Crochet Dragon Ornament for Christmas – Free Pattern
Looking for a Christmas decoration with a little extra personality? This crochet dragon Christmas ornament brings a playful twist to traditional holiday decorating. With...
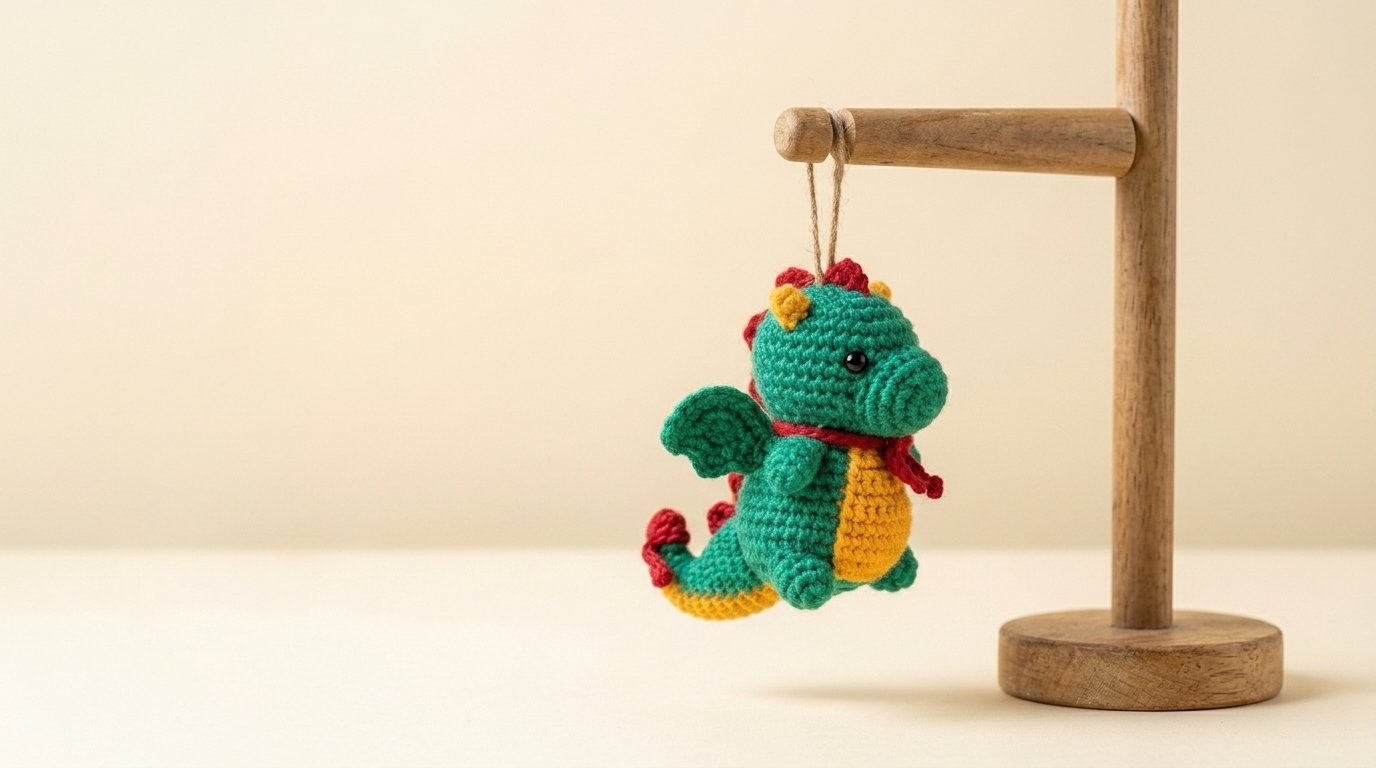
Looking for a Christmas decoration with a little extra personality? This crochet dragon Christmas ornament brings a playful twist to traditional holiday decorating. With its cheerful emerald-green body, golden belly, tiny wings, red scarf, and festive spikes, this little dragon is ready to hang on your Christmas tree.
This free pattern guides you through making a small amigurumi dragon, from its rounded head and curled tail to its sweet little horns. It’s a lovely handmade gift for dragon lovers, too.
If you’re comfortable with basic crochet stitches, you’re ready to give it a try. Plan on approximately four to six hours for your first ornament.
Crochet Dragon Christmas Ornament: Quick Facts
| Detail | Information |
|---|---|
| Skill level | Confident beginner |
| Estimated time | 4–6 hours |
| Finished height | Approximately 4–5 inches |
| Yarn weight | DK (#3) |
| Hook size | 2.75–3.0 mm |
| Main stitches | Chain, single crochet, slip stitch, increases, decreases |
| Construction | Continuous head and body with attached details |
| Terminology | US crochet terms |
Measurements and completion times are estimates. This original pattern draft has not been physically tested.
Materials and Tools You’ll Need
The festive colors are what make this little Christmas dragon special.
Yarn Colors
Use DK-weight cotton or cotton-blend yarn.
- Emerald green: Approximately 25–35 g for the body, head, wings, legs, arms, and tail.
- Golden yellow: Approximately 5–10 g for the belly, horns, and tail detail.
- Christmas red: Approximately 8–12 g for the scarf and spikes.
- Black: A small amount for embroidered eyes if preferred.
Yarn substitution: Acrylic yarn also works well. Choose a slightly smaller hook if your stitches leave visible gaps.
Additional Supplies
- 2.75–3.0 mm crochet hook
- Polyester fiberfill
- Two 6 mm black safety eyes or black embroidery yarn
- Yarn needle
- Stitch marker
- Scissors
- Approximately 8–10 inches of natural cotton cord or jute twine for hanging
Substitution tips: Yarn scraps can replace some fiberfill. A braided cotton-yarn loop can replace jute, and embroidered eyes can replace plastic safety eyes.
Safety note: This is a decorative ornament, not a baby toy. Small plastic eyes and attached pieces may be hazardous to young children. Keep it away from open flames and hot Christmas lights.
Crochet Abbreviations and Stitches
All instructions use US crochet terminology.
- ch – Chain: A basic foundation stitch.
- sc – Single crochet: Insert your hook, pull up a loop, yarn over, and pull through both loops.
- sl st – Slip stitch: Pull the yarn through the stitch and the loop on your hook.
- inc – Increase: Work two single crochet stitches into one stitch.
- sc2tog – Decrease: Work two neighboring single crochet stitches together.
- MR – Magic ring: An adjustable starting loop for working in the round.
- BLO – Back loop only: Work into only the back loop of the stitch.
- st/sts – Stitch/stitches
- rnd – Round
Unless otherwise stated, work in continuous rounds without joining. Move your stitch marker at the beginning of each new round.
Step-by-Step Crochet Dragon Christmas Ornament Pattern
We’ll start with the body and head, then create the smaller pieces and assemble the ornament.
Step 1: Crochet the Dragon’s Body
Using emerald-green yarn, make a magic ring.
Round 1: Work 6 sc into the ring. (6 sts)
Round 2: Inc in every stitch. (12 sts)
Round 3: Repeat (sc, inc) six times. (18 sts)
Round 4: Repeat (2 sc, inc) six times. (24 sts)
Round 5: Repeat (3 sc, inc) six times. (30 sts)
Round 6: Repeat (4 sc, inc) six times. (36 sts)
Rounds 7–11: Sc around. (36 sts per round)
Round 12: Repeat (4 sc, sc2tog) six times. (30 sts)
Round 13: Sc around. (30 sts)
Round 14: Repeat (3 sc, sc2tog) six times. (24 sts)
Round 15: Sc around. (24 sts)
Round 16: Repeat (2 sc, sc2tog) six times. (18 sts)
Round 17: Sc around. (18 sts)
Add a little stuffing to create a rounded belly.
Beginner tip: Stuff gradually. Too much fiberfill can stretch your stitches and make the body look uneven.
Step 2: Crochet the Rounded Dragon Head
Continue directly from the body without fastening off.
Round 18: Repeat (2 sc, inc) six times. (24 sts)
Round 19: Repeat (3 sc, inc) six times. (30 sts)
Round 20: Repeat (4 sc, inc) six times. (36 sts)
Round 21: Repeat (5 sc, inc) six times. (42 sts)
Round 22: Repeat (6 sc, inc) six times. (48 sts)
Rounds 23–28: Sc around. (48 sts per round)
Choose the front of your dragon. Position the eyes between Rounds 25 and 26, approximately eight stitches apart, and secure them now.
Continue:
Round 29: Repeat (6 sc, sc2tog) six times. (42 sts)
Round 30: Repeat (5 sc, sc2tog) six times. (36 sts)
Round 31: Repeat (4 sc, sc2tog) six times. (30 sts)
Round 32: Repeat (3 sc, sc2tog) six times. (24 sts)
Stuff the head evenly.
If using a cord hanging loop, prepare its attachment before closing the remaining opening, as described in Step 11.
Round 33: Repeat (2 sc, sc2tog) six times. (18 sts)
Round 34: Repeat (sc, sc2tog) six times. (12 sts)
Round 35: Sc2tog six times. (6 sts)
Fasten off and pull the remaining opening closed.
Common mistake: Stuffing the head too firmly can make the neck stretch. It should feel softly rounded, not tightly packed.
Step 3: Make the Dragon’s Rounded Snout
Using green yarn, make a magic ring.
Round 1: 6 sc in the ring. (6 sts)
Round 2: Inc around. (12 sts)
Round 3: Repeat (sc, inc) six times. (18 sts)
Rounds 4–5: Sc around. (18 sts per round)
Fasten off, leaving a long sewing tail.
Add a little stuffing, then sew the open edge onto the lower front of the head, beneath the eyes.
The muzzle should project forward slightly, creating the rounded dragon nose shown in the picture.
Step 4: Crochet the Golden Belly
Using golden-yellow yarn, ch 5.
Row 1: Sc in the second chain from the hook and across. (4 sts)
Row 2: Ch 1, turn, inc, 2 sc, inc. (6 sts)
Row 3: Ch 1, turn, inc, 4 sc, inc. (8 sts)
Rows 4–8: Ch 1, turn, sc across. (8 sts per row)
Row 9: Ch 1, turn, sc2tog, 4 sc, sc2tog. (6 sts)
Row 10: Ch 1, turn, sc2tog, 2 sc, sc2tog. (4 sts)
Fasten off, leaving a sewing tail.
Position the panel vertically on the front of the dragon’s body and sew it neatly in place.
Beginner tip: Pin the panel temporarily before sewing so it stays centered.
Step 5: Crochet Two Little Arms and Feet
For each arm, use green yarn.
Round 1: 6 sc in a magic ring. (6 sts)
Round 2: Repeat (sc, inc) three times. (9 sts)
Rounds 3–4: Sc around. (9 sts per round)
Round 5: Repeat (sc, sc2tog) three times. (6 sts)
Fasten off with a long tail. Flatten the opening and sew the arm to the side of the body.
Make two arms.
For each foot:
Round 1: 6 sc in a magic ring. (6 sts)
Round 2: Inc around. (12 sts)
Rounds 3–4: Sc around. (12 sts per round)
Fasten off, add a tiny amount of stuffing, and sew the feet near the bottom front of the body.
Make two feet.
Step 6: Make the Dragon’s Small Wings
Using green yarn, ch 6.
Row 1: Sc in the second chain from the hook and across. (5 sts)
Row 2: Ch 1, turn, inc, 3 sc, inc. (7 sts)
Row 3: Ch 1, turn, sc across. (7 sts)
Row 4: Ch 1, turn, sc2tog, 3 sc, sc2tog. (5 sts)
Row 5: Ch 1, turn, sc2tog, sc, sc2tog. (3 sts)
Fasten off, leaving a tail.
Make a second matching wing.
Gently shape each wing into a small triangle. Sew the wider edge of each wing to the upper back, positioning them so they angle outward.
Step 7: Crochet the Tapered Tail
Using emerald-green yarn, make a magic ring.
Round 1: 4 sc in the ring. (4 sts)
Round 2: Sc around. (4 sts)
Round 3: Inc around. (8 sts)
Round 4: Sc around. (8 sts)
Round 5: Repeat (sc, inc) four times. (12 sts)
Rounds 6–8: Sc around. (12 sts per round)
Round 9: Repeat (2 sc, inc) four times. (16 sts)
Round 10: Sc around. (16 sts)
Fasten off, leaving a long tail.
Stuff only the wider end. Sew it to the lower back of the body and gently curve the tail upward.
For the golden detail visible beneath the tail in the inspiration image, add a short line of yellow surface slip stitches along its underside.
Step 8: Make the Red Spikes and Golden Horns
The tiny spikes add a festive splash of red.
Using red yarn, make a small spike:
Round 1: 4 sc in a magic ring. (4 sts)
Round 2: Repeat (sc, inc) twice. (6 sts)
Round 3: Sc around. (6 sts)
Fasten off, leaving a tail.
Make approximately six spikes. Sew them along the crown, back, and upper tail.
For each golden horn:
Round 1: 4 sc in a magic ring. (4 sts)
Round 2: Sc around. (4 sts)
Round 3: Repeat (sc, inc) twice. (6 sts)
Fasten off and make a second horn.
Attach the two horns near the upper front of the head, slightly in front of the red spikes.
Beginner tip: Place the horns and spikes before sewing so you can check their spacing.
Step 9: Crochet the Little Red Christmas Scarf
Using Christmas-red yarn, ch 45.
Row 1: Sc in the second chain from the hook and across. (44 sts)
Row 2: Ch 1, turn, sc in every stitch. (44 sts)
Fasten off and weave in the tails.
Wrap the scarf gently around the dragon’s neck and tie a small knot at the front or side.
Let the two ends hang loosely, just like the inspiration image.
Keep the scarf comfortable around the neck rather than pulling it tight.
Step 10: Assemble and Shape Your Dragon
Check all attachment points before hanging the ornament.
- Make sure the snout is centered beneath the eyes.
- Check that the golden belly is visible below the scarf.
- Arrange the wings so they extend outward.
- Position the feet toward the front.
- Curve the tail slightly upward.
- Secure all horns and spikes firmly.
- Hide any loose yarn ends inside the body.
Your festive little dragon should now have a cheerful, rounded shape.
Step 11: Add the Christmas Hanging Loop
The reference ornament hangs from a natural twine loop, which gives it a lovely rustic appearance.
For a secure attachment, prepare the loop while the head is still open at the end of Round 32.
- Cut approximately 8–10 inches of strong cotton cord or jute twine.
- Fold it in half to form a hanging loop.
- Position the loop so it will emerge from the center of the closing rounds.
- Pass the loose cord ends into the head and tie them securely around separate stitch posts on the inside near Round 30.
- Double-knot the ends and check their hold before continuing to close the head.
- Complete the remaining head rounds, keeping the loop outside.
After the dragon is finished, gently test the loop over a soft surface before placing it on a tree.
Finishing and Christmas Styling Ideas
Your handmade dragon is ready to become part of your holiday decorations!
Hang it from a sturdy tree branch or a decorative wooden ornament stand.
The green body, red scarf, and golden details look lovely beside warm white Christmas lights and natural wooden ornaments.
You could also use it as a handmade gift topper or display it on a shelf with other festive amigurumi.
If you enjoy making cute holiday characters, try [Easy Crochet Reindeer Ornament → related pattern] next.
Make Your Christmas Dragon Your Own
1. Try a Traditional Christmas Palette
Use forest green, deep burgundy, and antique gold for a more classic holiday appearance.
2. Create a Snow Dragon
Make the body icy blue, with white wings and a silver-gray scarf. Keep the same basic construction.
3. Make a Matching Ornament Collection
Crochet several dragons in different colors and hang them together.
You could combine them with [Free Crochet Christmas Star Pattern → related pattern] for a playful handmade tree.
How to Care for Your Crochet Ornament
A little care will help preserve your handmade dragon for many Christmas seasons.
- Dust gently with a soft brush.
- Spot-clean rather than machine washing.
- Keep away from moisture and hot lights.
- Check the hanging loop before each holiday season.
- Store in a dry box with tissue paper to protect the wings and spikes.
Avoid placing heavy decorations on top of your dragon during storage.
Frequently Asked Questions
Is this crochet dragon Christmas ornament beginner-friendly?
It’s suitable for confident beginners who know basic amigurumi stitches. The body uses simple increases and decreases, while the smaller details require some assembly.
What is the best yarn for a small crochet dragon ornament?
DK cotton yarn is a good choice because it provides clear stitch definition and helps small details retain their shape. Lightweight acrylic yarn is another option for a softer finish.
Can I make this Christmas dragon without safety eyes?
Yes. You can embroider the eyes using black yarn, which also avoids using plastic eye components. Keep the design simple with two small embroidered oval eyes.
How do I make my crochet ornament lighter?
Use a small amount of lightweight fiberfill, avoid unnecessary internal supports, and choose lighter yarn. Make sure the finished ornament can hang without pulling down its Christmas tree branch.
A Little Dragon for Your Christmas Tree
This crochet dragon Christmas ornament is a fun way to add personality to your holiday decorations. Its cheerful green body, golden belly, bright red scarf, and tiny wings make it a sweet handmade keepsake.
Save this project to your Pinterest Christmas crochet board, and share your finished dragon with someone who loves handmade holiday decorations.
For more festive inspiration, explore [Free Crochet Christmas Ornament Patterns → related collection].