Crochet Dragon Amigurumi With Tiny Wings – Cute Green Baby Dragon Pattern
There’s something irresistible about a tiny handmade dragon with a round belly, colorful wings, and a sweet sleepy smile. This crochet dragon amigurumi pattern...
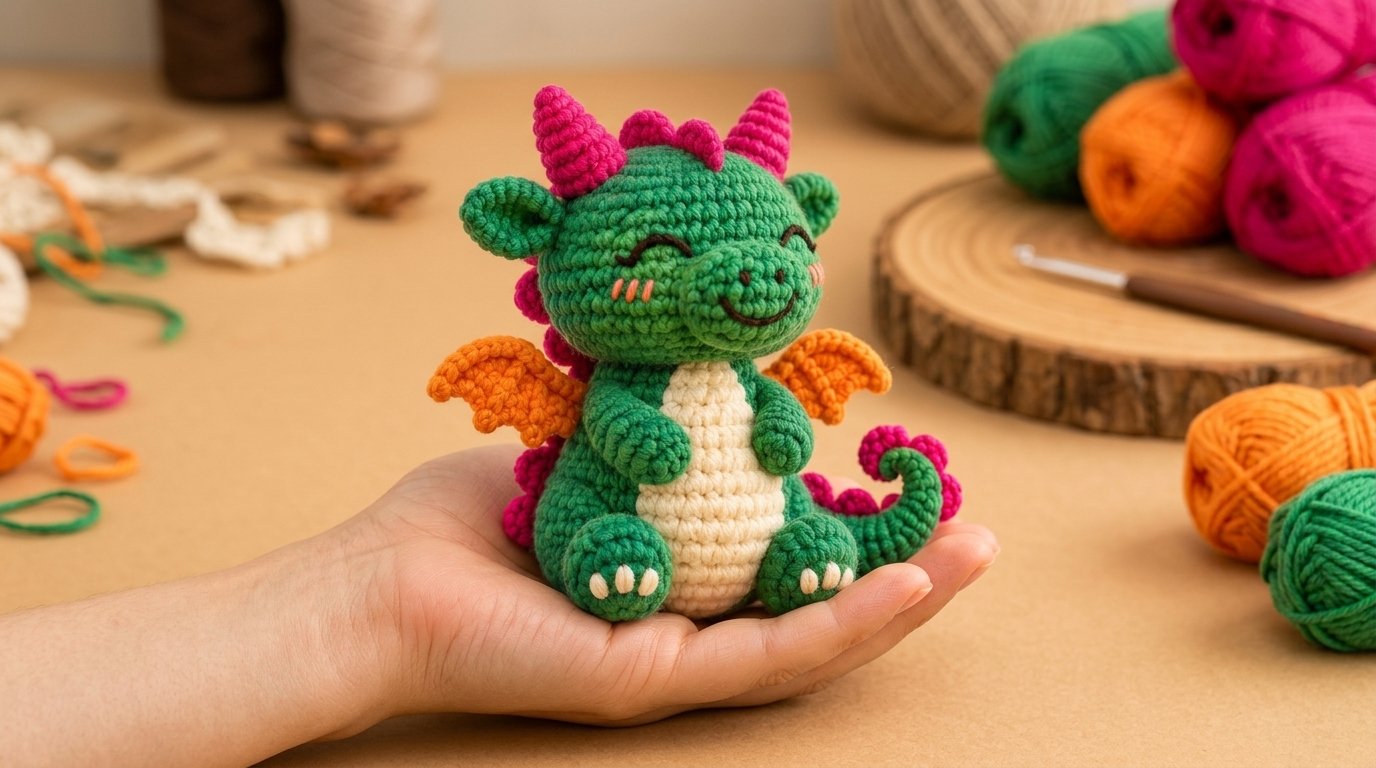
There’s something irresistible about a tiny handmade dragon with a round belly, colorful wings, and a sweet sleepy smile. This crochet dragon amigurumi pattern brings that adorable idea to life with bright emerald-green yarn, a soft cream belly, tiny tangerine-orange wings, and playful hot-pink horns and back spikes.
The little dragon has a rounded head, chubby feet, small arms, and a beautifully curled tail. Its embroidered closed eyes and rosy cheeks give it a peaceful, friendly expression.
This project is perfect for confident beginners who enjoy making amigurumi animals and want to try a slightly more detailed character. You’ll crochet each piece separately before sewing everything together.
Whether you’re making a handmade gift, decorating a nursery shelf, or adding a magical creature to your crochet collection, this baby dragon is a delightful project.
Quick Pattern Details
| Detail | Information |
|---|---|
| Skill level | Confident beginner |
| Project type | Crochet dragon amigurumi |
| Finished height | Approximately 6–8 inches |
| Estimated time | 6–9 hours |
| Yarn weight | Medium weight #4 |
| Crochet hook | 3.5 mm (E/4) |
| Construction | Separate pieces, sewn together |
| Main stitches | Single crochet, increases, decreases |
| Terminology | US crochet terms |
The finished measurements are approximate and depend on your yarn, hook size, and crochet tension.
Materials and Supplies
The vibrant color combination gives this little dragon its charming personality.
Yarn Colors
Emerald Green Yarn – Main Color
Use bright emerald-green cotton or acrylic yarn for the head, body, arms, legs, side fins, and curled tail.
Estimated amount: 100–140 yards.
Cream Yarn – Belly
Choose a warm ivory or soft cream shade for the rounded belly panel and tiny embroidered claws.
Estimated amount: 15–25 yards.
Hot Pink Yarn – Horns and Spikes
A vivid fuchsia-pink shade creates the decorative horns and playful spikes running along the dragon’s back and tail.
Estimated amount: 25–35 yards.
Tangerine-Orange Yarn – Wings
Choose a saturated orange shade for the little scalloped wings.
Estimated amount: 15–25 yards.
Brown and Soft Pink Yarn – Face Details
Use a small amount of dark brown yarn for the embroidered eyes and smile, plus soft pink yarn for the cheeks.
Additional Supplies
- 3.5 mm crochet hook
- Polyester fiberfill stuffing
- Yarn needle
- Scissors
- Stitch markers
- Measuring tape
- Sewing pins
Yarn tip: Cotton yarn gives amigurumi excellent stitch definition and a structured appearance. Acrylic yarn creates a softer finish and is another good choice.
For a baby or toddler gift, use embroidered features and secure every small part carefully. Avoid detachable decorations.
Crochet Abbreviations
This pattern uses standard US crochet terminology.
| Abbreviation | Meaning |
|---|---|
| MR | Magic ring |
| ch | Chain |
| sc | Single crochet |
| hdc | Half double crochet |
| dc | Double crochet |
| sl st | Slip stitch |
| inc | Increase: 2 sc in one stitch |
| dec | Invisible single crochet decrease |
| st(s) | Stitch or stitches |
| rnd | Round |
| rep | Repeat |
Magic ring: An adjustable starting loop that closes tightly when the yarn tail is pulled.
Single crochet: Insert your hook into a stitch, pull up a loop, yarn over, and pull through both loops.
Invisible decrease: Insert your hook through the front loops of the next two stitches, yarn over and pull through both loops, then yarn over and pull through the remaining two loops.
Unless otherwise stated, work in continuous spiral rounds without joining.
Use a stitch marker to identify the first stitch of each round.
Crochet Dragon Amigurumi Pattern: Step-by-Step Instructions
We’ll create the dragon in several sections:
- Crochet the rounded green head.
- Make the small dragon snout.
- Crochet the body and cream belly.
- Make the arms and feet.
- Create the orange wings.
- Crochet the pink horns and spikes.
- Make the curled tail.
- Assemble the dragon and add its sleepy face.
Step 1: Crochet the Dragon’s Head
The oversized rounded head gives this baby dragon its adorable appearance.
Using emerald-green yarn and a 3.5 mm hook:
Round 1: Work 6 sc into a magic ring. (6 stitches)
Round 2: Increase in every stitch. (12 stitches)
Round 3: Repeat 1 sc, inc six times. (18 stitches)
Round 4: Repeat 2 sc, inc six times. (24 stitches)
Round 5: Repeat 3 sc, inc six times. (30 stitches)
Round 6: Repeat 4 sc, inc six times. (36 stitches)
Round 7: Repeat 5 sc, inc six times. (42 stitches)
Round 8: Repeat 6 sc, inc six times. (48 stitches)
Rounds 9–15: Work 1 sc in every stitch. (48 stitches per round)
The head should now resemble a rounded bowl.
Shape the Head
Round 16: Repeat 6 sc, dec six times. (42 stitches)
Round 17: Repeat 5 sc, dec six times. (36 stitches)
Round 18: Repeat 4 sc, dec six times. (30 stitches)
Round 19: Repeat 3 sc, dec six times. (24 stitches)
Begin stuffing the head.
Round 20: Repeat 2 sc, dec six times. (18 stitches)
Round 21: Repeat 1 sc, dec six times. (12 stitches)
Round 22: Work 6 decreases. (6 stitches)
Fasten off, leaving a long sewing tail.
Thread the tail through the remaining stitches and pull closed.
Beginner tip: Add stuffing gradually to keep the head smooth and evenly rounded.
Step 2: Crochet the Dragon’s Snout
The short snout gives your dragon a friendly, rounded face.
Using emerald-green yarn:
Round 1: Work 6 sc into a magic ring. (6 stitches)
Round 2: Increase in every stitch. (12 stitches)
Round 3: Repeat 1 sc, inc six times. (18 stitches)
Round 4: Repeat 2 sc, inc six times. (24 stitches)
Rounds 5–7: Work 1 sc in every stitch. (24 stitches per round)
Fasten off, leaving a long sewing tail.
Stuff the snout lightly.
Position it on the lower front of the head and sew around its open edge, adding any remaining stuffing before closing the seam.
The rounded snout should project slightly forward.
Step 3: Crochet the Dragon’s Body
The body is plump at the bottom and narrows toward the neck.
Using emerald-green yarn:
Round 1: Work 6 sc into a magic ring. (6 stitches)
Round 2: Increase in every stitch. (12 stitches)
Round 3: Repeat 1 sc, inc six times. (18 stitches)
Round 4: Repeat 2 sc, inc six times. (24 stitches)
Round 5: Repeat 3 sc, inc six times. (30 stitches)
Round 6: Repeat 4 sc, inc six times. (36 stitches)
Rounds 7–13: Work evenly. (36 stitches per round)
Round 14: Repeat 4 sc, dec six times. (30 stitches)
Rounds 15–16: Work evenly. (30 stitches per round)
Round 17: Repeat 3 sc, dec six times. (24 stitches)
Rounds 18–19: Work evenly. (24 stitches per round)
Round 20: Repeat 2 sc, dec six times. (18 stitches)
Rounds 21–22: Work evenly. (18 stitches per round)
Fasten off, leaving a long tail.
Stuff the body firmly, keeping the top slightly flexible for attaching the head.
Step 4: Crochet the Cream Belly
The soft cream belly creates a beautiful contrast against the bright green body.
We’ll make a separate oval-shaped panel.
Using cream yarn:
- Chain 9.
- Row 1: Work 1 hdc into the third chain from your hook and across. (7 stitches)
- Row 2: Chain 1, turn, work 2 hdc into the first stitch, 1 hdc into each of the next 5 stitches, and 2 hdc into the last stitch. (9 stitches)
- Row 3: Work 1 hdc across. (9 stitches)
- Row 4: Increase at both ends, with 7 hdc between. (11 stitches)
- Rows 5–8: Work evenly. (11 stitches per row)
- Row 9: Work hdc2tog, 7 hdc, then hdc2tog. (9 stitches)
- Row 10: Work evenly. (9 stitches)
- Row 11: Work hdc2tog, 5 hdc, then hdc2tog. (7 stitches)
Fasten off with a long sewing tail.
Position the panel vertically on the front of the dragon’s body.
Sew around its edges using cream yarn.
Keep the panel centered and slightly curved to follow the rounded belly.
Step 5: Crochet the Small Dragon Arms
Make two identical green arms.
Round 1: Work 6 sc into a magic ring. (6 stitches)
Round 2: Increase in every stitch. (12 stitches)
Rounds 3–6: Work evenly. (12 stitches per round)
Round 7: Repeat 2 sc, dec three times. (9 stitches)
Rounds 8–10: Work evenly. (9 stitches per round)
Fasten off with a sewing tail.
Stuff the rounded lower end lightly.
Leave the upper portion relatively flat for attaching to the shoulders.
Step 6: Crochet the Dragon’s Feet
The baby dragon has two chubby feet that extend forward when it sits.
Make two feet using green yarn.
Round 1: Work 6 sc into a magic ring. (6 stitches)
Round 2: Increase in every stitch. (12 stitches)
Round 3: Repeat 1 sc, inc six times. (18 stitches)
Rounds 4–6: Work evenly. (18 stitches per round)
Round 7: Repeat 1 sc, dec six times. (12 stitches)
Round 8: Work evenly. (12 stitches)
Fasten off with a long tail.
Stuff the feet lightly and sew their openings closed.
Using cream yarn, embroider three tiny claw marks on the front of each foot.
These small details make the finished dragon especially cute.
Step 7: Crochet the Tiny Orange Wings
The orange wings are small, scalloped, and slightly curved.
Make two wings using tangerine-orange yarn.
- Chain 6.
- Row 1: Work 1 sc into the second chain from your hook and across. (5 stitches)
- Row 2: Chain 1, turn, increase in the first and last stitches, working sc between. (7 stitches)
- Row 3: Work evenly. (7 stitches)
- Row 4: Increase at both ends. (9 stitches)
- Row 5: Work evenly. (9 stitches)
- Row 6: Increase at both ends. (11 stitches)
- Row 7: Work evenly. (11 stitches)
Add the Scalloped Edges
Working along one outer side of the wing, add three small scallops.
At three spaced edge points, work:
1 sc, 1 hdc, 2 dc, 1 hdc, 1 sc.
Use slip stitches between the scallops.
Fasten off with a long tail.
Make the second wing, positioning the scallops on the opposite side for a mirrored pair.
The finished wings should look like small decorative dragon wings.
Step 8: Crochet the Pink Dragon Horns
The bright fuchsia horns add a playful pop of color.
Make two horns.
Using hot-pink yarn:
Round 1: Work 4 sc into a magic ring. (4 stitches)
Round 2: Work evenly. (4 stitches)
Round 3: Repeat 1 sc, inc twice. (6 stitches)
Round 4: Work evenly. (6 stitches)
Round 5: Repeat 2 sc, inc twice. (8 stitches)
Round 6: Work evenly. (8 stitches)
Round 7: Repeat 3 sc, inc twice. (10 stitches)
Round 8: Work evenly. (10 stitches)
Fasten off with a sewing tail.
Stuff each horn lightly.
Position them on top of the dragon’s head, slightly behind the face.
Sew them securely in place.
Step 9: Crochet the Pink Back Spikes
The little pink spikes give your dragon a magical fantasy appearance.
We’ll make approximately eight small triangular spikes.
Using hot-pink yarn:
- Chain 6.
- Row 1: Work 1 sc into the second chain and across. (5 stitches)
- Row 2: Chain 1, turn, work sc2tog, then 3 sc. (4 stitches)
- Row 3: Chain 1, turn, work sc2tog, then 2 sc. (3 stitches)
- Row 4: Chain 1, turn, work sc2tog, then 1 sc. (2 stitches)
- Row 5: Chain 1, turn, work sc2tog. (1 stitch)
Fasten off with a sewing tail.
Arrange the spikes down the dragon’s back and along the outer curve of its tail.
Keep their pointed ends facing outward.
Step 10: Crochet the Curled Dragon Tail
The curled tail is one of the most adorable features of this design.
We’ll crochet from the narrow tip toward the wider base.
Using green yarn:
Round 1: Work 6 sc into a magic ring. (6 stitches)
Rounds 2–7: Work evenly. (6 stitches per round)
Round 8: Repeat 2 sc, inc twice. (8 stitches)
Rounds 9–13: Work evenly. (8 stitches per round)
Round 14: Repeat 3 sc, inc twice. (10 stitches)
Rounds 15–19: Work evenly. (10 stitches per round)
Round 20: Repeat 4 sc, inc twice. (12 stitches)
Rounds 21–24: Work evenly. (12 stitches per round)
Round 25: Repeat 2 sc, inc four times. (16 stitches)
Rounds 26–29: Work evenly. (16 stitches per round)
Round 30: Repeat 3 sc, inc four times. (20 stitches)
Rounds 31–34: Work evenly. (20 stitches per round)
Fasten off with a long sewing tail.
Stuff the wider portion lightly, leaving the tip flexible.
Shape the Curled Tail
- Bend the narrow end into a gentle spiral.
- Thread green yarn through your needle.
- Make hidden stitches along the inside curve.
- Pull gently to bring the tip inward.
- Secure the curl with several small stitches.
The tail should hold a soft spiral shape without becoming too stiff.
Step 11: Crochet the Small Side Fins
The dragon in the inspiration image has two rounded green fins extending from the sides of its head.
Make two using emerald-green yarn.
- Chain 7.
- Work 1 sc into the second chain.
- Work 1 hdc into the next chain.
- Work 1 dc into each of the next 2 chains.
- Work 1 hdc into the next chain.
- Work 3 sc into the final chain.
- Continue along the opposite side of the foundation chain.
- Work 1 hdc, 2 dc, 1 hdc, and 1 sc into the remaining five chain loops.
- Join with a slip stitch.
Fasten off with a long tail.
Gently shape each fin.
Position one on either side of the head, slightly behind the embroidered eyes.
Sew the narrow ends securely to the head.
Step 12: Assemble the Dragon
Now it’s time to bring your little dragon together.
Attach the Head
Position the head above the body.
The snout should face forward, with the cream belly directly beneath it.
Sew the body’s open neckline securely to the underside of the head.
Add extra stuffing near the neck if needed for support.
Attach the Arms and Feet
Place the arms on either side of the upper body.
Angle them slightly inward toward the cream belly.
Sew the feet to the lower front of the body, keeping them evenly spaced.
Check that the dragon can sit comfortably before securing the final stitches.
Attach the Tail
Position the wider end of the curled tail at the lower back.
Sew it securely to the body.
The spiral tip should curl outward beside the dragon.
Attach the Wings
Position the orange wings on the upper back.
Angle them slightly upward and outward.
Sew the narrower edge of each wing firmly to the body.
Add the Spikes
Arrange the pink spikes along the back and outer edge of the tail.
Sew each spike securely along its wider edge.
Step 13: Embroider the Sleepy Dragon Face
The peaceful expression is what gives this little dragon its charming personality.
Using dark brown yarn, embroider two gently curved closed eyes.
Position them above the snout on opposite sides of the face.
For each eye, use several short stitches to create a smooth upward curve.
Add a tiny curved smile to the front of the snout.
Using soft pink yarn, embroider two or three small blush stitches beneath each eye.
You can also add two tiny brown nostrils near the top of the snout.
Keep the embroidery simple for a sweet, friendly appearance.
Finishing Your Crochet Dragon
Take a moment to inspect your finished amigurumi.
Weave in all remaining yarn ends.
Gently shape the head and body with your hands.
Straighten the orange wings and adjust the pink horns.
Check that the tail curl holds its shape.
Make sure the small arms, feet, and decorative spikes are securely attached.
The finished dragon should have a seated pose with its cream belly facing forward and its colorful wings extending from the back.
Make This Crochet Dragon Your Own
1. Pastel Baby Dragon
Use mint-green yarn for the body, pale cream for the belly, lavender for the horns, and peach for the wings.
2. Rainbow Fantasy Dragon
Keep the emerald body but make the horns and spikes in several bright colors.
You can also use different colors for the two wings.
3. Miniature Crochet Dragon
Use thinner yarn and a smaller hook while keeping the same stitch counts.
The finished dragon will be smaller, making it a cute desk decoration.
Tips for Beautiful Dragon Amigurumi
Keep your stitches tight. A smaller hook helps prevent stuffing from showing through.
Stuff gradually. Small amounts of fiberfill help maintain smooth shapes.
Use stitch markers. They’re essential for keeping track of continuous rounds.
Pin pieces before sewing. This makes it easier to check their placement.
Shape the tail slowly. Gentle hidden stitches create a smoother spiral.
Keep the wings lightweight. Avoid heavy stuffing or thick reinforcement.
Embroider the face carefully. Small, evenly spaced stitches give the dragon a sweet expression.
How to Care for Your Crochet Dragon
Handmade amigurumi creatures can stay beautiful with gentle care.
- Remove dust with a soft brush.
- Spot-clean using a lightly damp cloth.
- Follow your yarn’s washing instructions.
- Avoid twisting or wringing the stuffed pieces.
- Allow the dragon to air-dry completely.
- Keep it away from prolonged direct sunlight.
- Check the decorative attachments occasionally.
Store your dragon in a clean, dry space when not on display.
Frequently Asked Questions
Is this crochet dragon amigurumi pattern beginner-friendly?
Yes, it’s suitable for confident beginners who know single crochet, increases, and decreases. The wings and curled tail require a little extra attention, but the separate-piece construction makes the project manageable.
What yarn is best for a cute crochet dragon?
Medium-weight cotton or acrylic yarn works well. Cotton creates defined stitches and structured shapes, while acrylic produces a softer finish.
How do I make the dragon’s tail curl?
Gently bend the narrow tail section into a spiral and secure the shape with hidden stitches along the inside curve. Leaving the tip lightly stuffed makes it easier to shape.
Can I make this crochet dragon smaller?
Absolutely! Use thinner yarn and a smaller crochet hook while following the same stitch counts. The finished size will depend on your yarn thickness and tension.
How can I make the dragon wings stand out?
Use firm stitches, shape the scalloped edges carefully, and attach each wing at a slight upward angle. A small amount of gentle blocking can also help the wings maintain their shape.
Conclusion
This crochet dragon amigurumi with tiny wings is a delightful way to turn colorful yarn into an adorable handmade fantasy creature.
The emerald-green body, soft cream belly, bright orange wings, and playful pink horns create a cheerful dragon that’s full of personality.
Enjoy making each small piece, shaping the curled tail, and adding the sweet embroidered face.
Whether you display your little dragon on a shelf, add it to your amigurumi collection, or give it as a thoughtful handmade gift, it’s sure to bring a smile.
Save this cute crochet dragon pattern to your favorite Pinterest crochet board so you can return whenever you’re ready to create another magical handmade friend!