Crochet Daffodil Pattern – Beautiful Potted Spring Flower Tutorial
Brighten your home with a cheerful handmade flower using this free crochet daffodil pattern. Featuring six golden-yellow petals, a ruffled orange trumpet, two long...
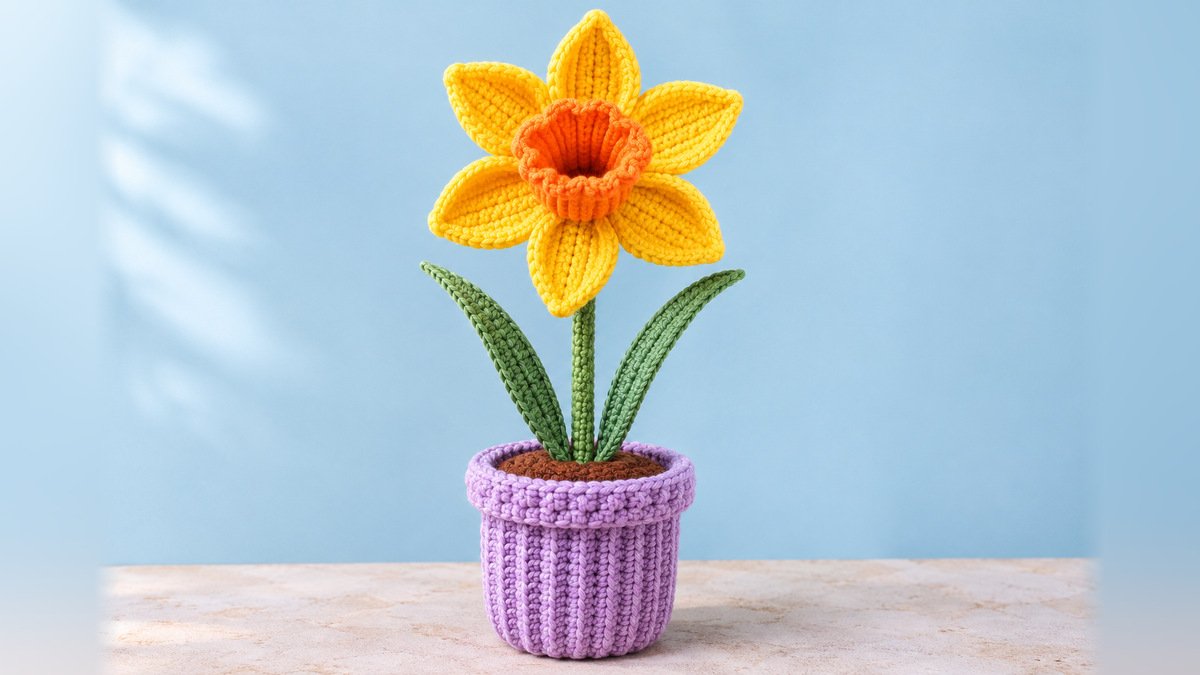
Brighten your home with a cheerful handmade flower using this free crochet daffodil pattern. Featuring six golden-yellow petals, a ruffled orange trumpet, two long green leaves, and a textured lavender flowerpot, this project brings the beauty of spring into your home without the need for watering or sunlight.
Daffodils are among the most recognizable spring flowers. Their distinctive trumpet-shaped centers and graceful petals make them especially appealing subjects for crochet.
This design, called the Golden Sunrise Daffodil, combines traditional floral shapes with a modern pastel planter. The contrast between the vivid yellow flower and soft lavender pot creates an eye-catching decoration for shelves, desks, and spring displays.
The daffodil is crocheted in several manageable pieces. You’ll create the flower petals, central trumpet, stem, leaves, pot, and soil insert separately before assembling them into one decorative plant.
This project is best suited to advanced beginners who are comfortable with basic crochet stitches and want to practice shaping three-dimensional flowers.
Why You’ll Love This Crochet Daffodil Project
There are several reasons to add this daffodil to your crochet collection.
Beautiful spring colors: Golden yellow, coral orange, botanical green, and lavender create a bright, cheerful color palette.
Recognizable floral details: Six shaped petals surround a raised, ruffled trumpet that gives the flower its classic daffodil appearance.
Textured flowerpot: The vertical ribbing adds an interesting handmade detail to the pastel planter.
No plant maintenance: Your completed flower stays colorful throughout the year without watering or sunlight.
Customizable design: Change the pot color, petal shade, or flower size to suit your decorating style.
Useful crochet techniques: This project introduces petal shaping, working in rounds, creating ribbed fabric, and assembling structural components.
The completed project also makes a charming handmade decoration for spring celebrations, Easter displays, or botanical-themed spaces.
Project Overview
| Project Detail | Information |
|---|---|
| Project name | Golden Sunrise Potted Daffodil |
| Category | Crochet Flowers and Plants |
| Difficulty | Advanced beginner |
| Crochet terminology | US terms |
| Yarn weight | Worsted weight #4 |
| Recommended hook | 3.5 mm and 4 mm |
| Number of flowers | One |
| Flower petals | Six |
| Leaves | Two |
| Approximate finished height | 10–12 inches |
| Approximate pot diameter | 3.5–4 inches |
| Estimated completion time | 5–8 hours |
Finished measurements and completion time are estimates. Your results will depend on yarn, gauge, and individual tension.
The flower is designed as an upright decorative piece, with a supported crochet stem and a stable, ribbed pot.
Materials and Supplies Needed
Choose soft, smooth yarn with good stitch definition.
Yarn colors
Color A – Golden Yellow
Approximately 35–50 yards.
Used for the six flower petals and the small circular flower base.
Color B – Coral Orange
Approximately 15–25 yards.
Used for the raised trumpet-shaped center.
Color C – Botanical Green
Approximately 35–50 yards.
Used for the stem and two long leaves.
Color D – Lavender
Approximately 70–100 yards.
Used for the ribbed crochet flowerpot.
Color E – Chocolate Brown
Approximately 15–25 yards.
Used for the soil insert inside the pot.
Crochet tools and additional materials
- 3.5 mm crochet hook for the flower, leaves, and stem
- 4 mm crochet hook for the pot
- Tapestry needle
- Stitch markers
- Sharp scissors
- Polyester fiberfill
- Measuring tape
- One smooth wooden craft dowel, approximately 7–8 inches long
- Optional washable plastic canvas for stabilizing the pot base
- Optional fabric glue for securing the stem support
The dowel must have smooth, protected ends and remain completely enclosed in the finished decoration.
This project is intended for display rather than use as a children’s toy.
Choosing the Right Yarn and Hook
The best yarn for a crochet daffodil should create defined stitches while holding its shape.
A smooth cotton yarn is particularly suitable for floral crochet because it provides structure and clear stitch definition.
Cotton-acrylic blends can also work well, offering a slightly softer texture.
For this design, choose a warm, saturated yellow rather than a very pale shade. The flower’s raised stitches become more visible when the yarn has enough color depth.
A vibrant coral-orange center provides the contrasting detail that makes the flower recognizable.
Hook selection
Use a 3.5 mm hook for the floral pieces.
The relatively small hook helps create firm stitches that support the petals and trumpet.
For the lavender pot, use a 4 mm hook to make the ribbed fabric slightly more flexible.
If your fabric is too loose, try a smaller hook.
If your stitches are extremely tight, increase your hook size slightly.
Crochet Stitches and Abbreviations
All instructions use US crochet terminology.
MR – Magic ring: An adjustable loop used to begin crocheting in the round.
ch – Chain
sl st – Slip stitch
sc – Single crochet
hdc – Half double crochet
dc – Double crochet
inc – Increase: Work two stitches into one stitch.
BLO – Back loop only
st / sts – Stitch / stitches
FO – Fasten off
Understanding back-loop-only crochet
When working BLO, insert your hook through the back loop of the stitch rather than beneath both top loops.
This creates a raised ridge on the opposite side.
The lavender flowerpot uses this technique to create vertical ribbing.
Understanding increases
When instructions say:
(sc 2, inc) × 6
Work one single crochet in each of the next two stitches, followed by two single crochet stitches in the next stitch. Repeat that sequence six times.
Before You Start
Before beginning, prepare your yarn and review the flower construction.
This daffodil consists of the following pieces:
- Six golden-yellow petals
- One yellow flower base
- One orange trumpet center
- One green stem
- Two long green leaves
- One lavender ribbed pot
- One brown soil disk
The pieces are assembled after crocheting.
Check your tension
The flower petals should be firm enough to maintain their shape without becoming stiff and difficult to work.
Make a small crochet sample before starting.
If your petal fabric curls excessively, adjust the hook size or tension.
Plan your flower proportions
The center trumpet should project forward from the yellow petals.
The six petals should form an evenly spaced circle around it.
The green stem should sit behind the flower and support its weight without visibly bending.
The leaves will extend outward from the lower stem, creating the familiar narrow foliage associated with daffodils.
Step-by-Step Crochet Daffodil Pattern
Part 1: Crochet the Six Yellow Petals
Using golden-yellow yarn and a 3.5 mm crochet hook, begin your first petal.
Foundation: Chain 11.
Work along one side of the foundation chain.
Starting in the second chain from the hook, work:
- 1 sl st
- 1 sc
- 2 hdc
- 4 dc
- 1 hdc
- 1 sc
You have worked into all ten available foundation chains.
Turn your work around the base of the chain to crochet along the opposite side.
Work:
- 1 sc into the opposite side of the final foundation chain
- 1 hdc
- 4 dc
- 2 hdc
- 1 sc
- 1 sl st
The petal should now resemble an elongated oval with a slightly pointed tip.
To create a defined center ridge, slip stitch back toward the petal base along the accessible bars of the foundation chain.
Fasten off with a long sewing tail at the base.
Gently shape the petal with your fingers.
Repeat the instructions until you have six matching yellow petals.
Part 2: Crochet the Flower Base
Using golden-yellow yarn, make a small circular disk.
Round 1: Work 6 sc in a magic ring. (6)
Round 2: Inc in every stitch. (12)
Round 3: (sc 1, inc) × 6. (18)
Fasten off, leaving a long tail.
This circular piece will hold the six petals and support the orange trumpet.
Part 3: Arrange and Attach the Petals
Lay the yellow flower base flat.
Position the six petals around its outer edge, with their narrow bases meeting near the center.
Divide the eighteen outer stitches into six groups of three.
Attach one petal base to each group of three stitches using its sewing tail.
Place the petals evenly around the circle.
Allow the pointed ends to extend outward.
Once all six petals are attached, check the arrangement from the front.
The petals should radiate from the center without excessive overlapping.
Make additional reinforcing stitches on the back if necessary.
Part 4: Crochet the Orange Trumpet Center
The trumpet is the most distinctive feature of a daffodil.
Using coral-orange yarn and a 3.5 mm hook, chain 18.
Join to the first chain with a slip stitch, taking care not to twist the chain.
Round 1: Work 1 sc in each chain around. (18)
Round 2: Work 1 sc BLO in every stitch. (18)
Round 3: Sc around. (18)
Round 4: (sc 2, inc) × 6. (24)
Round 5: (sc 3, inc) × 6. (30)
Round 6: (sc 4, inc) × 6. (36)
Round 7: (sc 1, inc) × 18. (54)
Round 8: Work 1 sl st in every stitch around. (54)
Fasten off and weave in the finishing tail.
The narrow starting opening forms the trumpet base, while the larger final round creates the flared front.
The increases near the outer edge produce a softly ruffled appearance.
Part 5: Attach the Trumpet to the Flower
Position the narrow eighteen-stitch opening of the orange trumpet over the center of the yellow flower base.
Use a tapestry needle and orange yarn to sew the trumpet base securely to the flower disk.
Keep the trumpet opening facing forward.
Make small stitches around the base so they are not obvious from the front.
Check that the orange center stands slightly away from the six surrounding petals.
Gently arrange the ruffled upper edge into a circular shape.
Your daffodil flower is now complete.
Part 6: Crochet the Green Stem
Using botanical-green yarn and a 3.5 mm crochet hook, make a small tubular stem.
Round 1: Work 6 sc in a magic ring. (6)
Rounds 2–28: Work 1 sc in each stitch around. (6)
Continue in spiral rounds, using a stitch marker to track your progress.
The result should be a narrow, flexible crochet tube.
Fasten off with a long sewing tail.
Add the stem support
Use a smooth wooden dowel that fits comfortably inside the crochet tube.
Protect both ends with a suitable covering, ensuring that the wood cannot pierce the yarn.
Insert the dowel carefully, leaving enough length below the stem to secure it inside the pot.
The support should extend up toward the flower head without protruding through the crochet fabric.
Sew the top of the stem to the center back of the flower disk.
Check that the daffodil sits at a natural angle.
Part 7: Crochet the First Green Leaf
Using botanical-green yarn, chain 19.
Starting in the second chain from the hook, work along the first side:
- 1 sl st
- 2 sc
- 3 hdc
- 6 dc
- 3 hdc
- 3 sc
Turn around the end of the foundation chain.
Work back along the opposite side:
- 3 sc
- 3 hdc
- 6 dc
- 3 hdc
- 2 sc
- 1 sl st
Slip stitch along the accessible foundation-chain bars toward the leaf base to create a raised central ridge.
Fasten off, leaving a long sewing tail.
The leaf should form a narrow, elongated shape with a gently pointed tip.
Part 8: Crochet the Second Green Leaf
Repeat the first leaf instructions exactly.
Both leaves should have matching lengths and similar widths.
Position the leaves near the lower portion of the stem, with their pointed ends extending outward in opposite directions.
Sew the leaf bases securely to the green stem.
For a natural appearance, position one leaf slightly higher than the other.
If the leaves need extra support, use small, enclosed plant-craft supports with protected ends.
Part 9: Crochet the Lavender Pot Base
Switch to lavender yarn and a 4 mm crochet hook.
Round 1: Work 6 sc in MR. (6)
Round 2: Inc around. (12)
Round 3: (sc 1, inc) × 6. (18)
Round 4: (sc 2, inc) × 6. (24)
Round 5: (sc 3, inc) × 6. (30)
Round 6: (sc 4, inc) × 6. (36)
Round 7: (sc 5, inc) × 6. (42)
Round 8: (sc 6, inc) × 6. (48)
Fasten off, leaving a sewing tail.
You should now have a flat circular base.
Part 10: Crochet the Ribbed Pot Walls
The pot walls are worked as a flat rectangle with vertical ridges.
Using lavender yarn, chain 16.
Row 1: Work 1 sc in the second chain from the hook and in each chain across. (15)
Row 2: Chain 1, turn, and work 1 sc BLO in every stitch. (15)
Rows 3–48: Repeat Row 2.
Maintain fifteen stitches in every row.
The resulting rectangle will have clearly visible ridges created by working through the back loops.
The fifteen-stitch dimension forms the height of the pot.
The forty-eight-row dimension forms its circumference.
Part 11: Form the Flowerpot
Bring the first and final rows of the ribbed panel together to form a cylinder.
Sew the edges together using a mattress stitch or whipstitch.
Keep the seam relaxed and aligned with the ribbing.
Position the circular pot base beneath the cylinder.
The base has 48 stitches, corresponding to the 48 row-ends around the bottom of the pot wall.
Sew one base stitch to each corresponding row-end, distributing the fabric evenly.
This creates a structured cylindrical flowerpot.
Part 12: Crochet the Upper Pot Rim
Attach lavender yarn to the upper edge of the pot.
Round 1: Work one sc into each of the 48 row-ends around the opening. (48)
Round 2: Sc BLO around. (48)
Round 3: Sc in every stitch around. (48)
Fasten off and weave in the yarn tail.
The upper rounds create a thicker decorative rim that complements the vertical ribbing.
Part 13: Crochet the Brown Soil Disk
Using chocolate-brown yarn, make a flat circular insert.
Round 1: 6 sc in MR. (6)
Round 2: Inc around. (12)
Round 3: (sc 1, inc) × 6. (18)
Round 4: (sc 2, inc) × 6. (24)
Round 5: (sc 3, inc) × 6. (30)
Round 6: (sc 4, inc) × 6. (36)
Round 7: (sc 5, inc) × 6. (42)
Round 8: (sc 6, inc) × 6. (48)
Fasten off with a long sewing tail.
The soil disk should fit inside the lavender planter beneath its raised upper rim.
Assembly and Finishing
Secure the flower stem
Position the supported green stem through the center of the soil disk.
Carefully open the center of the disk enough to accommodate the enclosed support without tearing the yarn.
Sew the green crochet tube securely to the soil disk.
The stem should remain centered and upright.
Stabilize the pot
Place a suitable flat stabilizing insert at the bottom of the pot if needed.
A small, fully enclosed weight pouch may also be used to reduce the risk of tipping.
Never place loose stones or other small objects inside an unsecured crochet decoration.
Position the lower end of the stem support securely inside the pot, ensuring it cannot shift or puncture the base.
Add polyester fiberfill around the support to help the pot maintain its shape.
Attach the soil disk
Position the brown soil disk just below the lavender rim.
Align its 48 outer stitches with the corresponding inner circumference of the pot.
Sew the disk into place with small, secure stitches.
Keep the daffodil stem upright while working.
Final shaping
Gently spread the six yellow petals into an even arrangement.
Adjust the orange trumpet so that the ruffled edge faces forward.
Position the two green leaves slightly away from the stem.
Straighten the pot walls and smooth the upper rim.
Your potted crochet daffodil is complete.
Tips for the Best Results
Keep the petals consistent. Use the same hook and yarn tension for all six petals.
Shape the flower before sewing. Arrange the petals around the base disk to check their spacing.
Avoid overtightening the trumpet. The orange center needs enough flexibility to maintain its flared, ruffled opening.
Use firm stitches for the pot. Tightly worked single crochet helps the planter hold its shape.
Protect the stem support. Ensure the dowel ends are smooth, covered, and unable to pierce the crochet.
Check the finished balance. Place the pot on a flat surface before closing the soil disk to confirm that it stands securely.
Take your time with assembly. Careful placement makes a significant difference to the finished flower’s appearance.
Common Mistakes and Troubleshooting
The petals curl inward
The stitch tension may be too tight.
Try working the petals with a slightly larger hook or gently reshape them before assembly.
The orange trumpet looks flat
Check the increase rounds carefully.
The change from 36 to 54 stitches creates the ruffled outer edge.
Make sure the smaller starting opening remains attached securely to the flower disk.
The daffodil leans forward
The stem support may be too flexible or insufficiently secured inside the pot.
Reposition the support and improve the stability of the pot base.
The lavender pot becomes wider at the top
The ribbed panel may have stretched during assembly.
Keep the seam tension even and distribute the stitches around the upper rim carefully.
The soil disk sinks into the planter
Add a little more support beneath the soil disk.
Avoid excessive stuffing that distorts the shape of the pot.
Creative Variations and Customization Ideas
This potted daffodil can be personalized while keeping the same basic construction.
Cream and yellow daffodil
Use cream yarn for the six outer petals and golden yellow for the trumpet.
This creates a softer spring flower.
Yellow-on-yellow daffodil
Work the center in a slightly deeper yellow shade for a more traditional monochromatic appearance.
Coral flowerpot
Replace the lavender planter with a warm coral or peach color.
This creates a cheerful, coordinated spring palette.
Miniature potted daffodil
Use sport-weight yarn and a smaller hook to create a compact version.
Remember to adjust the stem support and planter proportions accordingly.
Larger decorative flower
Choose a thicker yarn and appropriately sized hook to make a larger display piece.
Recalculate the pot and support dimensions to accommodate the additional weight.
How to Display Your Crochet Daffodil
The finished daffodil makes an attractive accent for several home decor settings.
Spring bookshelf decoration
Position the flower on a bookshelf beside neutral-colored books or small decorative objects.
The yellow petals create a cheerful contrast against the surrounding decor.
Desk decoration
Place the daffodil on a home office desk to introduce color without requiring a living plant.
Choose a location where the pot will remain stable.
Easter and spring displays
Use the flower as part of a simple spring arrangement.
The lavender pot works beautifully with pastel decorations.
Handmade gift
A potted crochet daffodil makes a thoughtful gift for someone who enjoys flowers, crochet, or seasonal decorations.
You can include a small handwritten card with the flower’s name and basic care instructions.
Care and Washing Instructions
Crochet flowers are generally easy to maintain when handled carefully.
Dust the petals and leaves gently with a soft, clean brush.
If the project contains a wooden dowel, permanent stabilizer, or other non-washable support, avoid soaking the assembled decoration.
Instead, spot-clean the yarn using a lightly dampened cloth and mild detergent if permitted by the yarn manufacturer.
Avoid pulling the petals or bending the supported stem sharply.
Keep the finished flower away from excessive moisture.
Store the decoration upright whenever possible.
Avoid prolonged direct sunlight, which may cause some yarn colors to fade.
Frequently Asked Questions
Is this crochet daffodil suitable for beginners?
This pattern is best suited to advanced beginners who understand chains, single crochet, half double crochet, double crochet, and basic increases.
The flower construction is manageable, but the assembly requires patience.
How many petals does a crochet daffodil need?
This design uses six golden-yellow petals arranged around one central orange trumpet.
Can I make the daffodil without a flowerpot?
Yes. You can make the flower and stem separately for use in a decorative arrangement.
The supported stem would need an appropriately finished base.
What yarn is best for crochet flowers?
Smooth cotton or cotton-blend yarn is a practical choice because it provides good stitch definition and helps shaped petals hold their form.
How do I make the trumpet look more realistic?
Maintain even tension in the narrow section and follow the increase instructions carefully.
Gently shape the ruffled outer edge after completing the final round.
Can I use a different color for the pot?
Absolutely. Cream, sage green, terracotta, sky blue, and blush pink are all attractive alternatives.
Does the crochet daffodil need stuffing?
The petals and trumpet do not require stuffing.
A small amount of stuffing inside the flowerpot helps support the soil disk and maintain the pot’s shape.
Can I make this crochet flower as a gift for a child?
The reference design uses a rigid stem support and is intended as a decorative item, not a children’s toy.
For a child-safe adaptation, a different construction and appropriate safety evaluation would be necessary.
Conclusion
This crochet daffodil pattern is a cheerful way to bring handmade spring color into your home.
With its six golden-yellow petals, ruffled orange trumpet, two graceful green leaves, and lavender ribbed pot, the Golden Sunrise Daffodil combines recognizable floral details with an original decorative presentation.
The project offers opportunities to practice shaped crochet pieces, three-dimensional construction, simple ribbing, and careful assembly.
Once you’ve completed the flower, experiment with different color combinations and planter finishes to create a decoration that matches your personal style.
Whether displayed on a bookshelf, desk, or spring-themed table, this crochet daffodil is a lovely reminder of the creativity possible with yarn and a hook.
Related Crochet Projects to Try Next
If you enjoy creating crochet flowers, consider exploring these related projects.
Crochet Tulip in a Pot: Create a colorful tulip with rounded petals and a slender stem.
Crochet Mini Sunflower: Practice making textured petals and a contrasting circular flower center.
Crochet Hyacinth Flower: Explore clustered small blossoms arranged along an upright stem.
Crochet Spring Flower Garland: Combine individual crochet flowers into a decorative hanging arrangement.
Each project offers another opportunity to explore floral shapes, color combinations, and handmade botanical decor.