Crochet Crescent Shoulder Bag Pattern – Free Textured Hobo Bag Tutorial
Create a stylish handmade accessory with this crochet crescent shoulder bag pattern, featuring a soft sage-green body, beautifully textured stitches, a curved half-moon silhouette,...
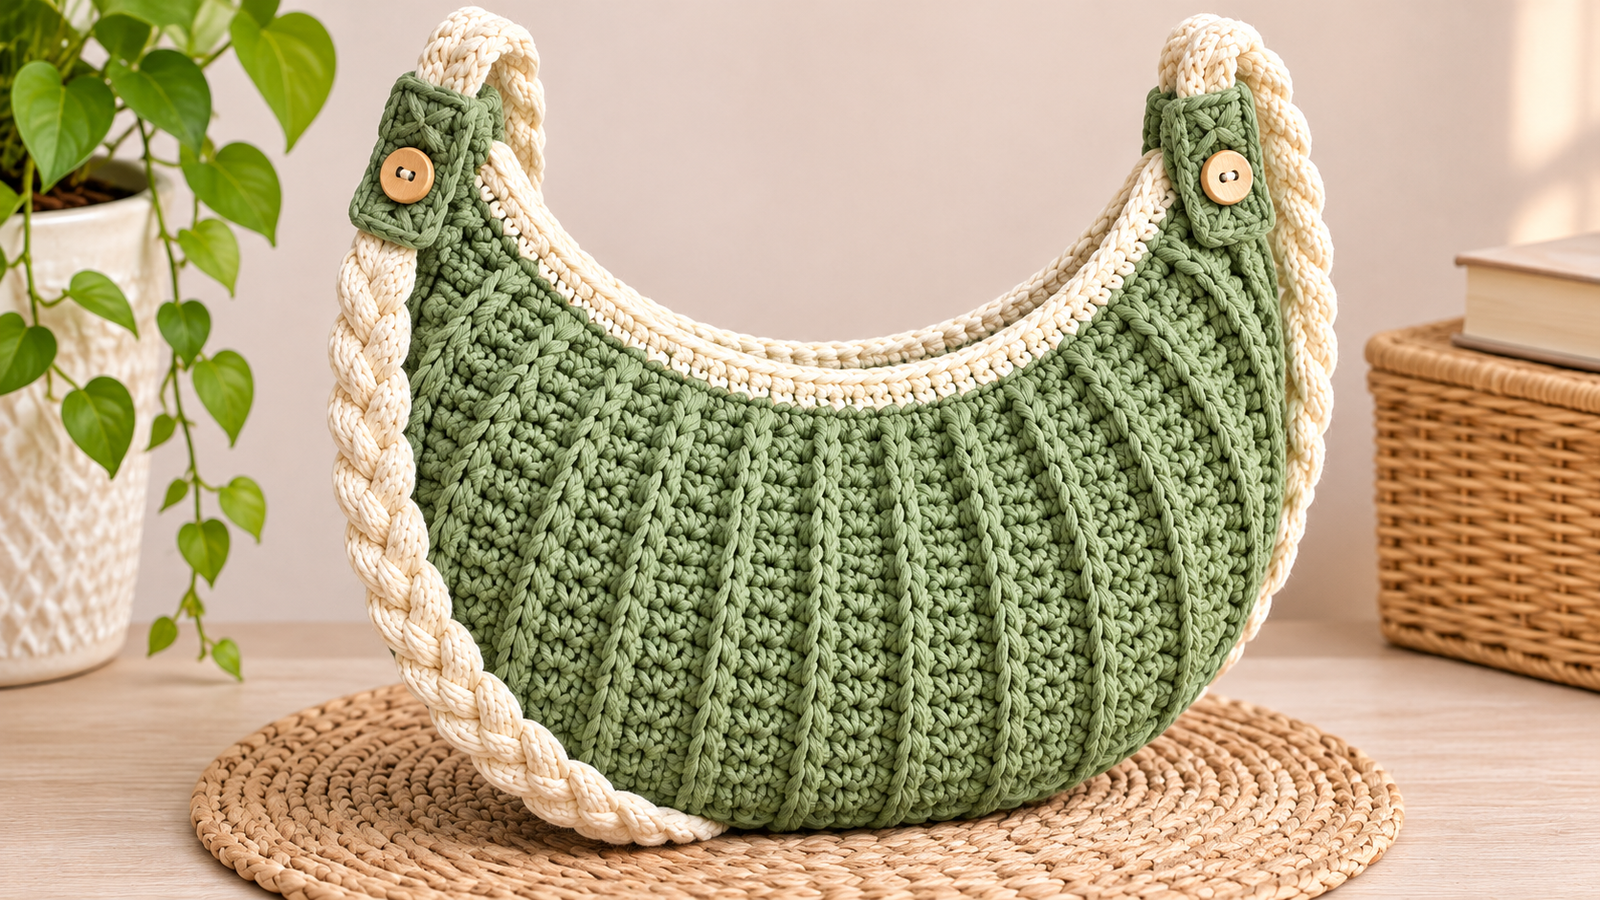
Create a stylish handmade accessory with this crochet crescent shoulder bag pattern, featuring a soft sage-green body, beautifully textured stitches, a curved half-moon silhouette, and a thick ivory braided strap.
This modern crochet handbag combines the relaxed shape of a hobo bag with the charm of handmade craftsmanship. Its rounded lower edge provides a soft, comfortable shape, while the contrasting cream trim adds a polished finishing detail.
The crescent design is especially appealing because it offers something different from traditional rectangular crochet totes. Instead of straight sides and a flat bottom, the bag has a gently curved body that sits naturally against the hip or under the arm.
In this free crochet tutorial, you’ll learn how to make two shaped panels, create a subtle raised texture, join the bag body, crochet a decorative braided shoulder strap, and finish the opening with a neat contrasting border.
The project is ideal for intermediate crocheters or confident beginners who want to explore shaped crochet accessories.
Why You’ll Love This Crochet Crescent Bag
This crochet crescent shoulder bag combines attractive design with practical construction.
Unique half-moon silhouette: The curved body creates a relaxed, fashionable appearance that looks different from ordinary crochet tote bags.
Beautiful textured stitches: The raised stitch pattern gives the sage-green fabric visual depth without adding complicated decorative motifs.
Comfortable braided strap: The thick cream crochet strap offers an attractive contrast to the green body.
Simple construction: The bag is made primarily from two matching shaped panels, which are joined before the edging and strap are added.
Easy color customization: You can create the same style in terracotta, denim blue, chocolate brown, burgundy, or natural cotton shades.
Useful everyday accessory: The finished bag is suitable for carrying lightweight personal essentials such as a wallet, phone, keys, and small accessories.
The design is also an enjoyable way to practice crochet shaping and professional finishing techniques.
Project Overview
| Project Detail | Information |
|---|---|
| Skill Level | Intermediate |
| Estimated Time | 6–9 hours |
| Finished Width | Approximately 12–14 inches |
| Finished Body Height | Approximately 6–8 inches |
| Strap Length | Approximately 25–32 inches |
| Yarn Weight | Medium #4 cotton |
| Hook Size | 4.0 mm |
| Crochet Terms | US terminology |
| Construction | Two shaped panels and a braided strap |
The measurements and completion time are estimates. Finished dimensions will vary depending on your yarn, gauge, and strap tension.
The main bag is made from two matching semicircular panels. The rounded outer edges are joined, leaving the upper edges open. A braided strap attaches at the two upper corners to create the characteristic crescent shoulder-bag appearance.
Materials and Supplies Needed
Yarn
Choose medium-weight cotton or cotton-blend yarn in two coordinating colors.
Main Color – Sage Green
Approximately 300–400 yards.
This color is used for the bag’s front panel, back panel, seams, and reinforcement pieces.
Accent Color – Warm Ivory
Approximately 120–180 yards.
Use ivory yarn for the upper edging and braided shoulder strap.
A smooth cotton yarn is particularly useful because it shows the stitch texture clearly and provides more structure than very soft or fuzzy yarn.
Crochet Tools
- 4.0 mm crochet hook
- Yarn needle with a large eye
- Sharp scissors
- Stitch markers
- Measuring tape
- Blocking pins, optional
Optional Finishing Supplies
- Matching cotton fabric for lining
- Sewing needle and matching thread
- Magnetic snap or small zipper
- Thin, nonstretch cotton tape for strap reinforcement
A lining is recommended if you plan to carry small objects regularly. It helps prevent items from slipping between stitches and reduces stretching.
Choosing the Right Yarn and Hook
The yarn you select will influence the bag’s structure, texture, and durability.
Medium-weight cotton yarn is an excellent choice for a crescent shoulder bag. It creates clearly defined stitches and offers enough firmness to maintain the curved shape.
Cotton-blend yarns also work, especially when you want a slightly softer, more flexible handbag.
Avoid extremely stretchy yarn for the main body. Excessive elasticity may cause the bag to sag when filled.
For this pattern, begin with a 4.0 mm crochet hook.
If your crochet fabric feels too loose, switch to a 3.5 mm hook. If your stitches are difficult to work into, try a slightly larger size.
The ideal fabric should be firm enough to support a small handbag while remaining flexible.
For the braided strap, firm cotton yarn is particularly important because handles experience more tension than other parts of the bag.
Crochet Stitches and Abbreviations
This pattern uses standard US crochet terminology.
| Abbreviation | Meaning |
|---|---|
| MR | Magic ring |
| ch | Chain |
| sc | Single crochet |
| hdc | Half double crochet |
| sl st | Slip stitch |
| inc | Increase |
| BLO | Back loop only |
| st / sts | Stitch / stitches |
| RS | Right side |
| WS | Wrong side |
| FO | Fasten off |
Half Double Crochet
Yarn over, insert the hook into the stitch, yarn over, and pull up a loop.
You should have three loops on the hook.
Yarn over and pull through all three loops.
Half Double Crochet Increase
Work two half double crochet stitches into the same stitch.
This increases the stitch count by one.
Back Loop Only
Instead of inserting the hook beneath both top loops of a stitch, insert it through the back loop only.
Working in the back loops creates subtle raised ridges on the crochet fabric.
These ridges provide the textured appearance used throughout the bag.
Before You Start
Before beginning the main panels, make a small gauge swatch.
Using your sage-green yarn and 4.0 mm hook, crochet a 20-stitch-wide sample in half double crochet.
Aim for approximately 14 half double crochet stitches and 11 rows over 4 inches.
Gauge is an important sizing reference for this project, although small variations are acceptable.
If your stitch count is significantly different, adjust your hook size before beginning.
The two crescent panels must be made using the same yarn, hook, and tension so their edges align during assembly.
Place a stitch marker on the right side of your first panel.
This makes it easier to position the front and back panels correctly before sewing.
For the main construction, turning chains do not count as stitches.
Step-by-Step Crochet Crescent Shoulder Bag Pattern
The pattern is divided into the body panels, assembly, cream edging, braided strap, and finishing details.
Part 1: Crochet the Front Crescent Panel
Use sage-green yarn.
The front panel is worked as an expanding semicircular fan, with increases distributed evenly across each row.
This creates a rounded lower edge and two upper corners.
Row 1:
Create a magic ring.
Chain 1 and work 4 hdc into the ring.
Pull the ring closed.
Turn your work. (4 sts)
Row 2:
Chain 1.
Work 2 hdc into each stitch across.
Turn. (8 sts)
Row 3:
Chain 1.
Working in BLO, repeat:
1 hdc, 2 hdc in the next stitch.
Repeat four times.
Turn. (12 sts)
Row 4:
Chain 1.
Working in BLO, repeat:
2 hdc, 2 hdc in the next stitch.
Repeat four times.
Turn. (16 sts)
Row 5:
Chain 1.
Repeat 3 hdc, increase four times, working in BLO.
Turn. (20 sts)
Row 6:
Chain 1.
Repeat 4 hdc, increase four times in BLO.
Turn. (24 sts)
Row 7:
Chain 1.
Repeat 5 hdc, increase four times in BLO.
Turn. (28 sts)
Row 8:
Chain 1.
Repeat 6 hdc, increase four times in BLO.
Turn. (32 sts)
Row 9:
Chain 1.
Repeat 7 hdc, increase four times in BLO.
Turn. (36 sts)
Row 10:
Chain 1.
Repeat 8 hdc, increase four times in BLO.
Turn. (40 sts)
You should now have a clearly rounded panel with a textured surface.
Continue Expanding the Crescent Shape
Continue the same increase sequence.
| Row | Repeat Four Times | Total Stitches |
|---|---|---|
| 11 | 9 hdc, inc | 44 |
| 12 | 10 hdc, inc | 48 |
| 13 | 11 hdc, inc | 52 |
| 14 | 12 hdc, inc | 56 |
| 15 | 13 hdc, inc | 60 |
| 16 | 14 hdc, inc | 64 |
| 17 | 15 hdc, inc | 68 |
| 18 | 16 hdc, inc | 72 |
Work these rows through the back loops, chaining 1 and turning after each row.
At the end of Row 18, your panel should have 72 stitches along its outer curved edge.
Fasten off, leaving a long yarn tail for assembly.
Gently lay the piece flat and shape the rounded lower edge with your hands.
The two upper sides should form the straight edges of the bag opening.
Part 2: Crochet the Back Panel
Make a second identical panel using sage-green yarn.
Follow the same instructions from Rows 1–18.
Your second panel should also finish with 72 stitches along the curved outer edge.
Place both panels on a flat surface and compare their dimensions.
If one panel is noticeably larger, check your stitch counts and tension before proceeding.
The panels should match closely enough for their outer edges to be joined without gathering.
Part 3: Create the Raised Crochet Texture
The back-loop half double crochet technique creates ridges across the surface.
These ridges follow the curved rows of the panel, giving the finished bag a softly sculpted appearance.
For additional stitch definition, gently stretch each panel into shape without pulling the fabric out of proportion.
You may also use a little water to lightly block the panels.
Pin them to matching outlines and allow them to dry completely before assembly.
Avoid overblocking, which can make the bag too loose.
Part 4: Join the Front and Back Panels
Place the two panels together with their right sides facing outward.
Align the beginning and end of Row 18 on both panels.
These outer points will become the bag’s upper corners.
The long rounded edges should line up.
Using sage-green yarn and a yarn needle, sew the corresponding stitches together along the entire 72-stitch curved edge.
Use a firm mattress stitch or whipstitch seam.
Keep the seam neat and consistent.
Do not sew the straight upper edges together.
These must remain open to form the bag opening.
After completing the seam, check that both panels hang evenly and that the bag retains its rounded shape.
If you prefer a more substantial bag, a narrow crocheted gusset can be inserted between the curved edges before sewing. A gusset increases the bag’s depth but is not required for the photographed slim crescent style.
Part 5: Crochet the Ivory Upper Edging
Switch to warm ivory yarn.
The cream border highlights the bag opening and creates a clean contrast against the sage-green body.
Join the ivory yarn at one upper corner.
Round 1:
Work single crochet stitches evenly along the exposed upper edge of the front panel.
Aim for approximately one sc into each row-end along both sides of the semicircle.
You should have about 36 stitches along the front opening.
Continue around the back panel’s upper edge, placing approximately the same number of stitches.
Join with a slip stitch.
The opening should have approximately 72 stitches in total.
Round 2:
Chain 1.
Work 1 sc in each stitch around the opening.
Join with a slip stitch.
Fasten off and weave in the ends.
The edging should lie flat without pulling the bag opening inward.
If the border puckers, loosen your tension or adjust the number of stitches placed along the row ends.
The contrasting ivory edging is now complete.
Part 6: Crochet the Three Strap Cords
The braided strap is one of the most distinctive features of this bag.
Instead of crocheting a traditional flat handle, you’ll make three long crochet strips and braid them together.
Use ivory yarn.
Make three identical strips.
Foundation:
Chain 120.
Row 1:
Starting in the second chain from your hook, work 1 sc into every chain across.
Turn. (119 sts)
Row 2:
Chain 1.
Work 1 sc into each stitch across.
Turn. (119 sts)
Row 3:
Chain 1.
Work 1 sc into each stitch across.
Fasten off, leaving an approximately 10-inch yarn tail.
Repeat until you have three matching strips.
The strips should be long, narrow, and fairly firm.
Lay them flat and check that all three are approximately the same length.
Part 7: Braid the Crochet Shoulder Strap
Arrange the three strips side by side.
Align their starting ends and sew them securely together.
Place the joined end beneath a heavy object or temporarily secure it to your work surface.
Begin braiding:
- Cross the right strip over the center strip.
- Cross the left strip over the new center strip.
- Continue alternating from right to left.
- Keep the tension consistent as you braid.
- Stop when you reach the opposite ends.
Do not pull the braid excessively tight.
The finished strap should feel substantial but remain flexible.
Sew the three ends together securely.
Measure the braided strap before attaching it to the bag.
The final length will be shorter than the original crochet strips because braiding reduces their effective length.
Aim for approximately 25–32 inches, depending on your preferred shoulder fit.
Part 8: Crochet the Strap Reinforcement Tabs
The ends of the braided strap need secure attachment points.
Use sage-green yarn.
Make two reinforcement tabs.
Foundation: Chain 9.
Row 1: Work 1 sc into the second chain from the hook and every chain across. (8 sts)
Rows 2–8: Chain 1, turn, and work 1 sc in every stitch across. (8 sts per row)
Fasten off, leaving a long sewing tail.
Repeat for the second tab.
These small rectangles reinforce the upper corners and help distribute the strap’s weight.
Part 9: Attach the Braided Strap
Locate the two upper corners of the finished bag.
Place one end of the braided strap against the inside of the first corner.
Allow approximately 1 inch of the strap to overlap the bag body.
Position one green reinforcement tab over the strap end.
Sew through the tab, strap, and bag fabric several times.
Use strong, closely spaced stitches.
Repeat on the opposite side.
Check that the strap is centered and that the bag hangs evenly.
The two attachment points should sit at equal heights.
For additional strength, sew a small square with diagonal reinforcement stitches through each attachment area.
If you plan to carry heavier items, consider reinforcing the strap with a nonstretch cotton tape or using a stronger woven strap beneath the crochet braid.
Part 10: Add an Optional Fabric Lining
A fabric lining can improve durability and make the bag more practical for daily use.
Choose lightweight cotton fabric in a coordinating shade.
Lay your finished bag flat and trace its outline onto paper.
Use this outline to create a lining pattern.
Cut two matching pieces of fabric, allowing approximately ½ inch for seams.
Place the fabric pieces together with their right sides facing inward.
Sew along the rounded lower edge, leaving the top open.
Turn the lining right side out.
Insert it into the crochet bag and align the upper edges.
Fold the raw fabric edges inward.
Hand-sew the lining beneath the ivory crochet border using small, discreet stitches.
Be careful not to pull the lining too tightly.
The lining should fit naturally inside the bag without distorting the crocheted panels.
Assembly and Finishing
After attaching the strap, carefully examine the entire bag.
Check the curved seam along the bottom to ensure it is secure.
Make sure the ivory border sits evenly around the opening.
Inspect both strap attachment points and reinforce any stitches that appear loose.
Weave in all remaining yarn tails.
Gently reshape the lower section to emphasize the rounded silhouette.
If you used a lining, check that it lies flat inside the bag.
You can also add a small magnetic snap to the lining near the center of the opening.
The finished bag should have a soft half-moon shape with a smooth upper edge and a comfortable braided strap.
Tips for the Best Crochet Bag Results
Maintain Even Tension
Consistent tension is essential when making two identical panels.
Changes in tension can cause one panel to become larger than the other.
Count Every Increase Row
The shaped panels rely on regular increases.
Check your stitch count after each row, especially during the first several rows.
Choose Structured Yarn
Cotton yarn or a sturdy cotton blend will help the bag hold its shape.
Very soft acrylic yarn may stretch more when the bag is filled.
Reinforce the Strap
The braided strap experiences more tension than the body of the bag.
Strong attachment stitches and reinforcement tabs will improve its durability.
Check the Fit Before Finishing
Hold the bag against your shoulder before permanently sewing the strap.
Adjust its length if necessary.
Common Mistakes and Troubleshooting
My Crescent Panels Are Uneven
The most common cause is inconsistent stitch counting or tension.
Compare both panels row by row and check that each finishes with 72 stitches along its outer edge.
My Bag Has Too Much Curl
Excessively tight stitches may cause the panels to curl.
Try using a slightly larger hook or gently blocking the pieces before assembly.
My Bag Looks Too Flat
The basic construction creates a relatively slim handbag.
For additional volume, insert a narrow gusset between the panels along their rounded lower edges.
My Strap Is Stretching
Braided crochet straps can stretch under weight.
Use firm cotton yarn, tighter stitches, and a reinforcement layer when needed.
My Top Edge Is Puckering
If the ivory border pulls inward, the edging may have too few stitches or be worked too tightly.
Remove the border and work it again with more relaxed tension.
Creative Variations and Customization Ideas
Once you understand the construction, you can customize this crochet crescent shoulder bag in many ways.
Terracotta Crescent Bag
Replace the sage-green yarn with warm terracotta and use an ivory or chocolate-brown strap.
Classic Black and Cream
Create an elegant everyday accessory using black yarn for the main body and cream for the edging and braid.
Denim Blue Shoulder Bag
Choose rich denim-blue cotton yarn for a relaxed, casual design that works beautifully with summer outfits.
Color-Blocked Crescent Bag
Use one shade for the front panel and another complementary shade for the back.
Shorter Shoulder Strap
Reduce the length of the three crochet strips for a compact underarm bag.
Crossbody Version
Make longer strap strips and adjust the final braid length to fit comfortably across your body.
For a crossbody design, reinforce the strap carefully to reduce stretching.
How to Style Your Crochet Crescent Shoulder Bag
The relaxed shape of this handmade bag works with many casual outfits.
Pair the sage-green version with a cream sweater and linen pants for a soft, natural look.
During warmer weather, style it with a simple white dress, denim shorts, or a lightweight blouse.
The cream braided strap complements neutral clothing, while the green body adds a subtle pop of color.
Because the bag is made from textured yarn, it looks especially attractive with simple outfits that allow the crochet details to stand out.
It also makes a thoughtful handmade gift for someone who loves modern crochet accessories.
Care and Washing Instructions
Cotton crochet bags can be durable, but they still require gentle care.
Check the yarn label before washing.
If the bag has no lining or delicate hardware, gentle hand washing may be suitable.
Use cool water and a mild detergent.
Avoid twisting or wringing the bag because this can distort its curved shape.
Press out excess water using a clean towel.
Reshape the bag while damp and allow it to dry flat.
If your bag contains a lining, magnetic snap, or other hardware, spot-cleaning may be a safer option.
Do not hang the wet bag by its strap, as the added water weight can cause stretching.
Store the bag flat or lightly filled with tissue paper to help preserve its shape.
Frequently Asked Questions
Is this crochet crescent bag suitable for beginners?
It is best for intermediate crocheters or confident beginners familiar with half double crochet, increasing, and joining panels.
What yarn is best for a crochet shoulder bag?
Cotton yarn is an excellent option because it offers clear stitch definition and relatively good structure.
Can I make this bag larger?
Yes. Continue the panel increase sequence beyond Row 18, adding four stitches per row. Make the same number of additional rows on both panels.
Can I make the bag smaller?
Yes. Stop the panel increase sequence earlier, such as after Row 15 or Row 16. Both panels must finish at the same size.
Do I need to add a lining?
A lining is optional, but it is helpful if you plan to carry small objects frequently.
Can I use acrylic yarn?
Yes, although softer acrylic yarn may stretch more than cotton. A lining and reinforced strap are recommended.
How do I make the strap stronger?
Use firm yarn, tightly worked crochet strips, and reinforced attachment tabs. You can also add a nonstretch reinforcement layer beneath the braid.
Can I add a zipper?
Yes. A zipper can be sewn into a fabric lining or attached beneath the finished crochet opening. Measure the opening after completing the bag to choose a suitable length.
Conclusion
This crochet crescent shoulder bag pattern is a wonderful way to explore modern crochet accessories while practicing useful construction techniques.
With its textured sage-green body, soft rounded silhouette, cream edging, and braided ivory strap, the finished handbag has a distinctive handmade appearance.
The two-panel construction keeps the basic shaping approachable, while the braided strap and finishing details provide opportunities to develop your skills.
Experiment with different yarn colors, strap lengths, and lining options to create a bag that suits your personal style.
Whether you make it for yourself or as a thoughtful handmade gift, this crochet crescent bag is a rewarding project that combines creativity and practical design.
Related Crochet Projects to Try Next
If you enjoy making handmade crochet bags, consider exploring these related projects.
Crochet Mini Bucket Bag: A compact handbag with a rounded base, upright sides, and a drawstring closure.
Crochet Granny Square Crossbody Bag: A colorful accessory assembled from decorative crochet squares.
Crochet Half-Moon Clutch: A smaller version of a curved handbag, designed without a long shoulder strap.
Crochet Drawstring Pouch: A simple pouch with a secure drawstring opening, perfect for organizing small essentials.
Each project introduces different shaping and finishing techniques while helping you build your crochet accessory collection.