Crochet Christmas Cactus Pattern
A crochet Christmas cactus pattern is a wonderful way to bring the beauty of winter-blooming plants into your home without worrying about watering, sunlight,...
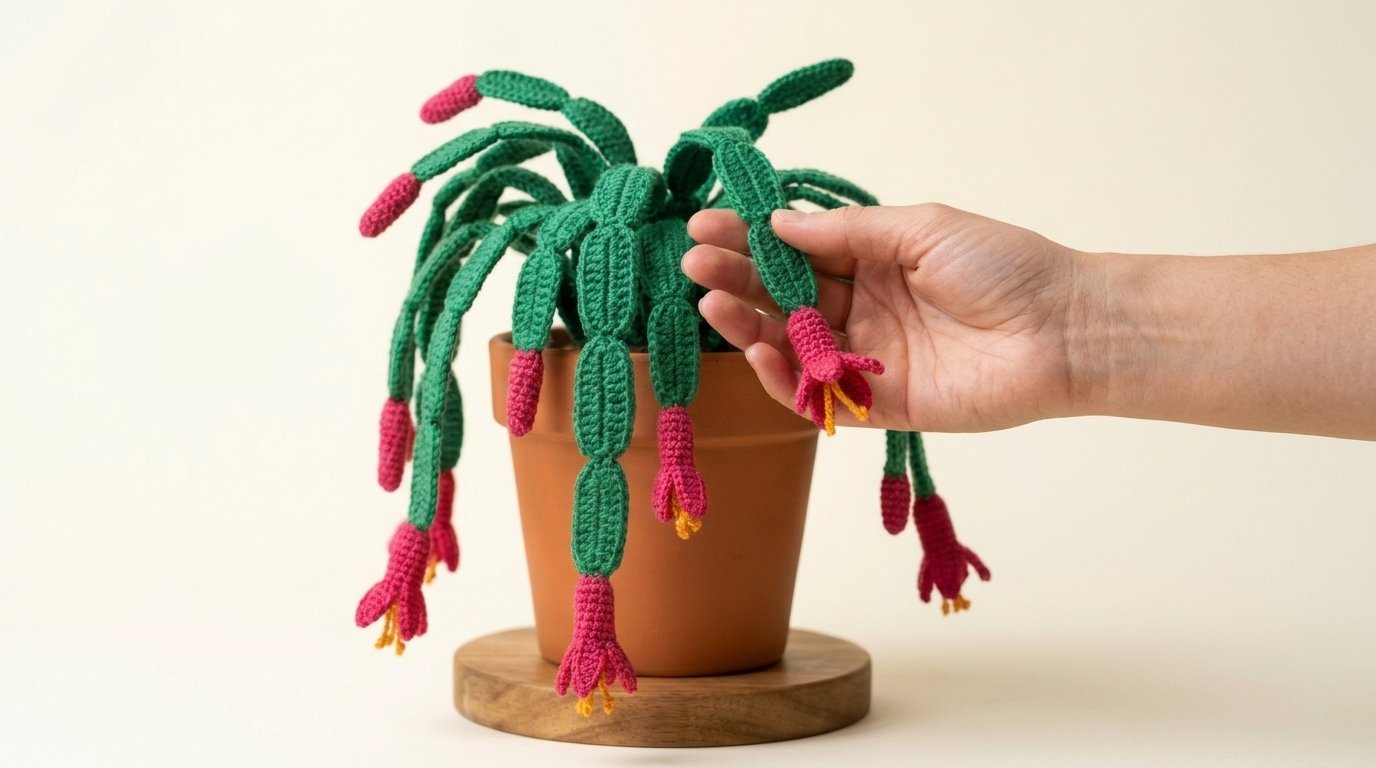
A crochet Christmas cactus pattern is a wonderful way to bring the beauty of winter-blooming plants into your home without worrying about watering, sunlight, or keeping a real cactus alive. With its long, arching green stems and cheerful pink flowers, this handmade plant captures the lovely appearance of a Christmas cactus in full bloom.
This crochet project features textured green segments that hang naturally over the sides of a classic terracotta pot. Bright pink tubular flowers decorate the ends of the branches, while tiny golden-yellow stamens add a delicate finishing touch.
The finished plant makes a charming Christmas decoration, a thoughtful handmade gift, or a colorful addition to a shelf throughout the year. Although the assembled cactus looks detailed, its individual pieces use basic crochet stitches that confident beginners can practice.
What You Need for This Crochet Christmas Cactus Pattern
You can make this project using inexpensive yarn and a few basic craft supplies.
Materials and Supplies
- Green yarn: Worsted-weight cotton or acrylic yarn in a rich emerald or forest-green shade.
- Pink yarn: Worsted-weight yarn in bright fuchsia, raspberry, or deep rose.
- Yellow yarn: A small amount for the flower stamens.
- Crochet hook: 3.5 mm (E/4), or a hook that creates firm stitches with your yarn.
- Fiberfill stuffing: A small amount to shape the green segments.
- Yarn needle: For attaching stems, flowers, and embroidered details.
- Stitch markers: To keep track of rounds.
- Scissors: For trimming yarn ends.
- Terracotta pot: Approximately 4 inches in diameter.
- Floral foam or sturdy cardboard: To support the finished cactus.
- Hot glue gun: For securing the plant support inside the pot.
Optional green chenille stems can provide extra support for the branches, especially if you want to position them into graceful curves.
Skill Level and Finished Size
Skill level: Confident beginner to intermediate
Estimated time: 6–9 hours, depending on the number of branches and flowers.
Finished size: Approximately 8–11 inches wide, including the hanging stems, when displayed in a 4-inch pot.
The exact measurements will depend on your yarn, hook size, and how many segments you add.
Crochet Abbreviations
This pattern uses US crochet terminology.
- MR: Magic ring
- ch: Chain
- sc: Single crochet
- sl st: Slip stitch
- hdc: Half double crochet
- inc: Two single crochet stitches in the same stitch
- dec: Single crochet decrease
- st(s): Stitch(es)
- BLO: Back loop only
- Rnd: Round
Numbers in parentheses indicate the total stitch count at the end of a round.
Work in continuous rounds unless otherwise instructed, and place a stitch marker in the first stitch of each round.
How to Crochet the Green Cactus Segments
The most recognizable feature of a Christmas cactus is its long collection of connected green segments.
Instead of making one continuous stem, you’ll crochet individual pieces and join them together to create flexible, arching branches.
Step 1: Make the First Green Segment
Using green yarn and a 3.5 mm crochet hook:
Rnd 1: Work 6 sc into a magic ring. (6)
Rnd 2: Repeat (1 sc, inc) three times. (9)
Rnd 3: Repeat (2 sc, inc) three times. (12)
Rnd 4–13: Work 1 sc in each stitch around. (12)
Rnd 14: Repeat (2 sc, dec) three times. (9)
Rnd 15: Work 1 sc in each stitch around. (9)
Add a very small amount of fiberfill if needed, keeping the shape relatively flat rather than round.
Fasten off, leaving a long yarn tail.
Thread the tail through the front loops of the nine remaining stitches, pull gently to close the opening, and secure the end.
Use your fingers to flatten the segment into a narrow, slightly oval shape.
This creates one green cactus section.
Step 2: Add Texture to the Segments
Real Christmas cactus stems have visible ridges and soft, flattened edges.
To imitate this appearance, use a yarn needle and matching green yarn to create two subtle raised lines running lengthwise along each segment.
You can use surface slip stitches or short straight embroidery stitches.
Keep the lines slightly curved rather than perfectly straight.
Avoid pulling the yarn too tightly, or the segments may bend unevenly.
For a more pronounced texture, choose a slightly lighter green yarn for these details.
Step 3: Crochet Additional Green Segments
Repeat the same pattern to make enough pieces for your cactus.
For a full potted plant similar to the pictured design, you can make approximately 24–30 green segments.
Some branches will use two segments, while longer branches may use three.
You can also make shorter segments by working fewer rounds between the increase and decrease sections.
The different lengths help create the natural, irregular shape of a real Christmas cactus.
How to Assemble the Cactus Branches
Once you’ve crocheted the green segments, begin joining them into hanging branches.
Step 4: Connect the Green Segments
Arrange two or three green segments in a slightly curved line.
Position the narrow ends together, then sew them securely using green yarn and a yarn needle.
Join each pair with several small stitches, creating a firm connection while allowing a little movement.
Avoid making every branch completely straight.
A gentle bend between segments gives the cactus its distinctive drooping appearance.
Create approximately ten branches of varying lengths.
You can make fewer branches for a smaller arrangement or add more for a fuller plant.
Step 5: Shape the Branches
Lay your finished branches on a table and experiment with their placement.
Some should hang downward, while others can extend outward before curving toward the pot.
If the branches need extra support, carefully insert a green chenille stem through the center of a branch before the final assembly, provided the stitches and joins leave enough space.
Fold and cover any sharp wire ends so they cannot poke through the crochet fabric.
You can skip wire entirely for a soft decorative cactus. The weight of the yarn will naturally encourage the longer branches to hang.
How to Crochet the Pink Christmas Cactus Flowers
The bright pink flowers are what make this project especially eye-catching.
Each flower has a narrow tubular base, small outward-opening petals, and delicate yellow stamens.
Step 6: Crochet the Pink Flower Base
Using pink yarn:
Rnd 1: Make 5 sc in a magic ring. (5)
Rnd 2: Work 2 sc in each stitch around. (10)
Rnd 3–8: Work 1 sc in each stitch around. (10)
This creates a small tube.
You can add one or two extra rounds if you prefer longer flowers.
Step 7: Make the Flower Petals
Continue with the pink yarn.
You’ll create five narrow petals around the open end of the flower.
For each petal:
- Slip stitch into the next stitch.
- Chain 5.
- Work 1 sc in the second chain from the hook.
- Work 1 hdc in each of the next two chains.
- Work 1 sc in the final chain.
- Slip stitch into the next unworked stitch of the flower opening.
Repeat this sequence five times around the opening, using two stitches of the opening for each petal.
Fasten off and weave in the yarn end.
Gently spread the petals outward with your fingers.
Step 8: Add Yellow Stamens
Cut two short pieces of yellow yarn, approximately 5 inches long.
Using a yarn needle, thread the pieces through the center of the flower so several short ends extend beyond the pink petals.
Secure the yarn inside the flower with a small knot.
Trim the visible yellow ends to approximately ½–¾ inch.
The yellow yarn creates the delicate stamens seen in Christmas cactus blossoms.
Repeat the flower pattern to make approximately eight to ten flowers.
Varying the flower lengths slightly will make the finished plant look more natural.
Attach the Flowers to the Green Branches
Step 9: Sew the Flowers in Place
Take one finished pink flower and position its closed base against the tip of a green branch.
Using a yarn needle and matching pink or green yarn, sew the flower securely to the branch.
Keep the petals facing outward so they can hang freely.
Repeat with the remaining flowers.
Place most flowers at the ends of the longest branches.
You can also add a few unopened pink buds to shorter branches.
For a simple bud, crochet a narrow pink tube for four or five rounds, close its opening, and attach it without adding petals.
This combination of open flowers and small buds makes the arrangement look more lifelike.
How to Make the Center of the Cactus
Step 10: Crochet the Main Plant Base
The central section supports the branches and helps the cactus look full.
Using green yarn:
Rnd 1: Make 6 sc in a magic ring. (6)
Rnd 2: Work 2 sc in every stitch. (12)
Rnd 3: Repeat (1 sc, inc) six times. (18)
Rnd 4: Repeat (2 sc, inc) six times. (24)
Rnd 5–8: Work 1 sc in each stitch around. (24)
Fasten off, leaving a long tail.
Add a small amount of fiberfill to create a rounded plant center.
Leave the bottom opening accessible so the base can be secured to the pot support.
Step 11: Attach All the Cactus Branches
Sew the green branches around the sides and top of the central section.
Arrange shorter branches near the top and longer branches around the outer edges.
Allow the stems to overlap slightly, creating a full, cascading appearance.
Rotate the plant as you work so the branches are distributed evenly.
If the arrangement looks too crowded, remove one or two branches rather than forcing everything into the center.
The goal is to create a natural shape with enough space for the individual segments and flowers to remain visible.
How to Display Your Crochet Christmas Cactus in a Pot
Step 12: Prepare the Terracotta Pot
Choose a small terracotta pot with a wide enough opening to support the crochet plant.
Cut a piece of floral foam to fit securely inside the pot.
Alternatively, cut several circles of thick cardboard and stack them to form a stable support.
Use hot glue to secure the support inside the pot, keeping your fingers clear of the hot adhesive.
If the plant is top-heavy, place a few clean stones in the bottom of the pot before adding the support.
Allow the glue to cool completely.
Step 13: Secure the Cactus
Position your crocheted cactus on top of the prepared support.
Use the yarn tail from the central base to sew the base onto a small piece of felt or sturdy fabric.
Glue the fabric to the top of the pot insert, keeping the adhesive away from the visible crochet stitches.
Check that the plant is balanced.
Adjust the branches so they drape over the pot’s edges.
The longest branches should hang downward, with the pink flowers pointing toward the tabletop.
For a polished display, cover any visible foam or cardboard with a circle of dark brown felt.
Tips for Making a Realistic Crochet Christmas Cactus
Use a Rich Green Yarn
Emerald green creates a lovely contrast with the bright pink flowers.
You can also combine forest green and medium green for a more natural appearance.
Keep the Segments Slightly Flattened
Christmas cactus stems aren’t round like those of many other cacti.
Flattening the crocheted pieces gives them a more recognizable shape.
Avoid overstuffing, which can make the stems resemble thick tubes.
Vary the Branch Lengths
A combination of short and long branches creates a more interesting plant.
Arrange the branches at different heights so the finished cactus doesn’t look perfectly symmetrical.
Three Crochet Christmas Cactus Variations
White Christmas Cactus
Use soft white or ivory yarn for the flowers and pale yellow yarn for the stamens.
The delicate flowers look beautiful against deep green stems and a rustic terracotta pot.
Red Holiday Christmas Cactus
Replace the bright pink flowers with rich Christmas red.
This variation works particularly well as a festive centerpiece or handmade holiday gift.
Mini Crochet Christmas Cactus
Make fewer green segments and smaller flowers using lightweight cotton yarn and a smaller hook.
Display the finished miniature plant in a tiny decorative pot.
It’s a sweet option for desks, bookshelves, or handmade gift arrangements.
Frequently Asked Questions
Is this crochet Christmas cactus pattern suitable for beginners?
Confident beginners can make this project if they’re comfortable working single crochet stitches, increases, decreases, and simple shaping. The flowers and assembly take extra patience, but the individual pieces are straightforward.
What yarn works best for a crochet Christmas cactus?
Worsted-weight cotton or acrylic yarn works well. Cotton gives the stems clear stitch definition, while acrylic tends to create a softer appearance. Choose yarn that holds its shape without feeling too stiff.
How do you make the crochet cactus branches hang naturally?
Use several connected green segments, keep the stuffing light, and allow the weight of the yarn to create a gentle droop. For more control over the shape, carefully concealed craft wire can provide extra support.
A Handmade Christmas Cactus That Blooms All Year
This crochet Christmas cactus pattern is a lovely way to enjoy colorful winter flowers without the maintenance of a real plant.
With its textured green stems, cascading branches, bright pink blossoms, and tiny yellow stamens, the finished cactus makes an attractive handmade decoration for your home.
You can customize the colors, adjust the number of branches, or create a miniature version to give as a thoughtful gift.
Display your finished crochet Christmas cactus on a windowsill, shelf, or holiday table, and enjoy a cheerful little plant that stays in bloom throughout the year.