Crochet Cardigan Sweater With Ripple Stripes – Easy Blue and Turquoise Chevron Cardigan Pattern
If you love colorful handmade clothing, this crochet cardigan sweater with ripple stripes is a beautiful project to add to your wardrobe. With its...
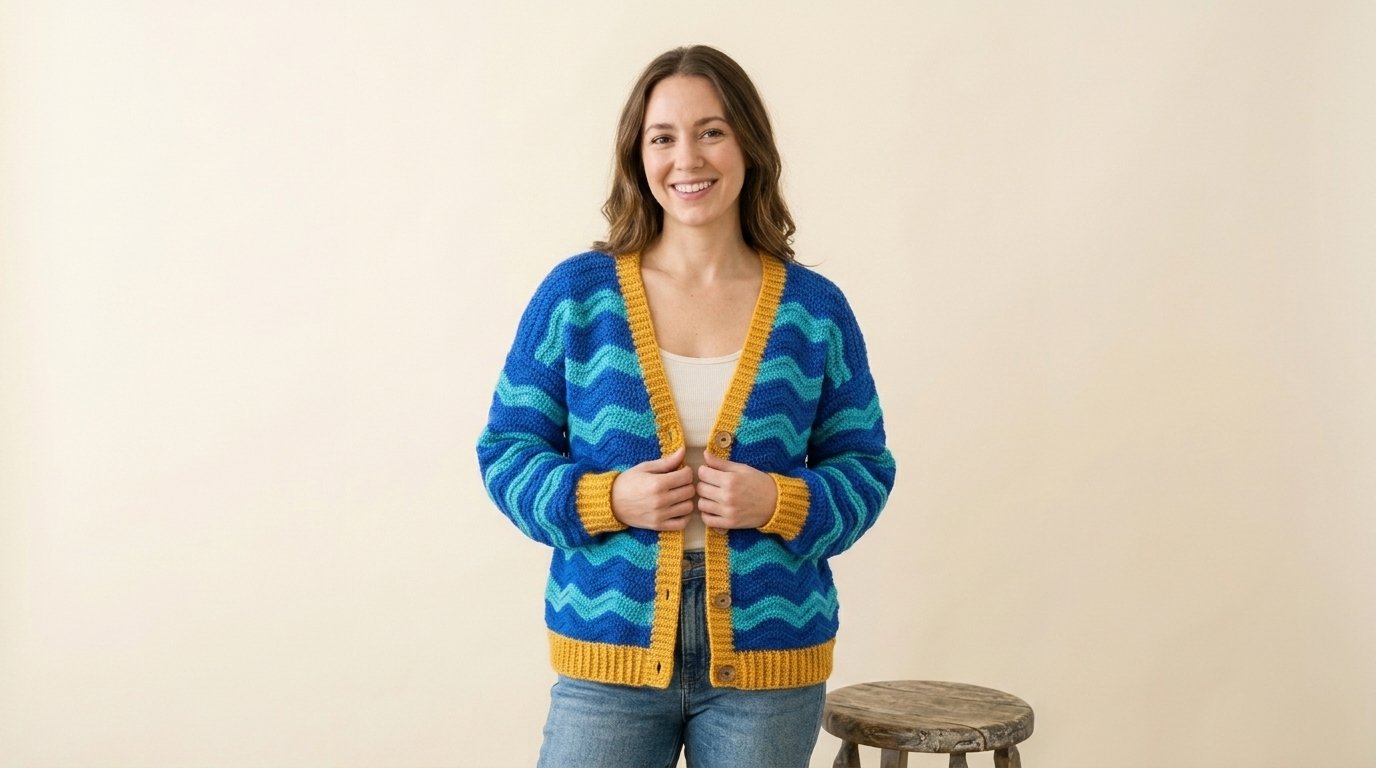
If you love colorful handmade clothing, this crochet cardigan sweater with ripple stripes is a beautiful project to add to your wardrobe. With its vibrant royal blue body, flowing turquoise wave patterns, and cheerful golden-yellow ribbed edges, this cardigan combines cozy comfort with a modern, playful design.
The gently zigzagging stripes create an eye-catching ripple effect across the body and sleeves, while the relaxed fit makes the cardigan comfortable for everyday wear. A flattering V-neckline, ribbed cuffs, and three wooden buttons complete the design.
This crochet cardigan is perfect for confident beginners who want to explore ripple stitches and make a colorful wearable project. You’ll work with simple crochet techniques, repeat an easy chevron pattern, and assemble the cardigan from separate pieces.
Whether you’re making it for cool autumn mornings, layering during winter, or wearing on breezy spring days, this handmade sweater is sure to become a favorite.
Quick Pattern Details
| Detail | Information |
|---|---|
| Skill level | Confident beginner to intermediate |
| Project type | Crochet cardigan sweater |
| Style | Relaxed V-neck cardigan |
| Suggested size | Women’s M/L |
| Finished bust | Approximately 44–46 inches |
| Finished length | Approximately 24 inches |
| Sleeve length | Approximately 20 inches |
| Estimated time | 20–28 hours |
| Yarn weight | Medium weight #4 |
| Crochet hook | 5 mm (H/8) |
| Main stitches | Half double crochet, ripple stitch, ribbing |
| Terminology | US crochet terms |
The cardigan is designed with a comfortable, slightly oversized fit. Finished dimensions are approximate and depend on your gauge and the natural contraction of the ripple pattern.
Materials and Supplies
The bright color combination is one of the most attractive features of this cardigan.
Yarn Colors
Royal Blue Yarn – Main Color
Choose a rich, vibrant royal blue for the cardigan’s main body and sleeves.
Estimated amount: 850–1,050 yards.
Bright Turquoise Yarn – Ripple Stripes
Use a cheerful turquoise or aqua-blue yarn for the lighter wave stripes.
Estimated amount: 250–350 yards.
Deep Teal Yarn – Secondary Ripple Color
A darker turquoise or teal shade adds depth and variation to the striped design.
Estimated amount: 150–220 yards.
Golden Yellow Yarn – Ribbing and Edging
Choose a warm mustard or golden-yellow shade for the cuffs, bottom hem, neckline, and button bands.
Estimated amount: 200–250 yards.
A soft acrylic-wool blend or washable acrylic yarn works particularly well for this cardigan.
Choose yarns of similar weight and texture so the different colors create even stitches.
Additional Supplies
- 5 mm crochet hook
- Three medium wooden buttons, approximately 20 mm
- Yarn needle
- Scissors
- Measuring tape
- Stitch markers
- Blocking pins and mat, optional
Yarn substitution tip: If you prefer natural fibers, a soft wool or cotton-wool blend can work beautifully. Make a gauge swatch before changing yarn, since different fibers affect the cardigan’s drape and finished size.
Gauge and Sizing
Before starting your cardigan, crochet a small ripple stitch swatch.
A suggested starting gauge is:
- 14 half double crochet stitches = 4 inches
- 11 rows = 4 inches
Measure the swatch after relaxing or blocking it.
Because ripple stitches create peaks and valleys, the finished fabric can contract horizontally. Measure the actual width of your ripple swatch rather than relying only on a flat half double crochet gauge.
For a relaxed cardigan, aim for approximately 4–8 inches of positive ease around your bust.
If your fabric feels stiff, try a slightly larger hook. If the stitches are too loose, use a smaller hook.
Crochet Abbreviations
All instructions use standard US crochet terminology.
| Abbreviation | Meaning |
|---|---|
| ch | Chain |
| sc | Single crochet |
| hdc | Half double crochet |
| dc | Double crochet |
| sl st | Slip stitch |
| hdc2tog | Half double crochet two stitches together |
| FPdc | Front post double crochet |
| BPdc | Back post double crochet |
| BLO | Back loop only |
| st(s) | Stitch or stitches |
| RS | Right side |
| WS | Wrong side |
| rep | Repeat |
Half double crochet: Yarn over, insert your hook into the stitch, pull up a loop, yarn over, and pull through all three loops.
Hdc2tog: Yarn over, insert your hook into the first stitch and pull up a loop. Yarn over, insert your hook into the next stitch and pull up another loop. Yarn over and pull through all five loops.
Front post double crochet: Work a double crochet around the vertical post of the stitch below, inserting your hook from front to back.
Back post double crochet: Work around the stitch post from the back of your fabric.
How to Crochet the Ripple Stripe Pattern
The ripple stitch creates the beautiful wavy stripes seen throughout this cardigan.
Instead of working perfectly straight rows, we’ll use increases and skipped stitches to form gentle peaks and valleys.
Basic Ripple Stitch
For this version, work over a foundation of 14 stitches plus multiples of 13.
Ripple Row:
- Work 2 hdc into the first stitch.
- Work 1 hdc into each of the next 5 stitches.
- Skip the next 2 stitches.
- Work 1 hdc into each of the next 5 stitches.
- Repeat 3 hdc into the next stitch, 1 hdc into each of the next 5 stitches, skip the next 2 stitches, 1 hdc into each of the next 5 stitches until one stitch remains.
- Work 2 hdc into the final stitch.
This sequence keeps the overall stitch count unchanged while forming alternating peaks and valleys.
For subsequent rows, chain 2, turn, and repeat the ripple sequence.
The turning chain does not count as a stitch.
Beginner tip: Place markers at the peaks and valleys while learning the pattern. They’re helpful for keeping your ripple sections aligned.
Color Stripe Sequence
Use the following color pattern throughout the cardigan:
| Rows | Color |
|---|---|
| 1–4 | Royal blue |
| 5–6 | Bright turquoise |
| 7–9 | Royal blue |
| 10–11 | Deep teal |
| 12–15 | Royal blue |
Repeat this 15-row sequence as you work.
For a more natural ripple appearance, you can occasionally make a turquoise stripe three rows wide instead of two.
When changing colors, complete the final yarn-over of the previous stitch with the new yarn.
This creates a clean transition between stripes.
Crochet Cardigan Sweater With Ripple Stripes: Step-by-Step Pattern
We’ll make the cardigan in five main pieces:
- One back panel
- Two front panels
- Two sleeves
Then we’ll add the golden-yellow ribbing, button bands, and wooden buttons.
Step 1: Crochet the Back Panel
The back panel forms the largest section of the cardigan.
Using royal blue yarn and your 5 mm hook:
- Chain 81.
- Row 1: Work 1 hdc into the third chain from your hook and every remaining chain. (79 stitches)
- Row 2: Chain 2, turn, and work the ripple stitch sequence across. (79 stitches)
- Rows 3–60: Continue the ripple stitch sequence, maintaining 79 stitches per row.
Follow the color stripe sequence as you work.
The back panel should measure approximately 22–23 inches wide and 21–22 inches long before adding the bottom ribbing, depending on gauge.
Fasten off, leaving a long sewing tail.
Common mistake: If your ripple pattern starts drifting sideways, check that you’re skipping two stitches at each valley and working three stitches at each peak.
Step 2: Crochet the Left Front Panel
The front panels feature the same colorful ripple pattern as the back.
We’ll also shape the upper edges to create the cardigan’s flattering V-neckline.
Using royal blue yarn:
- Chain 42.
- Row 1: Work 1 hdc into the third chain from your hook and across. (40 stitches)
- Rows 2–39: Continue the ripple pattern, keeping 40 stitches in each row.
Follow the same color sequence used for the back.
Shape the V-Neckline
Beginning with Row 40, gradually decrease stitches at the front-opening edge.
- Row 40: Work hdc2tog at the neckline edge, then continue across in pattern. (39 stitches)
- Row 41: Work evenly. (39 stitches)
- Row 42: Decrease one stitch at the neckline edge. (38 stitches)
- Continue decreasing one stitch at the neckline edge on every second row through Row 60.
After Row 60, you should have 29 stitches remaining.
As the neckline narrows, keep the ripple pattern aligned across the complete sections and work ordinary half double crochet near the shaped edge where a full ripple repeat no longer fits.
Fasten off with a long sewing tail.
The upper edge should form a gently sloping V shape.
Step 3: Crochet the Right Front Panel
Make the second front panel using the same starting stitch count.
- Chain 42.
- Work Row 1 in half double crochet. (40 stitches)
- Continue the ripple pattern through Row 39.
- Begin the neckline decreases at Row 40.
- Decrease one stitch every second row through Row 60.
Make sure the neckline shaping is mirrored so the two front panels face each other correctly.
Both front panels should finish with 29 stitches across the upper shoulder edge.
Beginner tip: Lay the two panels flat before fastening off. Their V-shaped edges should mirror each other when the right sides are facing upward.
Step 4: Join the Shoulder Seams
Lay the back panel flat with the right side facing upward.
Position the two front panels on top with right sides together.
Align the upper outer corners.
Each front panel has 29 stitches across the shoulder.
- Sew the left front shoulder to the outer 29 stitches of the back panel.
- Repeat on the opposite side.
- Leave the center 21 stitches of the back panel unseamed to create the back neckline.
Use a mattress stitch or whip stitch for neat seams.
Keep your stitches secure but not overly tight.
Turn the joined pieces right side out and check that the V-neckline lies evenly.
Step 5: Crochet the Ripple Stripe Sleeves
The sleeves feature the same blue and turquoise ripple stripes as the main body.
They have a comfortable, slightly relaxed shape that gathers into fitted golden-yellow cuffs.
Make two identical sleeve panels.
Using royal blue yarn:
- Chain 55.
- Row 1: Work 1 hdc into the third chain from your hook and across. (53 stitches)
- Row 2: Chain 2, turn, and work the ripple stitch sequence across. (53 stitches)
- Rows 3–50: Continue the ripple pattern, maintaining 53 stitches per row.
Follow the same color stripe sequence as the body.
The sleeve panel should measure approximately 15 inches wide before seaming, depending on gauge.
Fasten off, leaving a long yarn tail.
Repeat for the second sleeve.
Create the Sleeve Shape
The sleeves remain fairly wide throughout the arm, giving the cardigan its relaxed appearance.
The fitted cuffs will gather the extra fabric at the wrists.
If you prefer a narrower sleeve, you can gradually decrease stitches toward the wrist. However, you’ll need to adjust the ripple pattern as the stitch count changes.
For the version shown, keep the sleeve panels straight and allow the cuffs to create the gathering.
Step 6: Attach the Sleeves
Place the cardigan body flat with the wrong side facing upward.
Locate the shoulder seam on one side.
Fold the sleeve panel to find the center of its upper edge.
Match the sleeve center to the shoulder seam.
Leave approximately 21 body rows open on each side of the shoulder seam to create the armhole.
- Pin the sleeve center to the shoulder seam.
- Match the sleeve corners to the bottom edges of the armhole.
- Sew the sleeve evenly around the opening.
- Repeat for the second sleeve.
Fold the cardigan with right sides together.
Sew the side seams from the lower hem toward the underarms.
Continue sewing along the undersides of both sleeves.
Turn the cardigan right side out.
Try it on to check the shoulder and sleeve fit.
Step 7: Crochet the Golden-Yellow Ribbed Cuffs
The golden-yellow cuffs provide a beautiful contrast against the blue sleeves.
We’ll create the ribbing using front post and back post double crochet stitches.
Using golden-yellow yarn:
- Join your yarn at the wrist opening.
- Work 32 sc evenly around the opening, gathering the fabric slightly. Join with a slip stitch. (32 stitches)
- Round 2: Chain 2 and work 1 dc into every stitch. Join. (32 stitches)
- Round 3: Alternate 1 FPdc and 1 BPdc around. Join. (32 stitches)
- Rounds 4–7: Continue the ribbing pattern, working raised stitches around the matching posts. (32 stitches per round)
Fasten off and weave in the ends.
Repeat for the second cuff.
The finished cuffs should be approximately 2 inches long.
Helpful tip: Try the cuff over your hand before fastening off. It should feel comfortably snug without being difficult to pull on.
Step 8: Add the Golden-Yellow Ribbed Hem
The wide golden hem gives the cardigan a neat, structured finish.
Using golden-yellow yarn:
- Join your yarn at the lower front corner.
- Work sc evenly across the bottom edges of both front panels and the back panel, aiming for approximately 158–160 stitches.
- Chain 2 and turn.
- Work 1 dc into every stitch.
- Chain 2 and turn.
- Alternate FPdc and BPdc across the row.
- Continue the ribbing pattern for five more rows.
Fasten off and weave in your yarn tail.
The ribbed hem should add approximately 2 inches to the cardigan’s length.
Keep the lower edge relaxed so the cardigan doesn’t pull inward too much.
Step 9: Crochet the Golden Front Button Bands
The bright golden-yellow edging frames the V-neckline and creates a beautiful contrast with the blue ripple stripes.
We’ll work a continuous border around the front opening and neckline.
Using golden-yellow yarn:
- Join your yarn at the lower right front corner.
- Work sc evenly up the right front edge.
- Continue around the V-neckline.
- Work across the back neckline.
- Continue down the left front edge.
- Chain 1, turn, and work another row of sc.
- Continue until the band measures approximately 1–1.5 inches wide.
Work approximately three single crochets for every two half double crochet row ends as a starting point, adjusting the spacing so the edging lies flat.
At the neckline, work slightly fewer stitches if the band begins to flare.
Add the Buttonholes
The reference cardigan features three wooden buttons along the front opening.
Choose one front band for the buttonholes.
Position the buttons at the chest, waist, and lower front.
During the second-to-last band row:
- Work sc until you reach the first marked buttonhole position.
- Chain 2.
- Skip the next 2 stitches.
- Continue in sc until the next buttonhole position.
- Repeat for the remaining two buttonholes.
- Complete the row.
On the next row, work sc across, placing 2 sc into each chain-two space.
Fasten off.
Check that your chosen buttons fit comfortably through the openings.
Step 10: Sew on the Wooden Buttons
The natural wooden buttons add a lovely handmade touch.
Lay the cardigan flat with the front bands overlapping slightly.
Mark the button positions directly opposite the buttonholes.
Using a yarn needle and strong thread:
- Sew the first button securely onto the opposite front band.
- Repeat for the remaining two buttons.
- Make several reinforcing stitches through each button.
- Check that the bands close without pulling or stretching.
The cardigan can be worn buttoned or open, depending on your preferred style.
Finishing Your Ripple Stripe Cardigan
Take a few minutes to inspect the entire garment.
Weave in any remaining yarn ends.
Check the shoulder seams, sleeve seams, and button bands.
Gently straighten the ripple stripes so the colors flow naturally across the cardigan.
Blocking the Cardigan
Blocking can help the ripple stitches relax and improve the finished shape.
Follow your yarn’s care instructions.
For suitable yarns, gently dampen the cardigan and lay it flat on a clean towel or blocking mat.
Smooth the sleeves and front panels into shape.
Pay special attention to the V-neckline and button bands.
Allow the cardigan to dry completely before wearing it.
Avoid stretching the ripple sections excessively, since this can change the shape of the waves.
How to Adjust the Cardigan Size
This cardigan can be customized to suit different body measurements.
Make the Cardigan Wider
Add complete ripple repeats to the starting chains.
Each additional repeat uses 13 stitches.
Remember to adjust the shoulder seams and front panels to maintain the proportions.
Make the Cardigan Longer
Add more ripple rows to the body panels before starting the golden hem.
You can continue the same color stripe sequence for a longer cardigan.
Make the Sleeves Longer
Add extra ripple rows before the golden cuffs.
For shorter sleeves, remove several rows while keeping the color changes balanced.
Make the Cardigan More Oversized
Use a larger finished bust measurement and keep the sleeves relaxed.
A wider silhouette creates a cozy, casual look that’s perfect for layering.
Styling Ideas for Your Ripple Stripe Cardigan
The bright color combination makes this cardigan a beautiful statement piece.
Casual Everyday Outfit
Pair your cardigan with a simple white top, blue jeans, and comfortable sneakers.
The yellow trim and turquoise stripes add personality without needing many accessories.
Cozy Weekend Style
Wear the cardigan over a cream or beige turtleneck with relaxed trousers.
The colorful waves create a cheerful contrast against neutral clothing.
Creative Colorful Look
Pair your cardigan with a denim skirt or wide-leg jeans.
Add simple gold accessories to complement the golden-yellow ribbing.
This style is especially lovely for creative workspaces, casual outings, and relaxed weekends.
Make This Crochet Cardigan Your Own
Once you’re comfortable with the ripple stitch pattern, try experimenting with other color combinations.
1. Ocean-Inspired Ripple Cardigan
Use navy blue, seafoam green, and soft turquoise for the ripple stripes.
Finish with cream ribbing for a calming coastal look.
2. Sunset Ripple Cardigan
Try coral pink, warm orange, and golden yellow.
Use a deep burgundy shade for the main body to create a rich sunset-inspired design.
3. Pastel Spring Cardigan
Combine lavender, mint green, powder blue, and soft cream.
The lighter colors give the ripple pattern a gentle, playful appearance.
Tips for Beautiful Crochet Ripple Stripes
Keep your stitch count consistent. Ripple patterns rely on correctly placed increases and skipped stitches.
Use stitch markers. Mark the peaks and valleys while learning the pattern.
Choose smooth yarn. Good stitch definition makes the wave pattern easier to see.
Keep color changes neat. Change yarn during the final pull-through of the previous stitch.
Check your gauge. Ripple fabric may be narrower than expected because of the zigzag structure.
Try on the cardigan during assembly. This helps you adjust the fit before adding the ribbing.
Keep the edging relaxed. Tight button bands can distort the V-neckline.
How to Care for Your Crochet Cardigan
A handmade cardigan deserves gentle care.
- Wash according to your yarn label.
- Use cool water and mild detergent when appropriate.
- Avoid twisting or wringing the fabric.
- Lay the cardigan flat to dry.
- Reshape the ripple stripes while damp.
- Store folded to prevent the shoulders from stretching.
- Check the wooden buttons occasionally.
With proper care, your cardigan can remain a colorful favorite for many seasons.
Frequently Asked Questions
Is this crochet cardigan sweater with ripple stripes beginner-friendly?
This pattern is best for confident beginners who already know half double crochet and basic garment assembly. The ripple stitch requires attention to increases and skipped stitches, but the repeating pattern becomes easier with practice.
What yarn is best for a ripple crochet cardigan?
Medium-weight acrylic, wool blends, or soft cotton blends work well. Choose yarn with enough flexibility to allow the ripple stitches to drape comfortably.
How do I keep my crochet ripple stripes even?
Count your stitches regularly and use markers at the peaks and valleys. Make sure each increase and skipped-stitch section is worked consistently across the row.
Can I crochet this cardigan without buttons?
Absolutely! Simply skip the buttonholes and wooden buttons. You can wear the cardigan open for a relaxed, casual appearance.
Can I use different colors for the ripple stripes?
Yes! Ripple crochet looks beautiful in almost any color combination. You can use two colors for a simple design or several contrasting shades for a brighter, more playful cardigan.
Conclusion
This crochet cardigan sweater with ripple stripes is a wonderful way to combine colorful yarn, cozy texture, and timeless handmade style.
The rich royal blue body, flowing turquoise waves, golden-yellow ribbing, and natural wooden buttons create a cardigan that’s both cheerful and comfortable.
Take your time learning the ripple pattern, enjoy the changing colors, and make the design your own.
Whether you wear it over your favorite jeans or give it as a thoughtful handmade gift, this colorful crochet cardigan is a beautiful project to be proud of.
Save this ripple stripe cardigan pattern to your favorite Pinterest crochet board so you can return whenever you’re ready to create another cozy handmade sweater!