Crochet Barrel Cactus Pattern with Raised Ribs and a Pot
This crochet barrel cactus pattern makes a rounded emerald-green cactus with raised vertical ribs, two small side pups, a golden flower, and a terracotta-style...
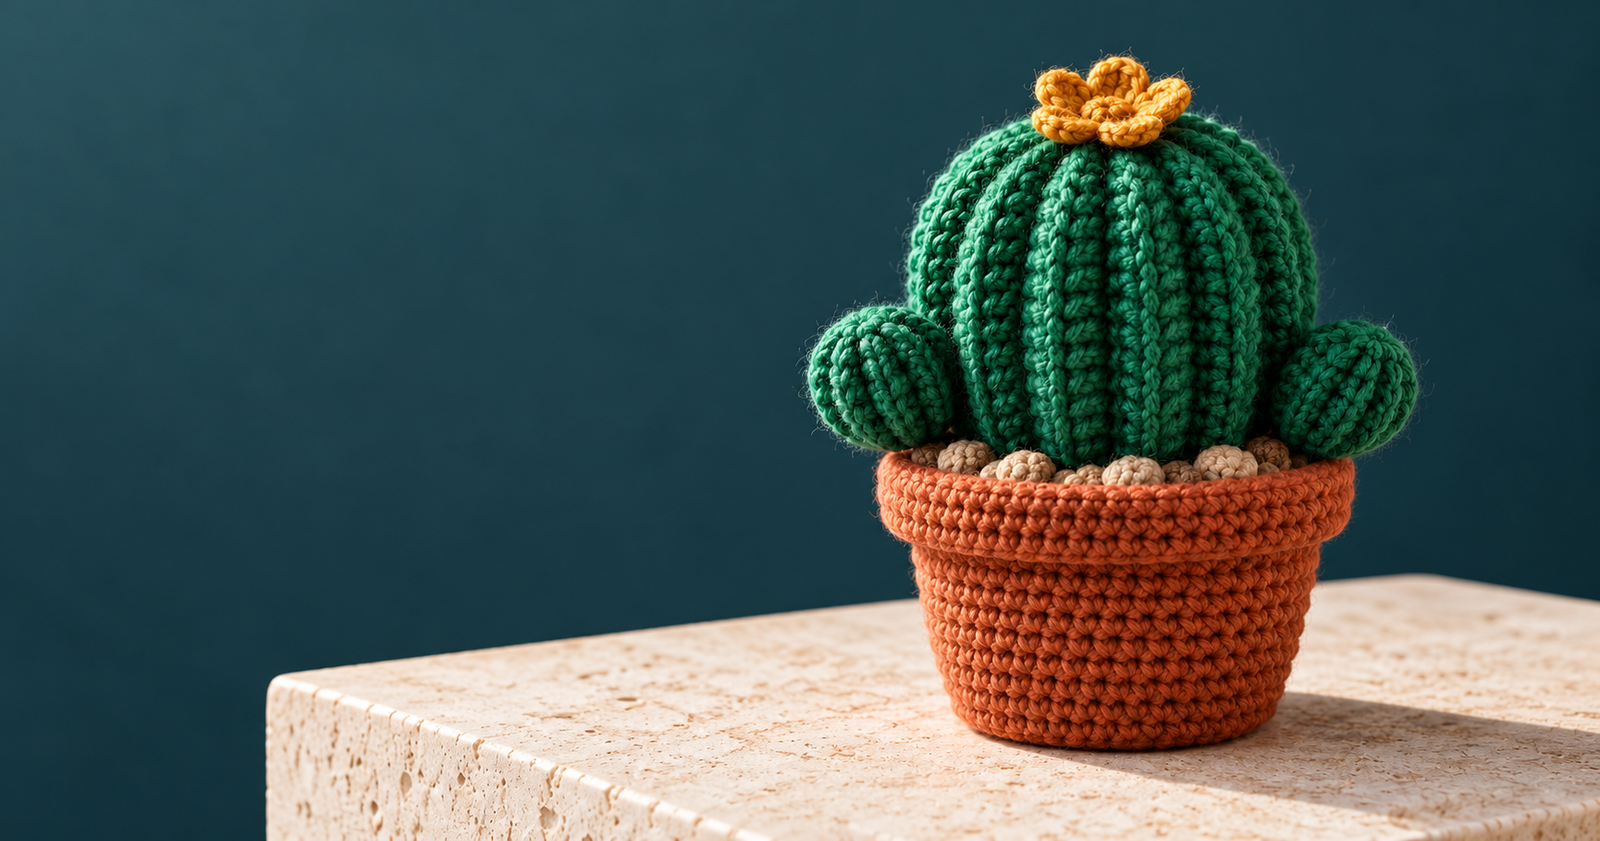
This crochet barrel cactus pattern makes a rounded emerald-green cactus with raised vertical ribs, two small side pups, a golden flower, and a terracotta-style crochet pot. The pieces are made separately, stuffed, and sewn together for a cheerful plant decoration that needs no watering.
The pattern uses US crochet terms and mostly single crochet. The cactus body is worked in the round, while the raised ribs are added with yarn embroidery after stuffing. It’s a good project for an advanced beginner who is comfortable with increases, decreases, and basic amigurumi assembly.
Why You’ll Love This Project
The rounded shape is built with simple increases and decreases, and the ribs are added after the body is complete. That makes it easier to keep the main cactus smooth and evenly stuffed. The side pups, flower, and pot give the finished piece plenty of character without requiring complicated stitch patterns.
Project Overview
- Project type: Crochet cactus plant decor
- Difficulty: Advanced beginner
- Estimated time: 4–6 hours
- Suggested finished size: About 6–8 inches tall
- Yarn weight: DK or light worsted
- Hook: 3.0 mm
- Main techniques: Single crochet, working in continuous rounds, increases, invisible decreases, and sewing
- Construction: Stuffed cactus and pups are attached to a crocheted pot
- Terminology: US crochet terms
Finished size and time are estimates and will vary with yarn, hook, and tension.
Materials and Supplies Needed
- DK or light-worsted yarn in emerald or deep teal, terracotta, golden yellow, and sand
- 3.0 mm crochet hook
- Yarn needle
- Stitch marker
- Scissors
- Polyester fiberfill
- Optional: firm cardboard or plastic canvas for the pot’s base
Use a hook small enough to make dense fabric that hides the stuffing. This design is intended as decorative home decor.
Choosing the Right Yarn and Hook
Smooth cotton or cotton-blend yarn gives the cactus clear stitch definition and helps the pot keep its shape. Acrylic yarn also works, though the finished piece may feel softer. Avoid fuzzy yarn because it can hide the ribs and make it harder to see your stitches.
Use a hook smaller than the yarn label’s suggested size if needed to keep the stuffing from showing. If you switch yarn weight, the cactus and pot will change size. Make sure the cactus base fits inside the pot opening before sewing the pieces together.
Crochet Stitches and Abbreviations
- ch — chain
- sc — single crochet
- sl st — slip stitch
- inc — work 2 single crochet stitches in the same stitch
- dec — single crochet 2 stitches together
- BLO — back loop only
- st / sts — stitch / stitches
- rnd / rnds — round / rounds
Use a stitch marker to mark the first stitch of each continuous round. Move it up as you work.
Before You Start
The cactus, pups, and pot are worked in continuous rounds without joining at the end of each round. Keep the fabric tight enough that stuffing does not show through. Stuff gradually as the pieces close so you can shape them evenly.
The raised ribs are embroidered onto the stuffed cactus with long vertical stitches. Pull the yarn just firmly enough to form a shallow groove; pulling too tightly can distort the body.
Step-by-Step Crochet Instructions
Make the Main Cactus
With emerald yarn and the 3.0 mm hook, begin with a magic ring.
Rnd 1: Work 6 sc into the ring. (6 sts)
Rnd 2: Inc in each st around. (12 sts)
Rnd 3: Sc, inc around. (18 sts)
Rnd 4: 2 sc, inc around. (24 sts)
Rnd 5: 3 sc, inc around. (30 sts)
Rnd 6: 4 sc, inc around. (36 sts)
Rnd 7: 5 sc, inc around. (42 sts)
Rnds 8–15: Sc in each st around. (42 sts)
Begin shaping the top:
Rnd 16: 5 sc, dec around. (36 sts)
Rnd 17: 4 sc, dec around. (30 sts)
Rnd 18: 3 sc, dec around. (24 sts)
Rnd 19: 2 sc, dec around. (18 sts)
Stuff the body firmly, shaping it into a rounded column. Continue closing:
Rnd 20: Sc, dec around. (12 sts)
Rnd 21: Dec around. (6 sts)
Fasten off, leaving a tail. Thread it through the remaining front loops and pull closed.
Add the Raised Ribs
Thread emerald yarn onto the yarn needle. Starting near the lower edge of the cactus, run a long stitch vertically over the surface from the base toward the top. Bring the needle back down beside the first stitch, drawing the yarn snug enough to make a shallow groove.
Repeat to create eight evenly spaced ribs around the cactus. Secure the yarn at the base and weave in the ends. Keep the ribs straight and evenly spaced.
Make the Side Pups
Make two pups in emerald yarn.
Rnd 1: Work 6 sc into a magic ring. (6 sts)
Rnd 2: Inc in each st around. (12 sts)
Rnd 3: Sc, inc around. (18 sts)
Rnds 4–6: Sc in each st around. (18 sts)
Rnd 7: Sc, dec around. (12 sts)
Add a small amount of stuffing.
Rnd 8: Dec around. (6 sts)
Fasten off, leaving a sewing tail. Close the opening as for the main cactus. Sew one pup to each lower side of the cactus, with the tops sitting just below its widest point.
Make the Golden Flower
With golden-yellow yarn, make a magic ring and work 5 sc into it. Join with a sl st to the first sc.
For each petal, ch 3, sl st in the next sc. Repeat around to make five small looped petals. Fasten off, leaving a tail. Sew the flower to the center of the cactus top.
Make the Terracotta Pot
With terracotta yarn, begin with a magic ring.
Rnd 1: Work 6 sc into the ring. (6 sts)
Rnd 2: Inc in each st around. (12 sts)
Rnd 3: Sc, inc around. (18 sts)
Rnd 4: 2 sc, inc around. (24 sts)
Rnd 5: 3 sc, inc around. (30 sts)
Rnd 6: 4 sc, inc around. (36 sts)
Rnd 7: 5 sc, inc around. (42 sts)
Rnds 8–16: Sc in each st around. (42 sts)
Create the pot’s rim:
Rnd 17: Sc in BLO around. (42 sts)
Rnd 18: 6 sc, inc around. (48 sts)
Rnd 19: Sc in each st around. (48 sts)
Fasten off and weave in the end. If you want the pot to stand more firmly, place a piece of firm cardboard or plastic canvas inside the base.
Add the Sand-Colored Pebbles
Make five small pebbles in sand-colored yarn.
Rnd 1: Work 6 sc into a magic ring. (6 sts)
Rnd 2: Inc in each st around. (12 sts)
Rnd 3: Sc in each st around. (12 sts)
Fasten off, leaving a sewing tail. Add a pinch of fiberfill, then close the opening. Sew the pebbles around the edge of the pot opening, leaving space in the center for the cactus.
Assembly and Finishing
Place the cactus base inside the pot. Sew it securely around the opening, catching the cactus and the pot’s inner edge. Arrange the two pups so both remain visible from the front. Sew on the golden flower, then check that no stuffing shows through the body or pot.
Shape the cactus gently with your hands. If the pot feels too soft, add a base insert before attaching the cactus.
Tips for Best Results
- Count stitches at the end of each increase and decrease round.
- Use invisible decreases to keep the cactus surface neat.
- Add stuffing in small amounts so the body stays evenly rounded.
- Mark the pot’s first stitch and keep its sides straight.
- Space the ribs evenly before tightening the embroidery yarn.
- Check the cactus fit inside the pot before sewing it in place.
Common Mistakes and Troubleshooting
Stuffing shows through the cactus. Use a smaller hook or tighten your tension slightly.
The body looks lopsided. Check the increase rounds and distribute stuffing evenly before closing the top.
The ribs pull the cactus out of shape. Loosen the embroidery yarn and keep the grooves shallow.
The pot opening is too small. Check the stitch count and make sure the final increase round is complete. You can add one more increase round if needed, but the pot may become wider than the sample.
The cactus leans in the pot. Reposition it before sewing, then attach it evenly around the opening. A firm base insert can also help the pot stand upright.
Creative Variations
Use forest green or blue-green yarn for a different cactus color. Make the flower coral or cream, or add a third pup at the back for a fuller silhouette. For a taller version, add a few more even rounds to the cactus body before beginning the decrease rounds.
How to Use or Style Your Crochet Project
Display the cactus on a desk, bookshelf, or windowsill. It works well as a small accent on its own or as part of a collection of handmade plant decor. Since the pot and cactus are crocheted, keep the piece indoors and away from moisture.
Care and Maintenance
Remove dust with a soft brush or a cool hair dryer held at a distance. If the yarn label allows washing, spot-clean gently with a damp cloth and mild detergent. Avoid soaking the pot, especially if it contains a cardboard base insert. Let the piece dry fully before returning it to display.
Frequently Asked Questions
Is this crochet cactus suitable for beginners?
It is best for an advanced beginner. The stitches are basic, but the pattern uses continuous rounds, shaping, stuffing, and sewing.
Can I make the cactus without side pups?
Yes. Make the main cactus and pot as written, then skip the pup instructions.
How do I make the ribs stand out more?
Use a slightly thicker strand of matching green yarn for the surface embroidery, and pull it gently to form defined grooves.
Can I use worsted-weight yarn?
Yes. The cactus will be larger and may need a larger pot. Keep the hook small enough to make dense fabric.
Does the pot need a plastic or cardboard insert?
No, but an insert can help the base feel firmer. Check that any insert is fully enclosed and does not have sharp edges.
Can I make the flower in another color?
Yes. A contrasting color such as coral, cream, or pink makes the top detail stand out.
Conclusion
This crochet barrel cactus combines simple amigurumi shaping with raised surface ribs, two small pups, and a terracotta-style pot. Make the pieces in your favorite greens and warm accent colors, then arrange them into a cheerful handmade display.
Related Crochet Projects
- Crochet succulent in a small pot
- Crochet hanging vine
- Crochet mushroom home decor
- Crochet potted flower pattern