Crochet Baby Girl Cardigan Idea
A crochet baby girl cardigan is one of the sweetest handmade clothing projects you can create for a little one. With its bright raspberry-pink...
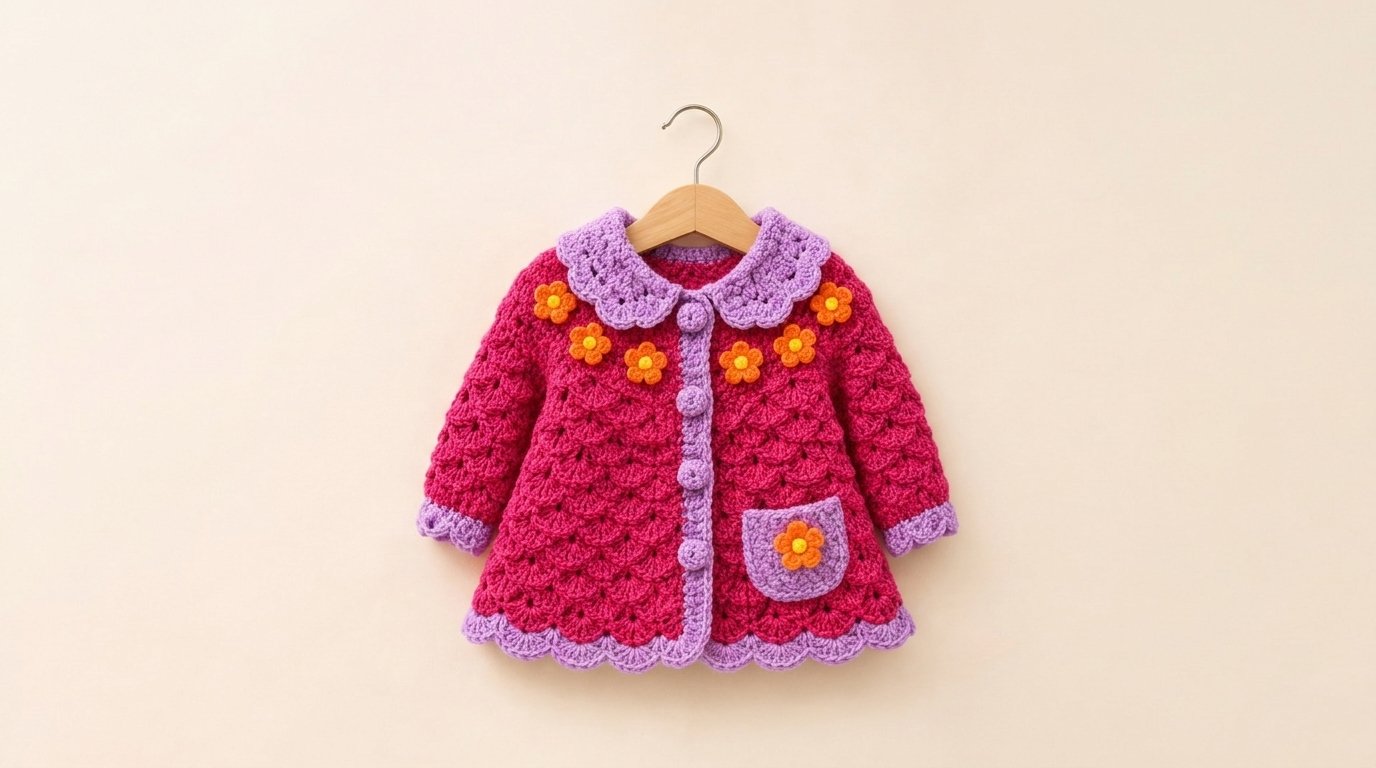
A crochet baby girl cardigan is one of the sweetest handmade clothing projects you can create for a little one. With its bright raspberry-pink body, soft lilac collar, delicate scalloped edging, and cheerful orange flowers, this adorable cardigan combines cozy comfort with playful handmade details.
The design features a beautiful textured crochet pattern, a rounded Peter Pan-style collar, long sleeves with matching lavender cuffs, and four decorative lilac buttons along the front opening. Small orange flower appliqués decorate the upper chest, while a tiny lavender patch pocket adds an extra touch of charm.
This colorful baby cardigan is a lovely choice for spring outfits, birthday celebrations, family photographs, or thoughtful handmade gifts. The combination of vibrant pink, gentle purple, and warm orange creates a cheerful look that feels special without being overly complicated.
If you enjoy crocheting baby clothes, this project offers a wonderful opportunity to practice garment construction, decorative borders, textured stitches, and simple crochet flowers.
What Makes This Crochet Baby Girl Cardigan Special?
The most noticeable feature of this cardigan is its vibrant color combination.
Raspberry-pink yarn creates a lively foundation, while lavender details soften the overall appearance. Tiny orange flowers provide a contrasting accent, making the cardigan look cheerful and playful.
Several design elements help give this cardigan its distinctive appearance.
- Textured pink body: Soft shell-inspired stitches create a delicate handmade surface.
- Scalloped lavender collar: A rounded Peter Pan-style collar frames the neckline.
- Four decorative buttons: Matching lavender-covered buttons complete the front opening.
- Orange crochet flowers: Small floral appliqués decorate the chest and pocket.
- Matching sleeve cuffs: Lavender edging gives the sleeves a coordinated finish.
- Decorative lower hem: A soft scalloped border adds a pretty final detail.
- Small patch pocket: A lavender pocket on the lower front adds an adorable accent.
The cardigan has a comfortable, slightly relaxed shape that makes it suitable for layering over a soft baby top.
Materials and Supplies
Before beginning, gather your yarn and crochet tools.
Yarn
Choose soft, lightweight yarn suitable for baby clothing.
- Raspberry-pink yarn: Approximately 250–350 yards of DK-weight yarn for the cardigan body and sleeves.
- Lavender yarn: Approximately 80–120 yards for the collar, cuffs, button bands, hem, and pocket.
- Tangerine-orange yarn: A small amount for the flower appliqués.
- Golden-yellow yarn: A few yards for the flower centers.
These amounts are estimates for a small baby cardigan. Larger sizes and denser stitch patterns require more yarn.
Soft cotton blends, machine-washable acrylic baby yarn, or other smooth yarns designed for baby garments are practical choices.
Avoid scratchy fibers, heavily shedding yarn, and decorative materials that may irritate delicate skin.
Crochet Tools
- 4 mm (G/6) crochet hook, or the size needed to obtain your desired gauge.
- 3.5 mm (E/4) crochet hook for smaller decorative details.
- Yarn needle.
- Stitch markers.
- Measuring tape.
- Scissors.
- Four small buttons, if using a buttoned closure.
- Matching sewing thread.
- Blocking mat and rustproof pins, optional.
Skill Level and Finished Size
Skill level: Confident beginner to intermediate
Estimated time: 10–15 hours, depending on size and experience.
Suggested size: Approximately 6–12 months, adaptable to other baby sizes.
For a comfortable fit, compare the finished cardigan measurements with a well-fitting baby sweater.
A useful starting point for a 6–12-month cardigan is:
| Measurement | Approximate Finished Size |
|---|---|
| Chest circumference | 22–23 inches |
| Body length | 12–13 inches |
| Upper sleeve circumference | 9–10 inches |
| Sleeve length | 8–9 inches |
| Collar depth | 1½–2 inches |
These are design targets rather than universal baby sizing measurements. Actual fit depends on the baby’s proportions and your crochet gauge.
Crochet Stitches and Abbreviations
This cardigan uses US crochet terminology.
| Abbreviation | Meaning |
|---|---|
| ch | Chain |
| sc | Single crochet |
| hdc | Half double crochet |
| dc | Double crochet |
| sl st | Slip stitch |
| BLO | Back loop only |
| inc | Increase |
| dec | Decrease |
| st(s) | Stitch or stitches |
| RS | Right side |
| WS | Wrong side |
You’ll also use simple shell stitches and scalloped edging to create the textured details.
How to Crochet a Baby Girl Cardigan
This cardigan can be made using a panel-based construction method.
You’ll crochet one back panel, two front panels, and two sleeves. After joining the pieces, you’ll add the lavender collar, decorative edging, buttons, pocket, and flowers.
Because the design can be adjusted for different baby sizes and yarn gauges, use your measurements to determine the exact stitch counts for the panels.
Step 1: Make a Crochet Gauge Swatch
Before starting the cardigan, crochet a small sample using raspberry-pink yarn.
Begin with a foundation chain and work several rows of half double crochet.
You can also create a second swatch using your favorite shell-stitch pattern to check how the textured fabric drapes.
Wash and dry the swatch according to the yarn label.
Measure the number of stitches and rows across a central 4-inch section.
Use these measurements to calculate the width and length of your cardigan panels.
The fabric should feel soft and flexible rather than stiff or overly loose.
For baby clothing, comfortable drape is just as important as neat stitch definition.
Step 2: Crochet the Raspberry-Pink Back Panel
Using raspberry-pink yarn, chain enough stitches to reach your chosen back-panel width.
For a 22-inch finished chest circumference, a back panel approximately 11 inches wide is a useful starting point.
Work rows of half double crochet or a textured shell-stitch pattern.
Continue until the panel reaches your planned body length, allowing space for the lower lavender border.
Keep the side edges straight and count your stitches regularly.
If you’re using shell stitches, complete each repeat consistently so the texture looks balanced across the panel.
Fasten off and set the finished back panel aside.
Step 3: Crochet the Two Front Panels
The front of the cardigan consists of two separate pieces.
Each front panel should measure approximately half the width of the back panel, allowing for the front edging and button overlap.
Use the same raspberry-pink yarn and stitch pattern.
Work both panels to the same length as the back.
For a rounded neckline, begin shaping the upper inside edges during the final section of each panel.
You can create the shaping with gradual decreases, following the measurements of a well-fitting baby cardigan.
Make sure the left and right panels are mirror images.
Lay all three body pieces flat to check their proportions before assembling them.
Step 4: Join the Shoulder Seams
Place the front panels over the back panel with the right sides facing.
Align the outer shoulder edges.
Using a yarn needle and matching pink yarn, sew the shoulder seams together.
Leave enough space in the center for a comfortable neckline.
The opening should be wide enough to fit over the baby’s head without stretching excessively.
The decorative lavender collar will be added later, so keep the neckline edges neat.
Step 5: Sew the Side Seams
Align the lower corners of the front and back panels.
Sew upward along both sides, stopping at your marked armhole openings.
Use small, even stitches and avoid pulling the yarn tightly.
Turn the cardigan right side out.
The body should now resemble a small sleeveless cardigan with a front opening.
Check the shape against your measurements before attaching the sleeves.
How to Crochet the Long Baby Cardigan Sleeves
The pictured cardigan features long pink sleeves with beautiful textured stitches and matching lilac cuffs.
Step 6: Crochet the First Sleeve
Using raspberry-pink yarn, make a foundation chain that matches your planned upper sleeve width.
Work rows of your chosen textured stitch pattern until the sleeve reaches the desired length.
For a slightly tapered sleeve, decrease gradually toward the wrist.
A relaxed baby sleeve should allow enough room for comfortable arm movement.
Avoid making the wrist opening too narrow.
The sleeve should remain flexible and easy to pull over a baby’s hand.
Step 7: Make the Second Sleeve
Repeat the same instructions to create a matching sleeve.
Check both sleeves for consistent length and width.
Fold each sleeve lengthwise with the right sides facing.
Sew the long edges together to create a tube.
Leave the upper opening unsewn for attachment to the cardigan.
Step 8: Attach the Sleeves
Turn the cardigan body inside out.
Position one sleeve inside its armhole.
Align the sleeve seam with the cardigan side seam.
Use stitch markers to distribute the sleeve edge evenly around the armhole opening.
Sew the sleeve securely in place.
Repeat for the second sleeve.
Turn the cardigan right side out and check that the sleeves hang naturally.
How to Crochet the Lavender Peter Pan Collar
The rounded lavender collar is one of the prettiest details of this design.
It creates a soft, vintage-inspired appearance that pairs beautifully with the bright pink body.
Step 9: Create the Collar Foundation
Using lavender yarn, attach your hook at the front neckline.
Work a row of single crochet stitches around the neckline, distributing them evenly.
Keep the stitches relaxed so the neckline remains comfortable.
The collar will be formed from two rounded sections that meet near the center front.
Mark the center back and the positions where the two collar sections will end.
Step 10: Shape the Rounded Collar
Work several rows of half double crochet along each collar section.
Increase gradually toward the outer edges to create a gently curved shape.
The collar should extend outward approximately 1½–2 inches.
For the rounded tips, work additional stitches near the outer corners.
Try the collar flat against the cardigan after each row.
The finished shape should resemble two softly rounded petals resting around the neckline.
Step 11: Add the Scalloped Collar Edging
Using lavender yarn, work a decorative scalloped border around the outer edge of each collar section.
A simple scallop can be made by working five double crochet stitches into one stitch, skipping the next stitch, and securing the shell with a slip stitch in the following stitch.
Adjust the spacing to suit your stitch count and the curve of the collar.
Keep the scallops small and evenly shaped.
Fasten off and weave in the yarn ends.
The finished collar should lie comfortably over the shoulders without curling tightly.
How to Crochet the Lavender Cuffs and Hem
The matching cuffs and lower border help connect the entire cardigan design.
Step 12: Add the Lavender Sleeve Cuffs
Attach lavender yarn to the lower edge of one sleeve.
Work a round of single crochet stitches around the wrist opening.
Continue with two or three rounds of half double crochet or single crochet.
For a lightly ribbed appearance, work through the back loops only.
Finish with a simple scalloped edge if desired.
Repeat on the second sleeve.
Keep the cuffs soft and comfortable rather than tightly fitted.
Step 13: Create the Scalloped Lower Hem
Attach lavender yarn to one lower front corner.
Work single crochet stitches evenly along the bottom of the cardigan.
On the next row, create a scalloped border using groups of double crochet stitches.
Distribute the scallops evenly so the edge looks balanced.
Avoid working too many stitches into one area, which can make the hem excessively ruffled.
The finished lavender border should frame the pink cardigan with a soft, decorative finish.
How to Make the Lavender Button Band
Step 14: Crochet the Front Edging
Using lavender yarn, work single crochet stitches along both front openings.
Continue for two or three rows to create sturdy button bands.
Keep the edges straight and avoid stretching the fabric.
The pictured cardigan has four lavender-colored buttons arranged vertically down the front.
Mark their positions before adding the buttonholes.
For each buttonhole, chain enough stitches to accommodate your chosen button and skip the corresponding number of stitches.
On the following row, work into the chain space to reinforce the opening.
Check the buttonhole size before fastening off.
Step 15: Make Matching Crochet-Covered Buttons
If you want the buttons to match the lavender edging, use small plain buttons as a base and cover them with crocheted fabric.
Crochet a small circle using lavender yarn and a hook suitable for the yarn weight.
Place the button inside and gather the crochet fabric around its back.
Secure the cover with small stitches.
Repeat for all four buttons.
Attach each finished button with strong sewing thread.
For baby garments, buttons require particular care because detached buttons present a choking hazard. Sew them firmly, check them before every use, and consider a button-free closure if making the cardigan for a very young baby.
How to Crochet the Small Orange Flowers
The orange flowers are cheerful decorative details that make this baby cardigan feel especially playful.
Step 16: Crochet the Flower Centers
Using golden-yellow yarn:
Round 1: Work 6 sc into a magic ring. Join with a slip stitch. (6)
Fasten off, leaving a short tail.
This creates the center of one small flower.
Step 17: Make the Orange Petals
Attach tangerine-orange yarn to any stitch of the yellow center.
For each petal:
- Chain 2.
- Work 2 dc into the same stitch.
- Chain 2.
- Slip stitch into the same stitch.
Repeat in each of the remaining five stitches to create six small petals.
Fasten off, leaving a yarn tail for sewing.
Gently spread the petals outward.
Make six or seven flowers, depending on how many you’d like to add to the cardigan.
Step 18: Sew the Flowers Onto the Cardigan
Lay the cardigan flat.
Arrange several flowers across the upper front panels, leaving enough space around the button band.
Position a flower near each shoulder and scatter smaller flowers across the upper chest.
Sew each appliqué securely through its center and around the petals.
Keep the attachment stitches hidden.
Avoid leaving loose petals that could be pulled or caught during wear.
How to Crochet the Lavender Patch Pocket
The small lavender pocket adds a charming finishing touch to the front of the cardigan.
Step 19: Crochet the Pocket
Using lavender yarn, chain enough stitches to create a pocket approximately 3 inches wide.
Work rows of single crochet or half double crochet until the piece measures approximately 3 inches tall.
For a softly rounded lower edge, decrease slightly at the lower corners during construction or add a rounded border afterward.
Fasten off, leaving a long yarn tail.
Work a row of single crochet along the upper edge to reinforce the pocket opening.
Step 20: Attach the Pocket
Position the pocket on the lower right front panel.
Check that it sits above the scalloped hem and doesn’t overlap the button band.
Using a yarn needle and matching lavender yarn, sew along the sides and bottom of the pocket.
Leave the upper edge open.
Attach one small orange flower to the front of the pocket.
If the cardigan is intended for a baby, secure the flower completely and avoid adding beads or other detachable decorations.
Three Tips for a Beautiful Crochet Baby Girl Cardigan
Choose Soft Yarn for Comfort
Baby clothing should feel gentle against the skin.
Choose smooth, washable yarn and avoid heavily textured or scratchy fibers.
A soft DK-weight yarn is a good choice for creating a lightweight cardigan with visible stitch definition.
Keep Decorative Details Lightweight
The collar, flowers, and pocket add personality, but they shouldn’t make the cardigan unnecessarily heavy.
Use small appliqués and secure them carefully.
Avoid bulky decorations around the neckline or sleeves.
Check the Fit During Assembly
Before completing the decorative borders, check the cardigan’s overall measurements.
Make sure the neckline is comfortable, the sleeves aren’t too tight, and the body allows room for layering.
Small adjustments are much easier before the final edging is added.
Three Creative Crochet Baby Cardigan Variations
Pastel Pink and White Baby Cardigan
Replace the raspberry-pink yarn with soft blush pink.
Use ivory yarn for the collar, cuffs, and hem.
Decorate the cardigan with tiny pale-yellow flowers for a gentle spring-inspired appearance.
Lavender and Peach Floral Cardigan
Use lavender yarn for the main body and cream yarn for the decorative borders.
Add peach-colored flowers with golden centers.
This combination creates a soft, colorful design suitable for birthdays and spring outfits.
Christmas Red Baby Girl Cardigan
Use deep Christmas-red yarn for the body and soft cream yarn for the collar and cuffs.
Replace the orange flowers with small golden stars.
The result is a festive cardigan that works beautifully for holiday photographs.
Frequently Asked Questions
Is this crochet baby girl cardigan suitable for beginners?
Confident beginners can make this cardigan if they’re comfortable with basic crochet stitches, measuring gauge, joining panels, and sewing pieces together. The scalloped collar and decorative flowers require extra patience but use familiar crochet techniques.
What yarn is best for a crochet baby cardigan?
Soft DK-weight cotton blends, machine-washable acrylic baby yarn, and other smooth baby-friendly yarns are practical options. Choose yarn that is comfortable, easy to clean, and suitable for the intended season.
How do I adjust the cardigan for a different baby size?
Start by measuring a well-fitting baby cardigan and making a gauge swatch. Adjust the number of foundation stitches to change the panel widths and the number of rows to change the lengths. Recalculate the sleeves and armholes together so they fit properly when assembled.
How should I wash a handmade baby crochet cardigan?
Follow the yarn manufacturer’s care instructions. Many machine-washable baby yarns can be cleaned on a gentle cycle using mild detergent. Place the cardigan in a mesh laundry bag to help protect the buttons and appliqués, and dry it according to the yarn label.
Can babies wear crochet cardigans while sleeping?
Crochet cardigans are best used as supervised daytime clothing. Remove the cardigan before placing a baby down to sleep, and use sleep clothing appropriate for the baby’s age and the room temperature.
Make a Colorful Crochet Baby Girl Cardigan
A crochet baby girl cardigan is a lovely handmade project that combines cozy clothing with cheerful colors and adorable decorative details.
The raspberry-pink body, scalloped lavender collar, matching cuffs, orange flower appliqués, and tiny patch pocket create a playful cardigan filled with personality.
You can customize the colors, adjust the size, simplify the decorations, or experiment with different textured stitches to make the design your own.
Whether you’re crocheting for a baby shower, birthday celebration, or a special handmade gift, this cardigan is a wonderful way to create something thoughtful and memorable.
Save this crochet baby girl cardigan idea to your Pinterest crochet board and enjoy making a colorful little sweater with beautiful handmade details.