Crochet Baby Dragon Amigurumi Pattern: A Tiny Pocket Companion
Introduction There’s something undeniably magical about a tiny crochet dragon. This amigurumi baby dragon fits right in the palm of your hand, with a...
Introduction
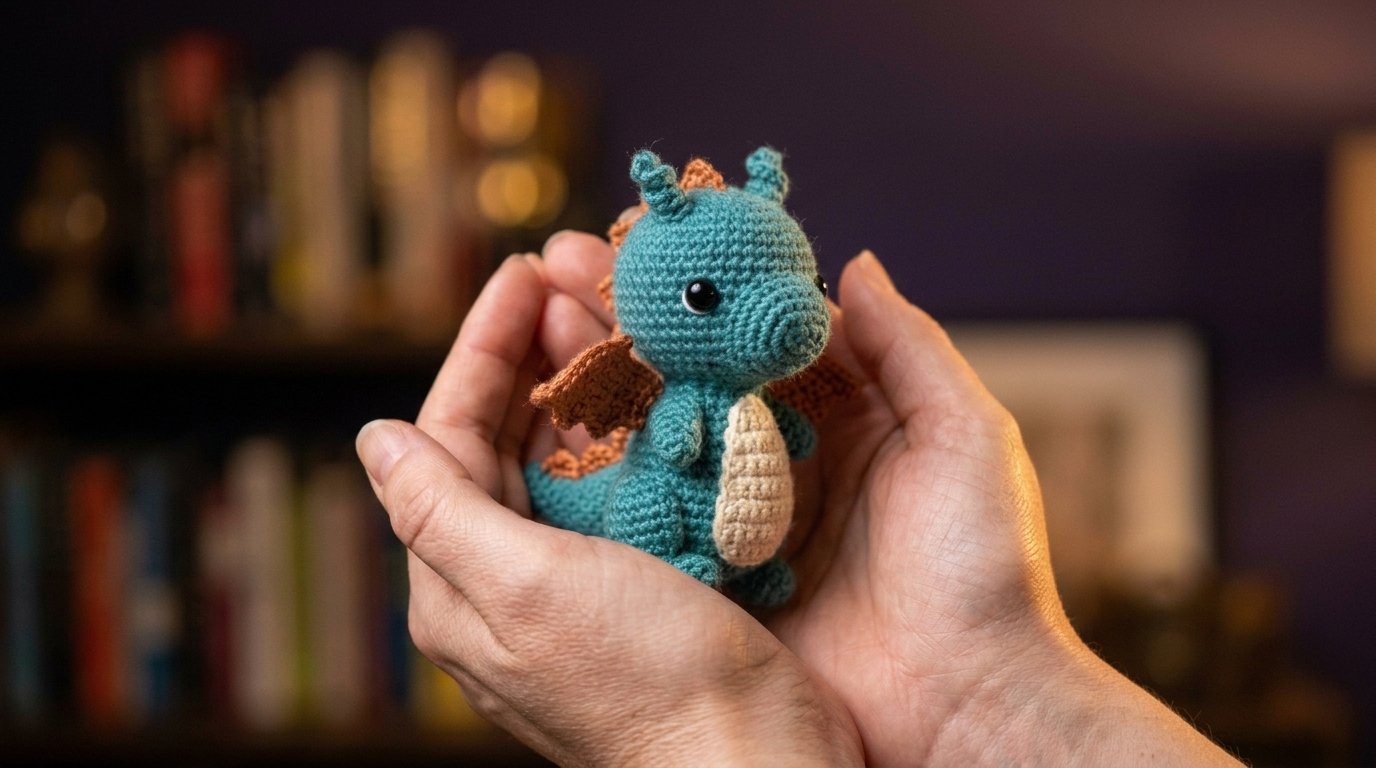
There’s something undeniably magical about a tiny crochet dragon. This amigurumi baby dragon fits right in the palm of your hand, with a teal body, a textured cream belly, and little rust-orange wings and spikes. The design is simple but full of character, and it makes a perfect desk companion, a thoughtful handmade gift, or a collectible for fantasy fans.
This is an intermediate amigurumi pattern. It uses basic single crochet in the round, but shaping the body and attaching the wings, spikes, and limbs takes a bit of patience and precision. The result is an adorable, sturdy little toy.
Why You’ll Love This Project
- Pocket-sized magic. The finished dragon is small enough to hold in one hand.
- Detailed but doable. The wings, spikes, and belly add character without requiring advanced techniques.
- A great gift. Perfect for fantasy lovers, children, or anyone who loves tiny handmade things.
- Customizable colors. Change the dragon’s colors to match any personality.
- Uses small amounts of yarn. A great stash-buster for leftover cotton.
Project Overview
- Project type: Amigurumi toy / fantasy creature
- Difficulty: Intermediate
- Estimated time: About 6–8 hours
- Suggested finished size: About 4 inches (10 cm) tall
- Yarn weight: Sport or DK (weight 2–3) cotton
- Crochet hook: 2.5 mm to 3.0 mm
- Main techniques: Magic ring, single crochet in the round, basic increases and decreases, simple shaping, attaching small appendages, placing safety eyes
- Construction: Head and body worked as one piece, with separate wings, spikes, arms, and legs sewn on
- Terminology: US crochet terms
Sizes and times are estimates and will vary with your yarn, hook, and tension.
Materials and Supplies Needed
- Sport or DK-weight cotton yarn in:
- Color A — teal for the body: about 50–60 yards
- Color B — cream for the belly: about 10–15 yards
- Color C — rust orange for the wings and spikes: about 15–20 yards
- 2.5 mm to 3.0 mm crochet hook
- Stitch marker
- Yarn needle
- Scissors
- Polyester fiberfill
- Two 6mm black safety eyes
Choosing the Right Yarn and Hook
Cotton yarn is the best choice for amigurumi because it holds the shape of the stitches, doesn’t stretch out over time, and gives the toy a clean, defined look. A cotton-acrylic blend also works but may be softer.
Use a 2.5 mm to 3.0 mm hook with sport or DK yarn. The hook should be slightly smaller than the yarn label recommends, creating a dense fabric so the stuffing doesn’t show through. If the fabric feels too loose, go down a hook size.
There is no strict gauge, but the finished dragon should measure roughly 4 inches tall. If your tension is tight, the dragon will be smaller; if loose, larger. Work consistently so the pieces match.
Crochet Stitches and Abbreviations
- ch — chain
- sl st — slip stitch
- sc — single crochet
- sc2tog — single crochet two stitches together (decrease)
- inc — increase (two single crochet in the same stitch)
- st — stitch
- sts — stitches
- rnd — round
Before You Start
Work in continuous rounds. Use a stitch marker to mark the first stitch of each round. Do not join rounds unless instructed, as this creates a seamless fabric.
Attach safety eyes before closing the head. Safety eyes must be inserted through the crochet fabric from the outside, with the washer secured on the inside. Do this before stuffing and closing the head completely.
Keep pieces separate until assembly. Work the head, body, wings, spikes, arms, and legs separately. It’s easier to shape and stuff the main body before attaching the smaller pieces.
Use firm, even tension. The fabric must be dense enough to hold stuffing and maintain the dragon’s shape.
Step-by-Step Crochet Instructions
Head and Body (Color A)
Round 1: Make a magic ring. Work 6 sc into the ring. (6 sts)
Round 2: Work 1 inc in each st around. (12 sts)
Round 3: Sc in next st, inc in next st. Repeat around. (18 sts)
Round 4: Sc in next 2 sts, inc in next st. Repeat around. (24 sts)
Rounds 5–8: Sc in each st around. (24 sts)
Round 9: Sc in next 2 sts, sc2tog. Repeat around. (18 sts)
Round 10: Sc in next st, sc2tog. Repeat around. (12 sts)
Round 11: Sc in each st around. (12 sts)
Round 12: Sc in next st, inc in next st. Repeat around. (18 sts)
Round 13: Sc in next 2 sts, inc in next st. Repeat around. (24 sts)
Rounds 14–18: Sc in each st around. (24 sts)
Round 19: Sc in next 2 sts, sc2tog. Repeat around. (18 sts)
Round 20: Sc in next st, sc2tog. Repeat around. (12 sts)
Round 21: Sc2tog around. (6 sts)
Fasten off. Stuff the body and head firmly with fiberfill, and insert the safety eyes into the head before closing completely. Whipstitch the opening closed.
Belly (Color B)
Worked as a small oval piece sewn onto the front of the body.
Round 1: Ch 5. Sc in the second ch from the hook and in each ch across. (4 sts)
Round 2: Ch 1, turn. Work 1 inc in the first st, sc in the next 2 sts, inc in the last st. (6 sts)
Round 3: Ch 1, turn. Sc in each st across. (6 sts)
Fasten off. Sew the belly to the front of the body with the yarn tail.
Wings (make 2, Color C)
Worked in rows, forming a small triangle.
Row 1: Ch 6. Sc in the second ch from the hook and in each ch across. (5 sts)
Row 2: Ch 1, turn. Sc in each st across. (5 sts)
Row 3: Ch 1, turn. Sc in the first 2 sts, sc2tog, sc in the last st. (4 sts)
Row 4: Ch 1, turn. Sc in each st across. Fasten off.
Sew the wings to the back of the body, just below the neck.
Spikes (make 5–7, Color C)
Worked as small triangles.
Row 1: Ch 3. Sc in the second ch from the hook and in the last ch. (2 sts)
Row 2: Ch 1, turn. Sc in each st across. (2 sts) Fasten off.
Sew the spikes along the top of the head and down the back.
Arms (make 2, Color A)
Round 1: Make a magic ring. Work 6 sc into the ring. (6 sts)
Rounds 2–4: Sc in each st around. (6 sts)
Fasten off, leaving a tail. Lightly stuff the arms and sew them to the sides of the body.
Legs (make 2, Color A)
Round 1: Make a magic ring. Work 6 sc into the ring. (6 sts)
Rounds 2–4: Sc in each st around. (6 sts)
Fasten off, leaving a tail. Lightly stuff the legs and sew them to the bottom of the body.
Assembly and Finishing
Insert safety eyes into the head. Sew the belly to the front of the body. Sew the arms and legs to the sides and bottom of the body. Sew the wings to the back. Sew the spikes along the head and back.
Weave in all ends. Shape the dragon gently with your fingers to even out the stuffing. Add a small smile with black embroidery thread if desired.
Size Adjustments
- Larger dragon: Use worsted-weight yarn and a 3.5 mm hook, following the same rounds.
- Smaller dragon: Use fingering-weight yarn and a 2.0 mm hook.
- Different colors: Change the body and wing colors to create a custom dragon.
Tips for Best Results
- Stuff firmly but evenly. Overstuffing can stretch the stitches; understuffing makes the dragon floppy.
- Attach appendages securely. Use a double strand or extra stitches when attaching the wings, arms, and legs.
- Place eyes carefully. Safety eyes should be inserted before closing the head.
- Keep tension consistent. Uneven tension makes the dragon look lumpy.
- Weave in ends as you go. This keeps the inside of the toy neat and prevents loose ends from showing.
Common Mistakes and Troubleshooting
The stuffing shows through. The fabric is too loose. Use a smaller hook or tighter tension.
The head is too small. Check that the increase rounds were worked correctly.
The limbs are uneven. Measure the arms and legs against each other before sewing them on.
The eyes fall out. Safety eyes need washers secured firmly on the inside of the head.
The spikes are crooked. Pin them in place before sewing to check the alignment.
Creative Variations
- Ice dragon. Use pale blue and white yarn.
- Fire dragon. Use red and orange yarn.
- Forest dragon. Use green and brown yarn.
- Tiny keychain dragon. Add a small loop at the top of the head and attach a keychain ring.
- Custom wings. Use a different color for the wings to make them stand out.
How to Use or Style Your Crochet Project
This baby dragon is a perfect desk companion, a small gift, or a collectible. Keep it away from small children if it has safety eyes, and supervise pets that chew on yarn. It’s also a lovely decorative piece for a bookshelf or bedside table.
Care and Maintenance
Spot-clean with a damp cloth and mild soap. Do not machine wash or tumble dry, as this can distort the stuffing and the safety eyes. Air-dry fully. Store in a dust bag or a small box to protect the shape. Always follow the yarn label’s care instructions.
Frequently Asked Questions
Can a beginner make this dragon?
It’s best treated as intermediate. Beginners who are comfortable with single crochet and basic shaping can try it, but attaching the pieces requires some experience.
How much yarn does the dragon use?
About 75–95 yards total across all colors.
What size safety eyes should I use?
6mm safety eyes work well for this size of dragon.
Can I use acrylic yarn?
Yes, though cotton gives a cleaner, firmer finish.
How do I attach the wings securely?
Sew them with a double strand of yarn and make several passes through the base of the wing.
Can I make a larger version?
Yes. Use worsted yarn and a larger hook, following the same rounds.
Is this safe for young children?
Safety eyes are generally secure when properly attached, but small toys can still be a choking hazard. Keep them away from children under 3.
Conclusion
This crochet baby dragon is a tiny, magical project with a lot of personality. The teal body, cream belly, and rust-orange wings and spikes come together into a sturdy, pocket-sized companion. Whether you make it for yourself or as a gift, it’s a project that brings a little bit of fantasy into everyday life.
Related Crochet Projects
If you enjoy this amigurumi, you might also like a crochet baby unicorn, a mini crochet dinosaur, a crochet owl in a tiny pocket size, or a crochet fox.