Crochet Baby Deer Amigurumi – Free Woodland Fawn Pattern with Daisy Flower Crown
Bring a little woodland magic into your crochet collection with this adorable crochet baby deer amigurumi pattern. Featuring warm caramel-brown fur, oversized ears, a...
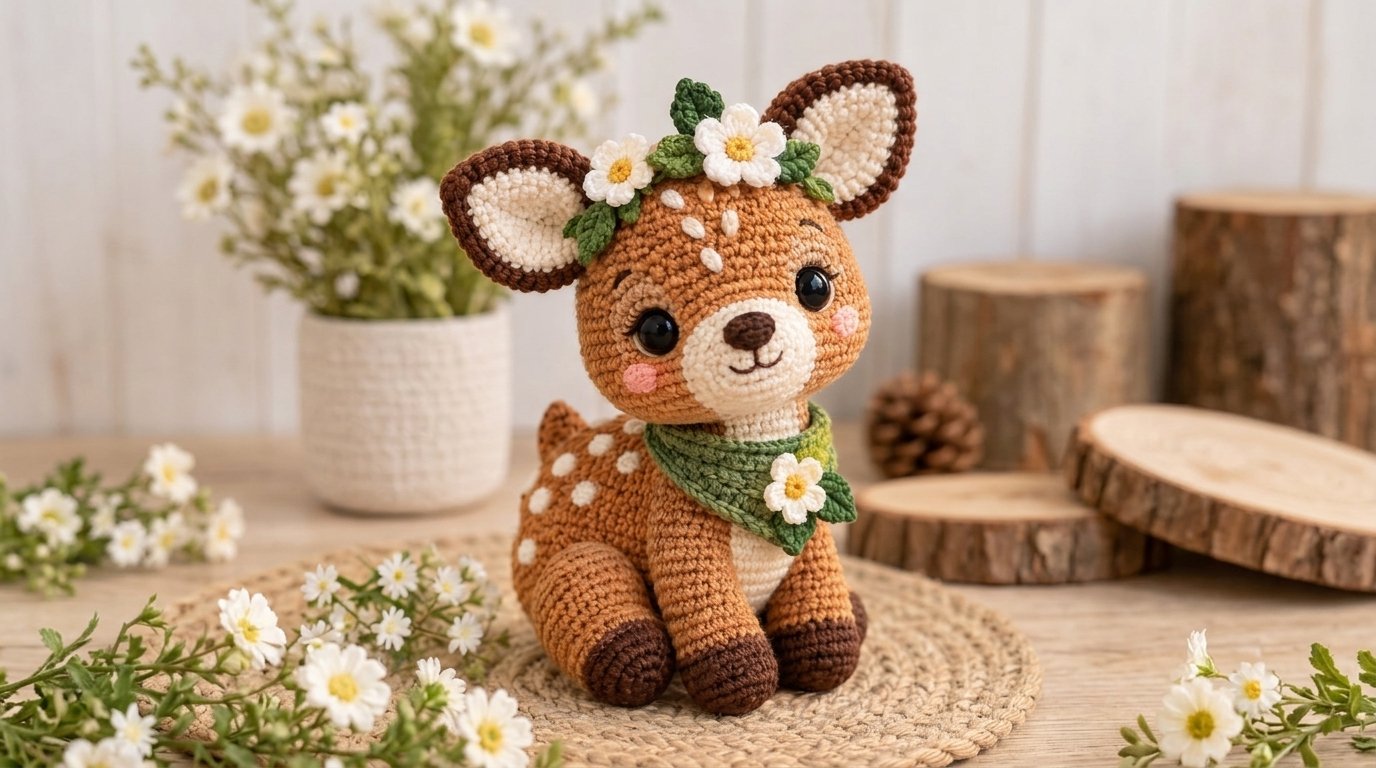
Bring a little woodland magic into your crochet collection with this adorable crochet baby deer amigurumi pattern. Featuring warm caramel-brown fur, oversized ears, a sweet cream-colored muzzle, tiny white spots, and a beautiful daisy flower crown, this charming little fawn is full of handmade character.
The design combines a soft, rounded body with a generously sized head, expressive dark eyes, rosy cheeks, and small chocolate-brown hooves. A leafy green scarf decorated with a miniature daisy adds a delightful finishing touch.
Inspired by peaceful woodland scenes and springtime wildflowers, this crochet deer makes a lovely decorative project for animal lovers, amigurumi collectors, and anyone who enjoys creating cute handmade characters.
The fawn is designed in a seated position, with its front legs resting forward and its rounded back legs supporting the body. Its large ears, delicate embroidered spots, and floral accessories give it an especially gentle appearance.
In this free crochet deer pattern, you’ll learn how to make the head, body, legs, ears, muzzle, flower crown, and scarf before assembling everything into one adorable woodland animal.
Why You’ll Love This Crochet Baby Deer
This woodland fawn combines classic amigurumi techniques with small decorative details that make the finished character special.
- Adorable woodland design: The oversized ears, rounded face, and tiny white spots create a recognizable baby deer appearance.
- Beautiful floral accessories: White daisies with yellow centers and green leaves bring a fresh botanical touch.
- Soft, natural color palette: Caramel brown, ivory, chocolate brown, blush pink, and olive green work beautifully together.
- Excellent crochet practice: Learn to shape amigurumi pieces using increases and decreases.
- Customizable details: Change the flower colors, scarf design, or facial expression.
- Thoughtful handmade gift: The finished deer makes a charming decorative present for woodland-animal enthusiasts.
- Flexible construction: The head, body, legs, ears, and accessories are made separately, allowing you to complete the project in smaller sessions.
The pattern is particularly enjoyable if you already know basic amigurumi techniques and want to explore more detailed animal designs.
Project Overview
Here are the basic details for this crochet baby deer project.
| Project Detail | Description |
|---|---|
| Project type | Amigurumi woodland animal |
| Skill level | Intermediate |
| Crochet terminology | US terms |
| Yarn weight | DK / Light Weight #3 |
| Recommended hook | 3 mm |
| Construction | Continuous rounds and sewn components |
| Main technique | Single crochet amigurumi |
| Estimated finished height | 7–9 inches |
| Estimated working time | 10–14 hours |
| Main accessories | Daisy crown and green scarf |
The finished measurements and working time are estimates.
This is an original, untested pattern interpretation of the pictured crochet deer. Your finished toy may vary depending on yarn choice, tension, stuffing, and assembly.
The pattern uses a relatively large head, rounded body, short legs, and oversized ears to capture the fawn’s cute proportions.
Materials and Supplies Needed
Gather your yarn, tools, and accessories before beginning.
Yarn Colors
Choose DK-weight cotton or a soft cotton-blend yarn.
Color A – Caramel Brown
Used for the head, body, outer ears, and most of the legs.
Color B – Cream or Ivory
Used for the muzzle, belly, inner ears, and decorative spots.
Color C – Chocolate Brown
Used for the hooves, ear edging, and embroidered nose.
Color D – Olive Green
Used for the scarf and decorative leaves.
Color E – White
Used for the daisy petals.
Color F – Golden Yellow
Used for the daisy centers.
Color G – Soft Pink
Used for the rosy cheeks.
Estimated Yarn Quantities
- Caramel brown: 150–220 yards
- Cream: 40–70 yards
- Chocolate brown: 25–40 yards
- Olive green: 30–50 yards
- White: 15–25 yards
- Yellow and pink: Small leftover amounts
These are approximate planning quantities rather than measured requirements.
Crochet Tools
- 3 mm crochet hook
- 2.5 mm crochet hook for smaller decorative pieces
- Yarn needle
- Scissors
- Stitch markers
- Polyester fiberfill
- Measuring tape
- Two black safety eyes, approximately 10–12 mm, for a decorative display piece
- Black embroidery thread
Important safety note: Plastic safety eyes and decorative attachments can become choking hazards. For a toy intended for a baby or child under three, embroider the eyes and facial features instead, omit small detachable decorations, and ensure every component is securely attached.
Choosing the Right Yarn and Crochet Hook
Yarn selection plays an important role in the appearance of amigurumi animals.
For this crochet deer, smooth cotton yarn is an excellent option because it creates clear stitches and maintains the shape of the head, body, and ears.
A cotton-acrylic blend can also work well if you prefer a softer texture.
For the sample design, DK-weight yarn provides a good balance between manageable stitches and delicate details.
Recommended hook size: Start with a 3 mm crochet hook for the main amigurumi pieces.
Amigurumi is usually crocheted with a smaller hook than the yarn label recommends. This creates a tight fabric that helps prevent stuffing from showing through.
If your stitches appear loose, try a slightly smaller hook.
If the fabric becomes too stiff or difficult to work, use a slightly larger hook.
For the tiny daisies and leaves, a 2.5 mm hook may provide more defined shapes.
Try to use yarn of similar thickness for the main deer components so the proportions remain consistent.
Crochet Stitches and Abbreviations
This pattern uses standard US crochet terms.
| Abbreviation | Meaning |
|---|---|
| MR | Magic ring |
| ch | Chain |
| sc | Single crochet |
| hdc | Half double crochet |
| dc | Double crochet |
| sl st | Slip stitch |
| inc | Increase: 2 sc in one stitch |
| dec | Invisible single crochet decrease |
| BLO | Back loop only |
| st(s) | Stitch(es) |
| rnd | Round |
| rep | Repeat |
| FO | Fasten off |
How to Make an Invisible Decrease
Insert your hook under the front loop of the next stitch.
Without yarning over, insert the hook under the front loop of the following stitch.
Yarn over and pull through both front loops.
Yarn over again and pull through the remaining two loops.
This technique creates a neater decrease and is especially useful for amigurumi.
Before You Start
Most of the deer is worked in continuous spiral rounds.
Do not join the rounds unless the instructions specifically tell you to.
Place a stitch marker in the first stitch of every round and move it upward as you work.
Count your stitches regularly, especially after increase and decrease rounds.
Stuffing advice: Add small amounts of fiberfill gradually instead of inserting one large piece. This helps produce a smooth shape without visible lumps.
The head should be firmly stuffed, while the legs can be filled a little more lightly.
Leave long yarn tails on pieces that will be sewn to the body.
Before starting, review the full instructions so you understand how the head, body, and decorative accessories will connect.
Step-by-Step Crochet Baby Deer Amigurumi Pattern
The deer is made from separate crocheted components that are assembled at the end.
Begin with the head, which is the most prominent feature of the design.
Step 1: Crochet the Baby Deer’s Head
Using caramel-brown yarn and a 3 mm hook:
Round 1: Make a magic ring and work 6 sc into it. (6 sts)
Round 2: Inc in every stitch around. (12 sts)
Round 3: 1 sc, inc repeat 6 times. (18 sts)
Round 4: 2 sc, inc repeat 6 times. (24 sts)
Round 5: 3 sc, inc repeat 6 times. (30 sts)
Round 6: 4 sc, inc repeat 6 times. (36 sts)
Round 7: 5 sc, inc repeat 6 times. (42 sts)
Round 8: 6 sc, inc repeat 6 times. (48 sts)
Round 9: 7 sc, inc repeat 6 times. (54 sts)
Round 10: 8 sc, inc repeat 6 times. (60 sts)
Rounds 11–20: Sc in every stitch around. (60 sts)
The head should now resemble a large rounded bowl.
Position the Eyes
If you’re making a decorative piece with safety eyes, position them between Rounds 14 and 15, approximately 11–12 stitches apart.
Check that the eyes are symmetrical before securing the backs.
For a child-safe version, embroider the eyes after the head is completed.
Continue Shaping the Head
Round 21: 8 sc, dec repeat 6 times. (54 sts)
Round 22: 7 sc, dec repeat 6 times. (48 sts)
Round 23: 6 sc, dec repeat 6 times. (42 sts)
Round 24: 5 sc, dec repeat 6 times. (36 sts)
Round 25: 4 sc, dec repeat 6 times. (30 sts)
Begin stuffing the head firmly.
Round 26: 3 sc, dec repeat 6 times. (24 sts)
Round 27: 2 sc, dec repeat 6 times. (18 sts)
Round 28: 1 sc, dec repeat 6 times. (12 sts)
Round 29: Dec around. (6 sts)
Finish stuffing.
FO and use a yarn needle to close the remaining opening.
The head should be round and slightly oversized compared with the body.
Step 2: Crochet the Cream Muzzle
Using cream yarn, ch 7.
Round 1: Sc in the second chain from the hook, sc in the next 4 chains, and work 3 sc into the final chain.
Continue along the opposite side of the foundation chain.
Sc in the next 4 available chain loops, then work 2 additional sc into the first foundation-chain position. (14 sts)
Round 2: Inc, 4 sc, inc in each of the next 3 stitches, 4 sc, inc in each of the last 2 stitches. (20 sts)
Rounds 3–4: Sc around. (20 sts)
FO, leaving a long sewing tail.
Add a small amount of stuffing and position the muzzle beneath the eyes.
Sew it securely to the lower front of the head.
Step 3: Embroider the Nose and Mouth
Using chocolate-brown yarn or embroidery thread, stitch a small rounded triangular nose near the upper center of the cream muzzle.
Create a short vertical stitch beneath the nose.
From the bottom of that stitch, embroider two short curved lines to form a gentle smile.
Keep the stitches neat and symmetrical.
The embroidered mouth gives the little deer its sweet expression.
Step 4: Crochet the Pink Cheeks
Using soft-pink yarn, make a magic ring.
Work 6 sc into the ring.
Join with a slip stitch and fasten off.
Make two small pink circles.
Position one beneath the outer edge of each eye.
Sew the circles securely to the head.
For a flatter finish, you can embroider a few pink stitches directly onto the face instead.
Step 5: Crochet the Deer’s Body
Using caramel-brown yarn:
Round 1: MR, 6 sc. (6 sts)
Round 2: Inc around. (12 sts)
Round 3: 1 sc, inc repeat 6 times. (18 sts)
Round 4: 2 sc, inc repeat 6 times. (24 sts)
Round 5: 3 sc, inc repeat 6 times. (30 sts)
Round 6: 4 sc, inc repeat 6 times. (36 sts)
Round 7: 5 sc, inc repeat 6 times. (42 sts)
Round 8: 6 sc, inc repeat 6 times. (48 sts)
Rounds 9–13: Sc around. (48 sts)
Round 14: 6 sc, dec repeat 6 times. (42 sts)
Rounds 15–16: Sc around. (42 sts)
Round 17: 5 sc, dec repeat 6 times. (36 sts)
Rounds 18–19: Sc around. (36 sts)
Round 20: 4 sc, dec repeat 6 times. (30 sts)
Rounds 21–22: Sc around. (30 sts)
Round 23: 3 sc, dec repeat 6 times. (24 sts)
Round 24: Sc around. (24 sts)
FO, leaving a long sewing tail.
Stuff the body firmly, especially around the lower half.
Leave the upper opening unclosed so the body can be attached beneath the head.
Step 6: Make the Cream Belly Patch
Using cream yarn, ch 11.
Round 1: Starting in the second chain from the hook, sc in that chain and the next 8 chains.
Work 3 sc in the last chain.
Continue around the opposite side, sc in the next 8 chain loops, then work 2 additional sc into the first foundation-chain position. (22 sts)
Round 2: Inc, 8 sc, inc in each of the next 3 stitches, 8 sc, inc in each of the final 2 stitches. (28 sts)
Round 3: Sc around. (28 sts)
FO, leaving a sewing tail.
Position the patch vertically on the front of the body.
Sew it flat, allowing the upper edge to sit near the neck.
Step 7: Crochet the Front Legs
Make two identical front legs.
Begin with chocolate-brown yarn.
Round 1: MR, 6 sc. (6 sts)
Round 2: Inc around. (12 sts)
Rounds 3–5: Sc around. (12 sts)
Change to caramel brown.
Rounds 6–15: Sc around. (12 sts)
Round 16: 1 sc, dec repeat 4 times. (8 sts)
Rounds 17–18: Sc around. (8 sts)
Stuff the lower portion of each leg firmly and the upper portion lightly.
Flatten the opening and work 4 sc through both layers to close it.
FO, leaving a long sewing tail.
Make the second front leg in the same way.
The dark-brown sections form the small hooves.
Step 8: Crochet the Rounded Back Legs
The back legs are wider than the front legs to help create the deer’s seated appearance.
Make two.
Using chocolate-brown yarn:
Round 1: MR, 6 sc. (6 sts)
Round 2: Inc around. (12 sts)
Round 3: 1 sc, inc repeat 6 times. (18 sts)
Round 4: 2 sc, inc repeat 6 times. (24 sts)
Round 5: Sc around. (24 sts)
Change to caramel brown.
Rounds 6–11: Sc around. (24 sts)
Round 12: 2 sc, dec repeat 6 times. (18 sts)
Round 13: Sc around. (18 sts)
Round 14: 1 sc, dec repeat 6 times. (12 sts)
Round 15: Sc around. (12 sts)
Stuff firmly enough to create rounded haunches.
Flatten the opening and sc through both layers to close it using 6 sc.
FO, leaving a long sewing tail.
These larger legs will sit on either side of the body.
Step 9: Crochet the Oversized Ears
The large ears are one of the most recognizable features of this woodland fawn.
Make two caramel-brown outer ears and two smaller cream inner-ear pieces.
Outer Ear
Using caramel-brown yarn, ch 2.
Row 1: Work 2 sc into the second chain from the hook. (2 sts)
Row 2: Ch 1, turn, inc in each stitch. (4 sts)
Row 3: Ch 1, turn, sc across. (4 sts)
Row 4: Ch 1, turn, sc, inc, inc, sc. (6 sts)
Row 5: Sc across. (6 sts)
Row 6: Sc, inc, 2 sc, inc, sc. (8 sts)
Rows 7–9: Sc across. (8 sts)
Row 10: Sc, dec, 2 sc, dec, sc. (6 sts)
Row 11: Sc across. (6 sts)
Row 12: Sc, dec, dec, sc. (4 sts)
Row 13: Dec twice. (2 sts)
FO, leaving a long sewing tail.
Make two.
For a dark outline similar to the reference design, work a neat round of chocolate-brown single crochet around the outer edges before attaching the inner sections.
Cream Inner Ear
Using cream yarn, ch 2.
Follow the same shaping method:
- Row 1: 2 sc
- Row 2: Inc twice (4 sts)
- Row 3: Sc across (4 sts)
- Row 4: Sc, inc, inc, sc (6 sts)
- Rows 5–8: Sc across (6 sts)
- Row 9: Sc, dec, dec, sc (4 sts)
- Row 10: Sc across (4 sts)
FO and make two.
Sew each cream piece to the center of an outer ear, leaving the brown border visible.
Gently pinch the bottom of each ear to create a natural cupped shape.
Step 10: Create the White Deer Spots
The little cream spots are essential for the baby deer’s appearance.
Using cream yarn and a yarn needle, embroider small oval or teardrop-shaped spots on the head and back.
For the forehead, make approximately five small spots between and above the eyes.
For the upper body and back, add another eight to twelve spots.
Use several short satin stitches for each spot.
Avoid making every marking exactly the same size.
A slightly irregular arrangement creates a more natural woodland appearance.
Keep most of the body spots on the upper back and sides so they remain visible when the deer is sitting.
Step 11: Crochet the Green Scarf
The soft green scarf adds color and makes the little deer especially charming.
Using olive-green yarn and a 3 mm hook:
Foundation: Ch 8.
Row 1: Sc in the second chain from the hook and across. (7 sts)
Row 2: Ch 1, turn, sc across. (7 sts)
Repeat Row 2 until the scarf measures approximately 15–18 inches long, or enough to wrap comfortably around the deer’s neck.
FO and weave in the ends.
Wrap the scarf gently around the neck with the ends overlapping toward the front.
Secure it with a few hidden stitches so it stays in place.
Step 12: Crochet the White Daisy Flowers
The flower crown is a lovely finishing detail.
Make two larger daisies for the head and one smaller daisy for the scarf.
Using white yarn and a 2.5 mm hook:
Round 1: MR, 6 sc. Join with a sl st. (6 sts)
Round 2: In each stitch, work:
Sl st, ch 2, 2 dc, ch 2, sl st.
Repeat in all six stitches to create six petals.
FO, leaving a sewing tail.
For larger flowers, use a slightly larger hook or increase the petal height by replacing the double crochet stitches with treble crochet stitches.
Yellow Daisy Centers
Using yellow yarn:
MR, 6 sc.
Join with a slip stitch and fasten off.
Make one yellow center for each flower.
Sew the yellow centers over the middle of the white petals.
Step 13: Crochet the Green Leaves
Using olive-green yarn and a 2.5 mm hook, ch 7.
Starting in the second chain from the hook, work:
1 sc, 1 hdc, 2 dc, 1 hdc, 1 sc.
FO, leaving a sewing tail.
This creates a small, elongated leaf.
Make approximately four to six leaves for the flower crown.
You can make some leaves smaller by reducing the foundation chain and using fewer double crochet stitches.
Step 14: Assemble the Daisy Flower Crown
Lay the two larger daisies on a flat surface.
Position the green leaves around their bases.
Arrange the flowers so they overlap slightly, creating a small woodland flower crown.
Sew the components together using matching yarn.
Place the floral arrangement between the deer’s ears, slightly toward the front of the head.
Secure it with several stitches through the flower centers and leaf bases.
Make sure the ears remain visible on either side.
Attach the smaller daisy to the green scarf near the front of the neck.
Step 15: Make the Small Tail
Using caramel-brown yarn:
Round 1: MR, 6 sc. (6 sts)
Round 2: Inc around. (12 sts)
Rounds 3–4: Sc around. (12 sts)
Round 5: Dec around. (6 sts)
Add a small amount of stuffing.
FO, leaving a sewing tail.
Sew the tail to the lower back of the body, keeping it small and rounded.
Assembly and Finishing
Now that all the components are complete, it’s time to assemble your woodland fawn.
Begin by placing the head above the body.
Use stitch markers to establish the front and back of the deer.
Position the body so the cream belly faces forward.
Sew the open 24-stitch neck edge securely to the underside of the head, using small, evenly spaced stitches.
Add a little extra stuffing at the neck if necessary to support the head.
Next, attach the front legs on either side of the cream belly patch.
Position them so they angle slightly forward.
Sew the rounded back legs to the lower sides of the body, allowing their hoof ends to extend toward the front.
Attach the ears to the upper sides of the head, approximately around Rounds 8–10, adjusting their placement to achieve a balanced expression.
Finally, add the embroidered spots, tail, daisy crown, and green scarf if you haven’t already attached them.
Check the entire deer for loose stitches and weave in all remaining yarn ends.
Your crochet baby deer should now have a sweet seated silhouette with oversized ears and decorative woodland details.
Tips for the Best Results
A few simple techniques can make your finished amigurumi look neater and more polished.
Use tight, even stitches. Amigurumi fabric should be dense enough that the stuffing doesn’t show through.
Stuff the head gradually. Distribute fiberfill evenly to maintain a smooth rounded shape.
Position facial details carefully. Small adjustments to the eyes and muzzle can change the entire expression.
Keep the ears symmetrical. Pin both ears in place before sewing them permanently.
Avoid overstuffing the legs. Slightly softer upper legs make the seated position easier to achieve.
Plan the flower placement. Arrange the daisies and leaves before attaching them to the head.
Secure decorative elements. Check that flowers, leaves, and the scarf are sewn firmly in place.
Common Mistakes and Troubleshooting
Why Is My Deer Head Too Large?
The design intentionally features an oversized head for a cute amigurumi appearance.
However, if the head seems disproportionately large, check that you used the same yarn weight and hook size for the head and body.
Why Is Stuffing Showing Through?
Your stitches may be too loose.
Try using a smaller hook and distribute the stuffing more evenly.
Why Won’t My Deer Sit Upright?
The legs may be attached too high or the head may be pulling the body forward.
Adjust the rear-leg placement and make sure the bottom of the body forms a stable base.
Why Are My Ears Curling?
The tension may be too tight, or the inner-ear pieces may be pulling against the outer ears.
Gently shape the ears and avoid overtightening the sewing stitches.
Why Does the Flower Crown Look Uneven?
The flowers or leaves may be attached at different angles.
Arrange them with stitch markers before sewing and adjust their positions gradually.
Creative Variations and Customization Ideas
This crochet baby deer pattern is easy to customize.
Classic Woodland Deer
Omit the flower crown and scarf for a simple, realistic woodland fawn.
Pink Floral Deer
Replace the white daisies with blush-pink flowers and make the scarf in soft cream.
Autumn Baby Deer
Use rust-orange flowers, mustard-yellow leaves, and a warm brown scarf.
Winter Woodland Fawn
Make a cream-colored scarf and add a few embroidered snowflake details instead of flowers.
Mini Crochet Deer
Use fingering-weight yarn and a smaller hook to create a miniature version of the same design.
Personalized Gift
Choose the recipient’s favorite colors for the flower crown and scarf.
When adjusting yarn weight or hook size, remember that the finished toy dimensions will change.
How to Use or Display Your Crochet Deer
This sweet woodland fawn makes a beautiful decorative addition to a handmade crochet collection.
Display it on a bookshelf beside other amigurumi animals or place it on a nursery shelf out of reach of young children.
The soft caramel and cream colors complement natural wood, woven baskets, and neutral home decorations.
The daisy flower crown makes the deer particularly suitable for spring-themed displays and woodland-inspired gift collections.
You can also pair it with crochet rabbits, foxes, mushrooms, and other forest animals to create a coordinated decorative scene.
For gifting, consider wrapping the finished deer in a simple kraft-paper box with tissue paper.
If the deer is intended as a toy rather than a display piece, use child-appropriate materials and construction, including embroidered facial features instead of plastic eyes or beads.
Care and Maintenance Instructions
Proper care helps preserve the deer’s shape and delicate accessories.
Always follow the washing instructions for your chosen yarn.
For a stuffed amigurumi with attached flowers and a scarf, gentle spot cleaning is often preferable.
Use a soft damp cloth with a small amount of mild detergent to clean any marked areas.
Avoid rubbing the embroidered details or pulling on the flower crown.
If washing the entire toy is appropriate for all its materials, gently remove excess water using a towel.
Do not wring or twist the stuffed figure.
Allow it to air-dry thoroughly in a well-ventilated area.
Reshape the ears, legs, and flowers as needed.
Store your finished deer in a clean, dry location away from prolonged direct sunlight.
Frequently Asked Questions
Is This Crochet Baby Deer Pattern Beginner-Friendly?
The pattern is best suited to intermediate crocheters or confident beginners who have experience with amigurumi. The basic stitches are simple, but assembling the ears, facial features, and accessories requires patience.
What Yarn Is Best for Crochet Deer Amigurumi?
DK-weight cotton or cotton-blend yarn is a good choice because it provides clear stitch definition and helps the toy maintain its shape.
How Big Will the Finished Deer Be?
With the recommended DK yarn and 3 mm hook, the finished deer may measure approximately 7–9 inches tall, depending on your tension and assembly.
Can I Use Plush Yarn Instead?
Yes, but plush yarn will create a larger, softer toy and may make the smaller facial details more difficult to crochet.
Can I Make the Deer Without Safety Eyes?
Absolutely. Embroidered eyes are a suitable alternative and are preferable for projects intended for young children.
How Do I Make the Deer Sit Properly?
Position the back legs low on the body, angle the front legs forward, and ensure the body is evenly stuffed.
Can I Remove the Flower Crown?
Yes. The daisy crown and scarf are optional decorations. The deer will still have a cute woodland appearance without them.
Can I Make More Than One Deer Using Different Colors?
Yes. Try light beige, reddish brown, or soft gray-brown yarn to create a small woodland deer family.
Conclusion
This crochet baby deer amigurumi pattern is a charming way to combine classic amigurumi shaping with delicate woodland-inspired details.
From the oversized ears and sweet embroidered expression to the soft cream spots and daisy flower crown, every part of the design adds to the little fawn’s personality.
The separate components make it easy to work through the project one piece at a time, while the floral accessories offer plenty of opportunities for customization.
Whether you’re adding a new character to your amigurumi collection or creating a thoughtful handmade gift, this adorable woodland deer is a rewarding crochet project.
Choose your favorite yarn colors, prepare your crochet hook, and enjoy bringing your own little woodland fawn to life.
Related Crochet Projects to Try Next
If you enjoyed making this adorable crochet deer, consider trying these related amigurumi projects.
Crochet Woodland Fox Amigurumi: Create a cute orange fox with a fluffy tail and expressive face.
Crochet Baby Bunny: Make an adorable rabbit with floppy ears and a soft pastel scarf.
Crochet Mini Mushroom: Create colorful woodland mushrooms to display alongside your forest animals.
Crochet Baby Bear with Flowers: Make a sweet teddy bear decorated with a small floral accessory.
These woodland crochet projects are wonderful ways to practice amigurumi techniques and build a collection of handmade animal characters.