Crochet Ankle Socks Pattern for Everyday Shoes
A cheerful pair of handmade socks can make an ordinary day feel a little brighter. These colorful crochet ankle socks combine bold pink stripes,...
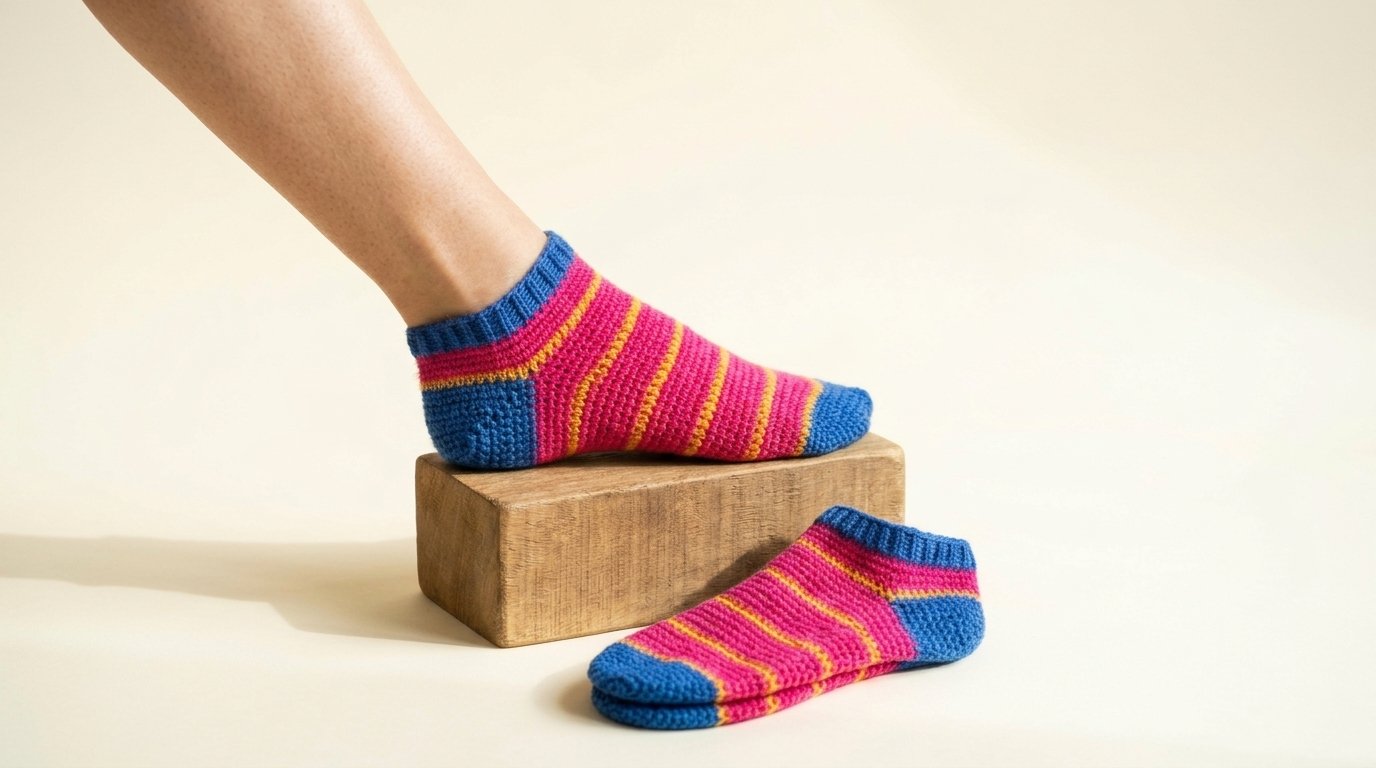
A cheerful pair of handmade socks can make an ordinary day feel a little brighter. These colorful crochet ankle socks combine bold pink stripes, golden yellow accents, and beautiful blue toes, heels, and cuffs for a playful design you can wear around the house or inside roomy everyday shoes.
This crochet ankle socks pattern is worked from the toe upward, with a separate heel added afterward. If you know basic single crochet stitches and are ready to learn a few new techniques, this is a lovely next project.
You’ll find adjustable sizing tips, beginner-friendly instructions, and helpful advice for creating a comfortable pair.
Crochet Ankle Socks Pattern: Quick Facts
- Skill level: Adventurous beginner
- Estimated time: 8–12 hours for a pair
- Construction: Toe-up, worked in rounds
- Suggested size: Women’s US 7–9, adjustable
- Finished foot circumference: Approximately 8 inches (20 cm) at the suggested gauge
- Finished foot length: Adjust to your measurements
- Main stitches: Single crochet, increases, decreases, and post-stitch ribbing
- Yarn: Sport-weight sock yarn
- Hook: 3 mm, or size needed to achieve gauge
All measurements and timings are estimates for this untested sample pattern. Check your gauge and fit before completing both socks.
Materials and Tools You’ll Need
For socks that feel comfortable rather than bulky, choose a smooth sock yarn that produces a firm but flexible fabric.
Yarn Colors
The pictured design uses three cheerful shades:
- Royal blue: For the rounded toes, shaped heels, and ribbed ankle cuffs.
- Hot pink: The main color across the foot and ankle.
- Golden yellow: Thin stripes that brighten the pink sections.
Allow approximately 350–450 yards of sport-weight sock yarn for a pair, depending on size, gauge, and yarn construction. This is a planning estimate rather than a tested quantity.
A superwash wool-and-nylon blend is a practical choice because the wool offers warmth and the nylon helps resist wear.
Yarn substitution: You can use another smooth sport-weight blend, but make a gauge swatch first. Pure cotton generally has less recovery, so it may not hold its shape as well.
Tools
- 3 mm crochet hook
- Stitch markers in two colors
- Yarn needle for finishing
- Small scissors
- Flexible measuring tape
- Optional sock blockers
Hook substitution: Use a slightly smaller or larger hook if your stitches are too loose or tight.
Marker substitution: A short contrasting yarn strand works when you don’t have locking stitch markers.
Gauge: Aim for 24 single crochet stitches and 28 rounds over 4 inches (10 cm), measured after washing your swatch. Work the swatch in the round because flat and circular crochet tension can differ.
Crochet Abbreviations and Basic Stitches
This pattern uses US crochet terminology.
- MR — Magic ring: An adjustable loop used to begin the closed toe.
- Ch — Chain: Yarn over and pull through the loop on your hook.
- Sc — Single crochet: Insert hook, pull up a loop, yarn over, and pull through both loops.
- Inc — Increase: Work two single crochet stitches into the same stitch.
- Sc2tog — Single crochet two together: Join two neighboring stitches into one to decrease.
- Dc — Double crochet: Yarn over, insert hook, pull up a loop, and pull through two loops twice.
- Fpdc — Front post double crochet: Work a double crochet around the front of the stitch post below.
- Bpdc — Back post double crochet: Work a double crochet around the back of the stitch post below.
- Sl st — Slip stitch: Pull a loop through the stitch and the loop already on your hook.
- St(s) — Stitch(es)
- Rnd — Round
Unless instructed otherwise, work the toe and foot in continuous spiral rounds. Place a marker in the first stitch and move it upward as you work.
Step-by-Step Crochet Ankle Socks Pattern
We’ll make one sock first, then repeat the instructions for the matching sock.
The pattern below uses 48 stitches around the foot. At the suggested gauge, this gives approximately 8 inches of circumference.
Step 1: Crochet the Blue Toe
Start with royal blue yarn and make a magic ring.
Round 1: Work 8 sc into the magic ring. Pull the ring closed. (8 stitches)
Round 2: Work 2 sc into every stitch. (16 stitches)
Round 3: Sc in each stitch around. (16 stitches)
Round 4: Repeat 1 sc, inc around. (24 stitches)
Round 5: Sc in each stitch around. (24 stitches)
Round 6: Repeat 2 sc, inc around. (32 stitches)
Round 7: Sc in each stitch around. (32 stitches)
Round 8: Repeat 3 sc, inc around. (40 stitches)
Round 9: Sc in each stitch around. (40 stitches)
Round 10: Repeat 4 sc, inc around. (48 stitches)
Rounds 11–14: Work 1 sc in every stitch. (48 stitches per round)
Your blue toe should now look like a rounded little pocket.
Beginner tip: Spread your increases evenly. If the fabric curls dramatically or looks unusually flat, recheck your stitch counts and gauge.
Common mistake: Forgetting to move the stitch marker can make the beginning of the round difficult to find.
Step 2: Begin the Hot Pink Foot
Join hot pink yarn at the beginning of the next round.
Work 1 sc into every stitch, keeping 48 stitches around.
Continue until you’ve completed six pink rounds.
For the yellow stripe, change to golden yellow on the final yarn-over of the preceding stitch, then work one complete round of yellow single crochet.
Change back to pink.
Your stripe sequence is:
- Six rounds in hot pink.
- One round in golden yellow.
- Repeat this seven-round sequence.
A small color jog is normal when using continuous rounds.
Beginner tip: Keep your color changes at the same side of the foot so the small transition marks are less noticeable.
Step 3: Work the Foot to Your Desired Length
Continue crocheting the striped tube, keeping 48 stitches in every round.
For a foot measuring approximately 9½ inches from toe to heel, a starting point is to work until the toe-to-heel-opening measurement is about 7 inches.
The separate heel will add the remaining length.
Try the unfinished sock over your foot, or compare it with a well-fitting sock.
Important: The ideal heel position depends on foot shape and crochet gauge. Measure rather than relying only on a fixed number of rounds.
Finish with a pink round before beginning the heel opening.
Step 4: Create the Heel Opening
This design uses an afterthought heel, meaning the heel is added after the main sock tube is finished.
First, lay your sock flat and identify the sole and top of the foot.
Adjust your round starting point to one side of the foot, just before the 24 sole stitches.
Now work the heel-opening round:
- Chain 24.
- Skip the next 24 stitches along the sole.
- Work 1 sc in each of the remaining 24 stitches across the top of the foot.
You now have a heel opening below the new chain bridge.
The working circumference remains 48 stitches: 24 chains and 24 single crochet stitches.
Beginner tip: Place markers at both ends of the skipped section. These will help you find the heel corners later.
Common mistake: Crocheting into the 24 skipped stitches closes the heel opening. Leave those stitches unworked for now.
Step 5: Crochet the Short Ankle Section
Continue in hot pink.
On the next round, work one single crochet into each of the 24 chains and each of the 24 existing stitches.
You should still have 48 stitches.
Continue for approximately 8–12 rounds, depending on your desired ankle height. Add another narrow golden yellow stripe if you want to match the bright layered appearance in the photo.
For a low ankle sock, the fabric should reach just above the heel opening before the cuff begins.
Fasten off the pink yarn.
Step 6: Make the Blue Ribbed Cuff
Attach royal blue yarn at the top edge.
Cuff Round 1: Chain 2, then work 1 dc into each stitch around. Join with a slip stitch to the first dc. The starting chain does not count as a stitch. (48 dc)
Cuff Round 2: Chain 2. Alternate 1 fpdc and 1 bpdc around. Join with a slip stitch. (48 stitches)
Cuff Rounds 3–4: Work fpdc around each previous front-post stitch and bpdc around each previous back-post stitch. Join each round. (48 stitches)
This creates a raised ribbed cuff resembling the textured blue band in the image.
Fasten off, leaving a tail for weaving in.
Beginner tip: Keep the cuff slightly relaxed. Crochet ribbing has less natural elasticity than knitted ribbing, so it should pass comfortably over your heel.
Step 7: Add the Blue Heel
Turn the sock so the heel opening is easy to access.
Join royal blue yarn at one corner.
Heel Round 1: Work 1 sc into each of the 24 skipped foot stitches and each of the 24 exposed chain loops. Pick up 1 additional stitch at each side corner to help prevent holes. (50 stitches)
Heel Round 2: Work sc around, using sc2tog once at each corner to remove the two additional stitches. (48 stitches)
Place markers at the two side corners, dividing the 48 stitches into two groups of 24.
The following rounds shape the heel. Begin at a side marker, and keep the two halves aligned.
- Round 3: Sc around. (48)
- Round 4: Repeat sc2tog, 20 sc, sc2tog twice. (44)
- Round 5: Sc around. (44)
- Round 6: Repeat sc2tog, 18 sc, sc2tog twice. (40)
- Round 7: Sc around. (40)
- Round 8: Repeat sc2tog, 16 sc, sc2tog twice. (36)
- Round 9: Sc around. (36)
- Round 10: Repeat sc2tog, 14 sc, sc2tog twice. (32)
- Round 11: Sc around. (32)
- Round 12: Repeat sc2tog, 12 sc, sc2tog twice. (28)
- Round 13: Sc around. (28)
- Round 14: Repeat sc2tog, 10 sc, sc2tog twice. (24)
- Round 15: Sc around. (24)
- Round 16: Repeat sc2tog, 8 sc, sc2tog twice. (20)
- Round 17: Sc around. (20)
- Round 18: Repeat sc2tog, 6 sc, sc2tog twice. (16)
The heel should form a gently tapered cup.
Fasten off, leaving a long yarn tail. Turn the sock inside out, flatten the final opening, and use the yarn needle to sew the remaining eight pairs of stitches together.
If there are small holes at the heel corners, close them neatly using the yarn tails.
Common mistake: Pulling the decrease stitches too tightly can create a pointed heel. Keep the tension consistent and check the fit before closing the opening.
These heel rounds are a proposed construction and should be tested for comfort and fit.
Step 8: Make the Second Sock
Repeat the same toe, foot, heel opening, ankle, cuff, and heel instructions.
Count the pink rounds and golden yellow stripes on your first sock so the second sock matches.
Place both socks side by side before finishing to compare their length and cuff height.
Finishing and Styling Your Crochet Socks
After completing both socks, weave every loose yarn end through several stitches on the inside.
Avoid making large knots beneath the foot, where they could feel uncomfortable inside shoes.
Try your socks on and check that:
- Your toes can move naturally.
- The heel sits comfortably against your foot.
- The cuff stays in place without squeezing.
- The fabric doesn’t bunch under your arch.
If needed, gently wash and reshape the socks according to the yarn label.
The bright royal blue and pink colors look especially charming with casual sneakers, clogs, or everyday lounge outfits. The wooden display block in the Pinterest photo also makes a lovely styling idea for photographing your finished pair.
Because crochet fabric can be thicker and less stretchy than commercial socks, test the fit inside your intended shoes before wearing them for a long day.
Make These Crochet Ankle Socks Your Own
1. Create a Softer Color Palette
Replace hot pink with dusty rose, switch royal blue to denim blue, and use cream instead of yellow.
The same stripe arrangement creates a completely different mood.
2. Make Taller Crochet Socks
After forming the heel opening, add more ankle rounds before beginning the cuff.
This creates a higher sock that works nicely with boots. Check that the extra fabric fits comfortably around your ankle.
3. Change the Stripe Spacing
Instead of six pink rounds between yellow stripes, try eight or ten.
Wider sections of pink create a calmer design, while closely spaced yellow rounds give the socks a busier, colorful appearance.
If you’re experimenting with yarn weights, make a new gauge swatch and recalculate the stitch counts before starting.
Caring for Your Handmade Crochet Socks
Check the yarn label before washing.
For wool-blend socks, gentle washing in cool water is often a sensible option unless the label provides different instructions.
Use mild detergent and avoid strong twisting or wringing. Reshape the socks and let them dry flat.
Store them folded rather than hanging them by the cuffs, which could gradually stretch the ribbing.
Inspect the heels and toes occasionally because these areas experience the most friction.
Frequently Asked Questions
Can beginners make crochet ankle socks?
Yes, especially if they already understand single crochet stitches and basic increases. This project introduces heel shaping and post-stitch ribbing, so it is best for an adventurous beginner willing to practice.
What is the best yarn for crochet socks worn with shoes?
A smooth, relatively thin sock yarn containing wool and nylon is a practical choice. It offers a useful balance of comfort and wear resistance, although the finished thickness still depends on your gauge.
How do I make crochet ankle socks fit a larger foot?
For a longer foot, add extra rounds before creating the heel opening. For a wider foot, you’ll need more stitches around the toe and foot and must recalculate the heel opening and decreases accordingly.
Why are my crochet socks too stiff?
A very tight gauge or thick yarn can produce a dense fabric with limited stretch. Try a thinner yarn or slightly larger hook, but always check that the resulting fabric is still durable enough for socks.
Final Thoughts
These colorful crochet ankle socks are a fun way to combine simple stitches with bold stripes and practical handmade style. Once you’ve completed your first pair, you can experiment with different colors, lengths, and cuff finishes.
Save this crochet ankle socks pattern on Pinterest so you can find it again, and share your finished socks with fellow crochet lovers.