Christmas Crochet Cardigan Pattern – Cozy Red and Green Holiday Sweater
There’s something magical about wearing a handmade cardigan during the Christmas season. The beautiful combination of deep red, forest green, and golden yellow instantly...
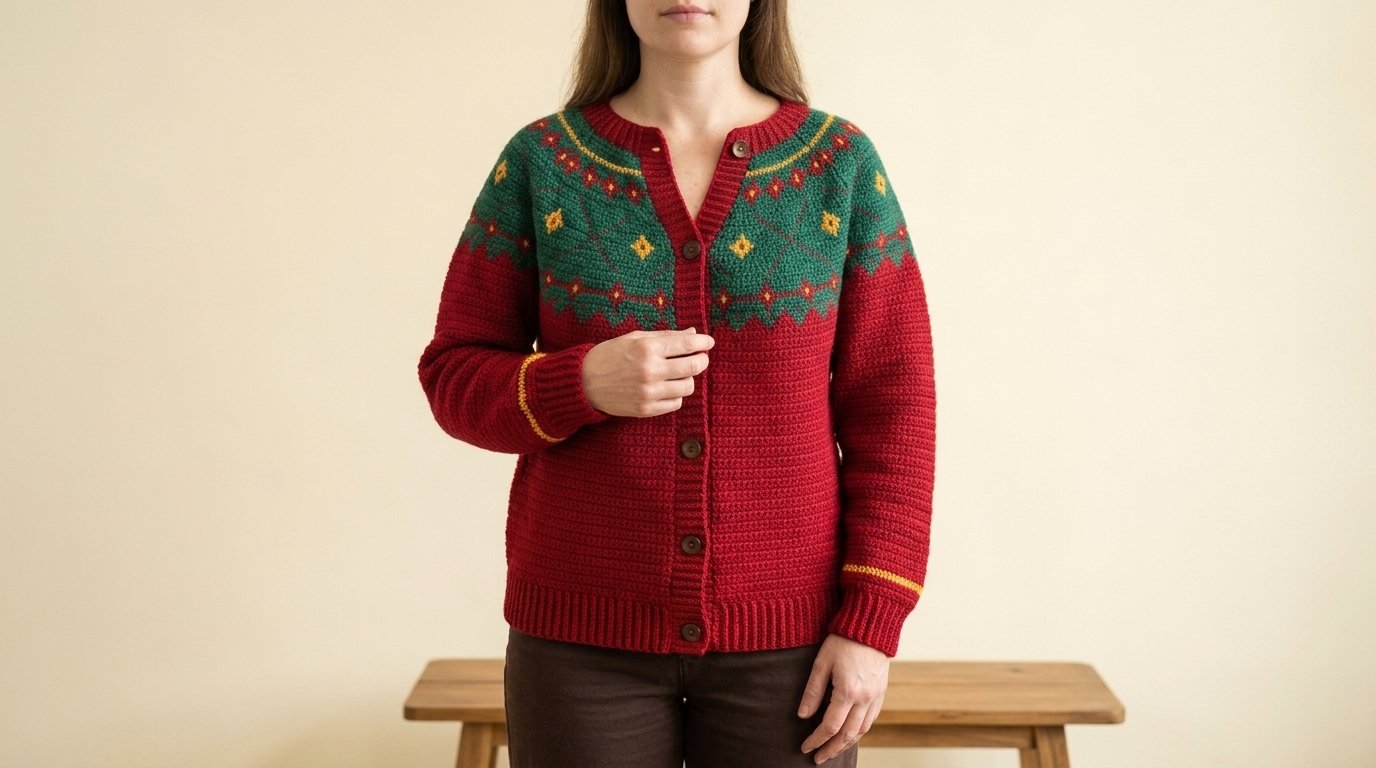
There’s something magical about wearing a handmade cardigan during the Christmas season. The beautiful combination of deep red, forest green, and golden yellow instantly brings a warm, festive feeling to your winter wardrobe.
This Christmas crochet cardigan pattern features a rich red body, a decorative green Fair Isle-inspired yoke, delicate geometric holiday motifs, ribbed cuffs, and a classic button-front opening. The result is a cozy, traditional-looking Christmas sweater with a charming handmade finish.
The cardigan is worked in separate pieces using basic crochet stitches, then assembled with simple seams. The colorful yoke decorations are added afterward, making the design more approachable for crocheters who haven’t tried complicated colorwork.
Whether you’re making something special for Christmas morning, a holiday gathering, or a thoughtful handmade gift, this cardigan is a lovely project to enjoy throughout the festive season.
Quick Pattern Details
| Detail | Information |
|---|---|
| Skill level | Confident beginner to intermediate |
| Style | Classic Christmas button-front cardigan |
| Fit | Relaxed, slightly fitted |
| Suggested size | Women’s medium |
| Finished bust | Approximately 40 inches |
| Finished length | Approximately 25 inches |
| Sleeve length | Approximately 20 inches |
| Estimated time | 20–30 hours |
| Yarn weight | Medium weight #4 |
| Crochet hook | 5 mm (H/8) |
| Main stitches | Single crochet, double crochet, post stitches |
| Terminology | US crochet terms |
The measurements are approximate and depend on your yarn, gauge, and tension. Check your fit as you work, especially before joining the shoulder and side seams.
Materials and Supplies
The rich Christmas color palette is what makes this cardigan stand out.
Yarn Colors
Christmas Red – Main Color
Choose a deep cranberry or traditional Christmas red for the body, sleeves, button bands, neckline, and ribbed edges.
Estimated amount: 1,100–1,400 yards.
Forest Green – Contrast Color
A rich evergreen shade creates the decorative upper yoke and shoulder sections.
Estimated amount: 250–350 yards.
Golden Yellow – Accent Color
Use a small amount of warm golden yarn for the festive diamond motifs and thin decorative stripes.
Estimated amount: 30–50 yards.
For a comfortable winter cardigan, choose a soft acrylic, wool-acrylic blend, or washable wool yarn.
Additional Supplies
- 5 mm crochet hook
- Five medium-sized wooden buttons, approximately 20 mm
- Yarn needle
- Scissors
- Stitch markers
- Measuring tape
- Blocking mat and pins, if available
Yarn substitution tip: Choose yarns of similar thickness and fiber content so the red, green, and yellow sections maintain consistent stitch tension.
Gauge and Sizing
Make a gauge swatch before beginning your cardigan.
Using your main yarn and single crochet:
- 14 stitches = 4 inches
- 16 rows = 4 inches
Use a 5 mm hook to begin, then adjust your hook size if needed.
The cardigan is designed with a relaxed fit and approximately 3–5 inches of positive ease.
For the suggested medium size, the finished bust measures approximately 40 inches before any additional ease created by the button bands.
You can customize the size by adding or removing stitches from the body panels and adjusting the sleeve width.
Crochet Abbreviations
This pattern uses US crochet terminology.
| Abbreviation | Meaning |
|---|---|
| ch | Chain |
| sc | Single crochet |
| dc | Double crochet |
| sl st | Slip stitch |
| sc2tog | Single crochet two stitches together |
| FPdc | Front post double crochet |
| BPdc | Back post double crochet |
| BLO | Back loop only |
| st(s) | Stitch or stitches |
| RS | Right side |
| WS | Wrong side |
| rnd | Round |
Single crochet: Insert your hook into the stitch, yarn over and pull up a loop, then yarn over and pull through both loops.
Sc2tog: Insert your hook into the next stitch and pull up a loop. Insert your hook into the following stitch and pull up another loop. Yarn over and pull through all three loops.
Front post double crochet: Work a double crochet around the vertical post of the stitch below, bringing your hook from the front around the post and back to the front.
Back post double crochet: Work around the post from the back of your fabric.
These post stitches create the stretchy ribbing used at the neckline, cuffs, and bottom hem.
Christmas Crochet Cardigan Pattern: Step-by-Step Instructions
We’ll make this cardigan in several manageable sections.
Start with the red body panels, add the green upper yoke, crochet the sleeves, and finish with the holiday motifs, ribbing, and wooden buttons.
Step 1: Crochet the Back Panel
The back panel begins at the lower body and works upward toward the shoulders.
Using Christmas red yarn and your 5 mm hook:
- Chain 71.
- Row 1: Work 1 sc into the second chain from your hook and every remaining chain. (70 stitches)
- Row 2: Chain 1, turn, and work 1 sc into every stitch. (70 stitches)
- Rows 3–64: Repeat Row 2, keeping 70 stitches in each row.
Your red back section should measure approximately 16 inches long.
Beginner tip: Count your stitches every few rows. Keeping your edges straight will make assembling the cardigan much easier.
Step 2: Add the Green Back Yoke
Now we’ll create the green upper section.
Change to forest green yarn.
- Row 65: Chain 1, turn, and work 1 sc across. (70 stitches)
- Rows 66–92: Continue working 1 sc in every stitch. (70 stitches per row)
- Fasten off, leaving a long sewing tail.
The green yoke should measure approximately 7 inches tall.
At this stage, you have a simple two-color back panel with a red lower section and green upper section.
We’ll add the holiday decorations later.
Step 3: Crochet the Left Front Panel
The front panels are narrower than the back and include shaping for the neckline.
Using Christmas red yarn:
- Chain 36.
- Row 1: Work 1 sc in the second chain from your hook and across. (35 stitches)
- Rows 2–64: Chain 1, turn, and work 1 sc into every stitch. (35 stitches per row)
Now change to forest green yarn.
- Rows 65–80: Continue working evenly in sc. (35 stitches per row)
Shape the Neckline
The neckline shaping begins at Row 81.
- Row 81: Work sc2tog at the edge facing the front opening, then sc across the remaining stitches. (34 stitches)
- Rows 82–92: Decrease one stitch at the neckline edge on every row.
At the end of Row 92, you should have 23 stitches remaining.
Fasten off, leaving a long tail for the shoulder seam.
The gradual decreases create a softly sloping front neckline.
Step 4: Crochet the Right Front Panel
Make the second panel using the same stitch counts.
Work the red lower section for 64 rows, followed by 16 straight green rows.
Begin the neckline decreases on Row 81.
This time, place the decreases along the opposite edge so the neckline mirrors the first panel.
Continue decreasing one stitch per row through Row 92.
You should finish with 23 stitches.
Lay the two front panels side by side, with the sloping edges facing each other.
Common mistake: If both neckline slopes face the same direction, the panels won’t form a matching pair. Check their orientation before fastening off.
Step 5: Create the Festive Yoke Decorations
The green yoke is the most distinctive feature of this Christmas cardigan.
The reference design features small red and golden diamond shapes, geometric lines, and traditional Fair Isle-inspired details.
We’ll recreate this decorative effect using surface embroidery and simple crochet chains.
Make the Small Diamond Motifs
Using red yarn and a yarn needle, embroider small diamond shapes directly onto the green crochet fabric.
Each diamond can cover approximately five stitches horizontally and five rows vertically.
Use the following arrangement as a guide:
..R..
.R.R.
R.Y.R
.R.R.
..R..
R = Red stitch
Y = Golden yellow center
. = Green background
Each character represents a position on your crochet stitch grid.
Work the motif using small surface stitches that follow the shape of the underlying crochet fabric.
The yellow center creates the tiny golden detail seen in the inspiration image.
Arrange the Decorative Motifs
Place the designs across the green yoke.
For a balanced Christmas look:
- Add a row of small red-and-yellow diamonds near the upper yoke.
- Space the motifs evenly across the back and front panels.
- Create larger decorative diamond outlines near the chest.
- Add small golden details inside selected diamonds.
- Keep the decorations approximately one inch away from the seams.
Add a Zigzag Border
The lower edge of the green yoke features a festive geometric transition.
You can create this with surface crochet.
Using red yarn:
- Insert your hook through the green fabric near the color-change line.
- Pull up a loop of red yarn.
- Make surface slip stitches diagonally across several stitches and rows.
- Change direction to create a repeating zigzag.
- Continue across the yoke.
This produces a decorative red geometric border without changing the garment’s construction.
Helpful tip: Keep your surface stitches loose enough that the fabric can still stretch comfortably.
Step 6: Crochet the Christmas Red Sleeves
The sleeves are mostly red, with a small green section near the shoulders and a golden accent near the cuffs.
We’ll make two matching sleeves.
Using Christmas red yarn:
- Chain 29.
- Row 1: Work 1 sc into the second chain from your hook and across. (28 stitches)
- Rows 2–3: Work 1 sc into every stitch. (28 stitches per row)
- Row 4: Work 2 sc into the first stitch, 1 sc across to the final stitch, then 2 sc into the last stitch. (30 stitches)
- Rows 5–7: Work evenly. (30 stitches per row)
- Row 8: Increase one stitch at each end. (32 stitches)
Continue this sequence, increasing one stitch at each end of every fourth row.
Your stitch counts will increase by two on Rows 12, 16, 20, 24, 28, 32, 36, 40, 44, 48, 52, 56, 60, 64, 68, and 72.
At Row 72, you should have 64 stitches.
Add the Green Shoulder Section
Change to forest green yarn at the beginning of Row 65.
Work Rows 65–72 using green instead of red, continuing the same sleeve increases.
This creates a narrow green section near the upper arm, connecting visually with the green body yoke.
Fasten off, leaving a long sewing tail.
Repeat for the second sleeve.
The upper sleeve should measure approximately 18 inches wide before joining.
Step 7: Join the Shoulder Seams
Place the back panel flat with the right side facing upward.
Position both front panels on top with right sides together.
Align the outer shoulder edges.
Each front shoulder has 23 stitches.
- Sew the left front shoulder to the outer 23 stitches of the back.
- Sew the right front shoulder to the opposite outer 23 stitches.
- Leave the center 24 stitches of the back open for the neckline.
Use a yarn needle and mattress stitch or whip stitch.
Keep the seams secure without pulling them too tightly.
Step 8: Attach the Sleeves and Close the Sides
Lay the cardigan body open with the wrong side facing upward.
Locate the center of each sleeve’s upper edge.
Match that center point to the shoulder seam.
Leave approximately 36 body rows open below each shoulder to form the armhole.
- Pin the sleeve center to the shoulder seam.
- Match the sleeve’s upper corners to the bottom edges of the armhole.
- Sew the sleeve around the armhole.
- Repeat on the opposite side.
Fold the cardigan with right sides together.
Sew the side seams upward from the lower edge, leaving the last 36 rows open for the sleeve attachments.
Then sew each sleeve from underarm to wrist.
Turn the cardigan right side out.
Try it on to check the fit before adding ribbing and buttons.
Step 9: Crochet the Red Ribbed Hem
The bottom edge features deep red ribbing that gives the cardigan a classic sweater finish.
Using red yarn:
- Join your yarn at the lower front corner.
- Work sc evenly across the bottom edges of both front panels and the back. (140 stitches)
- Chain 2 and turn.
- Work 1 dc into every stitch. (140 stitches)
- Chain 2 and turn.
- Alternate FPdc and BPdc across the row.
- Continue working post stitches for five additional rows, matching front posts to front posts and back posts to back posts.
- Fasten off and weave in the end.
The hem should add approximately 2 inches to the cardigan.
Step 10: Make the Ribbed Sleeve Cuffs
The cuffs feature red ribbing with a narrow golden accent stripe.
Using golden yellow yarn:
- Join your yarn around the wrist opening.
- Work 1 sc into each stitch around. (28 stitches)
- Join with a slip stitch and fasten off.
Change to red yarn.
- Round 1: Work 1 dc into each stitch. (28 stitches)
- Round 2: Alternate FPdc and BPdc around. (28 stitches)
- Rounds 3–7: Continue the ribbing pattern, maintaining the raised columns. (28 stitches per round)
Fasten off and weave in the yarn tail.
Repeat for the second sleeve.
The golden stripe should appear just above the red ribbed cuff.
Step 11: Crochet the Button Bands
The button bands give the cardigan its classic Christmas sweater appearance.
Using red yarn, begin along the straight front edge, from the bottom of the body to the point where the neckline shaping begins.
Work approximately three sc for every four row ends.
For the 80 straight body rows, this gives approximately 60 stitches.
First Button Band
- Row 1: Work 60 sc evenly along the straight front opening.
- Row 2: Chain 1, turn, and work 1 sc in each stitch.
- Rows 3–5: Repeat Row 2.
- Fasten off.
Second Button Band with Buttonholes
Repeat the first two rows on the opposite front edge.
On Row 3:
- Work 7 sc.
- Chain 2 and skip the next 2 stitches.
- Work 10 sc.
- Repeat the chain-2 opening followed by 10 sc three more times.
- Make one final chain-2 opening, skipping 2 stitches.
- Work 3 sc to finish the row.
You should have five buttonholes.
For Row 4, work sc across, placing 2 sc into each chain-2 space.
Work Row 5 evenly in sc.
The buttonholes should fit your chosen wooden buttons without being too loose.
Step 12: Crochet the Neckline Ribbing
The rounded neckline features a rich red ribbed border.
Using red yarn:
- Join your yarn at the upper edge of one button band.
- Work sc evenly along the sloped neckline.
- Continue across the 24 unseamed stitches at the back neckline.
- Work down the opposite neckline slope.
- Chain 2 and turn.
- Work 1 dc into each stitch.
- Continue for three additional rows, alternating front post and back post double crochet stitches.
Fasten off and weave in the yarn tail.
The neckline should lie comfortably against your neck without pulling or curling.
If it feels too tight, add a few stitches evenly around the curved sections.
Step 13: Sew on the Wooden Buttons
The dark wooden buttons create a lovely contrast against the bright red yarn.
Lay the cardigan flat with the button bands overlapping naturally.
Mark the position of each button opposite its corresponding buttonhole.
Using a yarn needle and a strong matching thread or yarn:
- Sew the first button securely to the opposite band.
- Repeat for the remaining four buttons.
- Check that each button passes comfortably through its buttonhole.
- Reinforce the attachments with several additional stitches.
Your Christmas cardigan is now ready for its finishing touches.
Finishing Your Christmas Crochet Cardigan
Take time to inspect the seams, ribbing, and decorative details.
Weave in any remaining yarn ends.
Gently straighten the green yoke and check that the diamond motifs are evenly positioned.
Make sure the front opening lies flat and the buttons line up neatly.
Blocking the Cardigan
Blocking can help the crocheted fabric relax and improve the overall appearance.
Follow the care instructions for your yarn.
If your yarn allows gentle washing, dampen the cardigan and lay it flat on a towel.
Smooth the sleeves, neckline, and front panels into shape.
Allow the cardigan to dry completely before wearing it.
How to Customize Your Christmas Cardigan
This design offers several ways to add your own creative touches.
1. Traditional Christmas Fair Isle Cardigan
Add more geometric diamonds and small golden details across the green yoke.
You can also extend the decorative design around the upper sleeves for a more elaborate holiday appearance.
2. Simple Red Christmas Cardigan
Keep the red body and green yoke but use fewer embroidered motifs.
This creates a cleaner, more understated look while preserving the festive color combination.
3. Vintage-Inspired Christmas Sweater
Replace the bright red yarn with burgundy and use a deeper pine-green shade for the yoke.
Choose antique-style wooden buttons and muted gold accents for a cozy vintage finish.
Styling Your Christmas Crochet Cardigan
This cardigan is easy to style because its classic button-front shape pairs beautifully with simple winter clothing.
Christmas morning: Wear it over a cream top with comfortable jeans or leggings.
Holiday dinner: Pair it with dark trousers, ankle boots, and delicate gold accessories.
Cozy winter weekends: Layer it over a simple turtleneck with relaxed pants.
Festive photos: Wear it with neutral colors so the traditional red-and-green design becomes the center of attention.
The cardigan also makes a thoughtful handmade Christmas gift for someone who loves cozy seasonal clothing.
Care Tips for Your Handmade Cardigan
A handmade Christmas sweater deserves gentle care.
- Wash according to your yarn label.
- Use cool water and mild detergent when hand washing.
- Avoid twisting or wringing the fabric.
- Lay the cardigan flat to dry.
- Store it folded rather than hanging it for long periods.
- Check the buttons and seams before each holiday season.
For long-term storage, keep your cardigan in a clean, dry place away from direct sunlight.
Frequently Asked Questions
Is this Christmas crochet cardigan pattern suitable for beginners?
This pattern is best for confident beginners who already understand basic crochet stitches and simple garment construction. The body uses straightforward single crochet rows, while the neckline shaping, seams, and decorative motifs introduce slightly more advanced techniques.
What yarn is best for a crochet Christmas sweater?
Medium-weight acrylic or wool-blend yarn works well for a cozy Christmas cardigan. Choose a yarn that feels comfortable against your skin and provides enough structure for the ribbed cuffs and button bands.
Can I make this Christmas cardigan in a larger size?
Yes. Add stitches to the body panels to increase the finished bust measurement, and adjust the sleeve width and armhole openings to match. Use your gauge swatch and personal measurements to plan the changes.
Can I crochet the Christmas cardigan without the decorative yoke?
Absolutely! You can keep the upper section plain green or make the entire cardigan red. The basic construction stays the same, so you can customize the appearance without changing the overall design.
Conclusion
This Christmas crochet cardigan pattern brings together traditional holiday colors, cozy crochet texture, and charming decorative details.
The cranberry-red body, forest-green yoke, golden diamond accents, and classic wooden buttons create a festive sweater you’ll look forward to wearing every winter.
Take your time with each section, enjoy adding the colorful details, and make the finished cardigan your own. Whether you wear it on Christmas morning or give it as a handmade gift, it’s a beautiful way to celebrate the season with crochet.
Save this Christmas cardigan pattern to your Pinterest crochet board so you can revisit it whenever you’re ready to make your next cozy holiday project!