Cascade Bloom Crochet Flower Knee High Socks Pattern
Introduction The Cascade Bloom crochet flower knee socks combine a fitted knee-high silhouette with a colorful botanical panel running along each outer calf. Rich...
Introduction
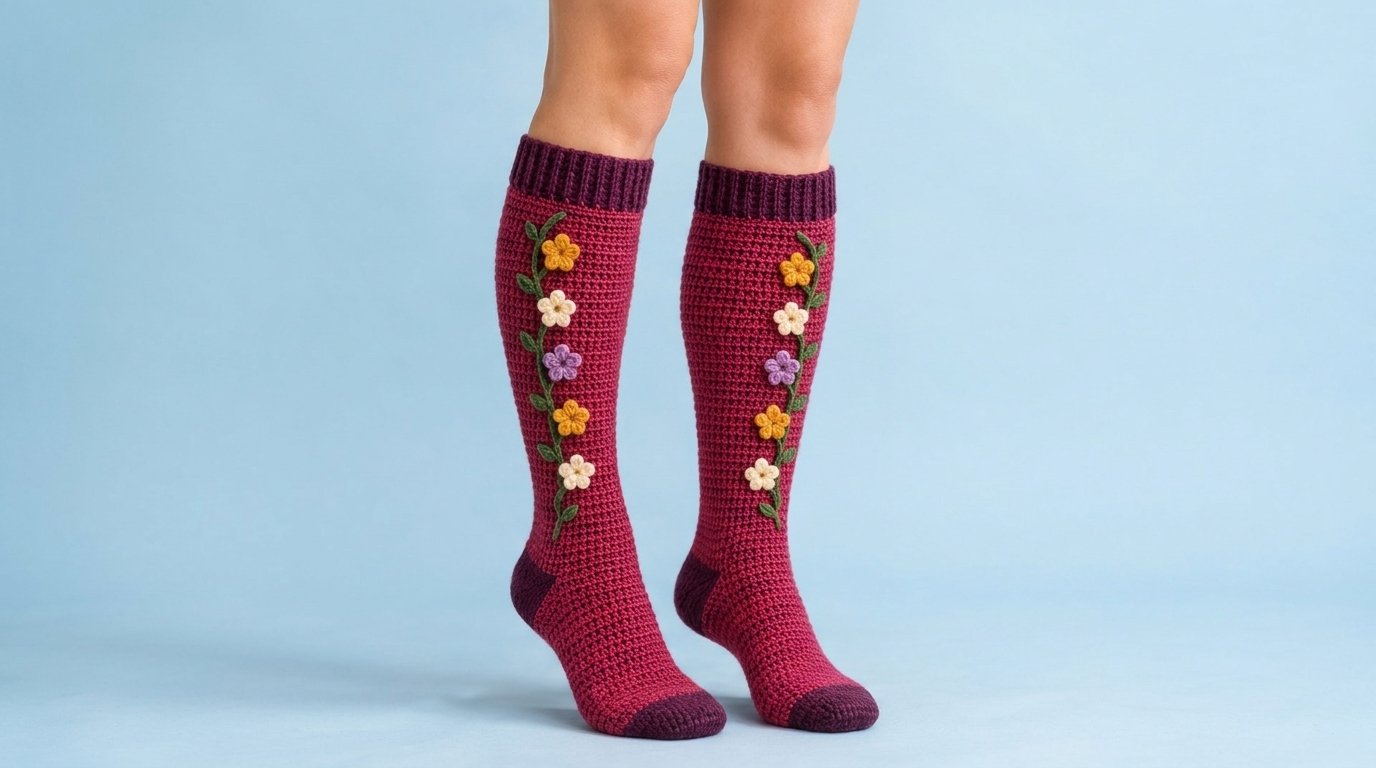
The Cascade Bloom crochet flower knee socks combine a fitted knee-high silhouette with a colorful botanical panel running along each outer calf. Rich raspberry yarn forms the main sock, while deep plum defines the ribbed cuffs, heels, and toes. Mirrored green vines hold five small flowers on each leg.
Unlike the earlier ankle-sock design, this crochet knee high socks pattern begins at the cuff and works downward. Graduated decreases shape the calf before a bridged heel opening, straight foot, wedge toe, and separately completed heel are added.
The project uses familiar stitches, but maintaining the fit over the calf and ankle requires careful measuring. It is best suited to intermediate crocheters or adventurous beginners who are comfortable working in rounds, counting decreases, and adjusting garment measurements.
Why You’ll Love This Project
The long silhouette makes the socks visually striking, while the dense crochet fabric provides warmth for indoor wear and roomy boots.
The design also offers:
- Three adult sizes
- Straightforward cuff-down construction
- Evenly distributed calf shaping
- Adjustable leg and foot lengths
- A simple afterthought-style heel
- Contrasting heels and toes
- Mirrored floral decorations
- Small appliqués that use leftover yarn
- A ribbed cuff that can hold optional elastic
Because the decoration is confined to the outer legs, the soles and inner ankles remain smooth.
Project Overview
- Project type: Adult crochet knee socks
- Difficulty: Intermediate
- Estimated time: 12–18 hours for a pair
- Sizes: Adult small, medium, and large
- Finished upper-calf circumference: 12 (13½, 15¼) inches
- Finished ankle circumference: 8 (9¼, 10½) inches
- Suggested foot length: 8½ (9¼, 10) inches, adjustable
- Finished leg length: Approximately 14 inches from cuff to heel opening
- Yarn weight: DK/category 3
- Hook: 3.25 mm or size needed for gauge
- Main techniques: Half double crochet, back-loop single crochet ribbing, increases, decreases, continuous rounds, seaming, and appliqué assembly
- Construction: Separate ribbed cuff, cuff-down shaped leg, bridged heel opening, straight foot, wedge toe, and added heel
- Terminology: US crochet terms
Measurements and completion times are estimates. Measure the intended wearer’s foot and leg before selecting a size.
Materials and Supplies Needed
For one pair:
- 400–520 yards of raspberry DK-weight yarn
- 90–130 yards of deep plum DK-weight yarn
- 25 yards of forest-green DK-weight yarn
- 15 yards of golden-mustard DK-weight yarn
- 15 yards of warm-ivory DK-weight yarn
- 8 yards of rich-lavender DK-weight yarn
- 3.25 mm crochet hook
- Four locking stitch markers
- Yarn needle
- Scissors
- Flexible measuring tape
- Optional sock-blocking forms
- Optional narrow elastic thread or soft ¼-inch elastic for the cuffs
A wool-and-nylon or acrylic-and-nylon blend provides useful resilience. Smooth yarn with a firm twist will show the shaped stitches and appliqués more clearly than fuzzy yarn.
Choosing the Right Yarn and Hook
Choose DK yarn that creates a dense, flexible fabric at the required gauge. Sock yarn containing nylon is helpful because the heels and toes experience more friction than the leg.
The raspberry and plum yarns should have similar fiber content and yardage per ounce. Using a much thicker contrast yarn can make the heels and toes feel bulky.
A 3.25 mm hook is a starting recommendation. Move up a hook size if the fabric feels rigid or cannot stretch over the heel. Move down if the stitches are loose or leave large gaps.
Cotton can be used, but pure cotton may stretch and remain stretched. A cotton blend containing nylon or elastic fiber will recover more effectively.
Crochet Stitches and Abbreviations
- ch — chain: Yarn over and pull through the loop on the hook.
- sl st — slip stitch: Insert the hook, yarn over, and pull through the stitch and the loop on the hook.
- sc — single crochet: Insert the hook, yarn over and pull up a loop, yarn over, and pull through both loops.
- hdc — half double crochet: Yarn over, insert the hook, yarn over and pull up a loop, yarn over, and pull through all three loops.
- dc — double crochet: Yarn over, insert the hook, yarn over and pull up a loop, then pull through two loops twice.
- BLO — back loop only: Work into only the back loop of the indicated stitch.
- hdc2tog — half double crochet two together: Yarn over, insert the hook into the next stitch and pull up a loop. Repeat in the following stitch, then yarn over and pull through all five loops.
- MR — magic ring
- st/sts — stitch/stitches
- rnd/rnds — round/rounds
- rep — repeat
The sock body is worked in continuous rounds. Move the beginning marker after every round.
Before You Start
Gauge
In half double crochet worked in rounds:
- 20 hdc = 4 inches
- 14 rounds = 4 inches
The stitch gauge determines the sock circumference, so prioritize stitch gauge if you cannot match both measurements.
Choosing a Size
Measure around the widest part of the calf and around the ball of the foot.
Choose a finished circumference approximately ½–1 inch smaller than the corresponding body measurement:
- Small: Foot circumference 8–8½ inches; calf up to approximately 13 inches
- Medium: Foot circumference 9¼–9¾ inches; calf up to approximately 14½ inches
- Large: Foot circumference 10½–11 inches; calf up to approximately 16¼ inches
If the calf and foot suggest different sizes, use the calf size for the leg and adjust to the required ankle stitch count during the shaping section.
Fit Notes
The ribbed cuff should stretch gently around the upper calf without restricting circulation. Optional elastic may help the socks remain upright, but it must not feel tight or leave a deep mark.
The socks are designed primarily for indoor wear or roomy boots. Dense crochet fabric and raised flowers may be uncomfortable in close-fitting footwear.
Step-by-Step Crochet Instructions
Make the Ribbed Cuff
Using deep plum, ch 13.
Row 1: Sc in the second ch from the hook and in each remaining ch. You should have 12 sc.
Row 2: Ch 1 and turn. Sc BLO in each st across.
Repeat Row 2 until the strip measures approximately 11 (12½, 14) inches without stretching.
Wrap the cuff around the upper calf. The short ends should meet when the strip is lightly stretched. Add or remove rows if necessary, ending with an even number of rows.
Join the short ends with slip stitches or whipstitch to make a ring. Turn the cuff so the seam faces inward.
Establish the Leg
Join raspberry yarn at the cuff seam.
Leg rnd 1: Work 60 (68, 76) hdc evenly around the lower edge of the cuff. Do not force one stitch into every ribbing row; distribute the required count evenly.
Place a beginning marker at the back of the leg. Place a second marker after 30 (34, 38) sts to identify the front center. The two sides lie halfway between these markers.
Leg rnds 2–6: Hdc in every st around. Maintain 60 (68, 76) sts.
The cuff should lie flat without flaring or gathering.
Shape the Calf
Each shaping round removes two stitches: one at the inner side and one at the outer side.
For a shaping round:
- Hdc to one stitch before the first side point.
- Work hdc2tog across that point.
- Continue to one stitch before the opposite side point.
- Work hdc2tog.
- Hdc to the beginning marker.
Keep the decreases aligned along the sides rather than the front or back of the leg.
Repeat the following sequence 10 (11, 12) times:
- Work 2 plain hdc rounds.
- Work 1 shaping round.
You should now have 40 (46, 52) sts.
Work 6 (3, 0) additional plain rounds. All sizes should have approximately 42 rounds below the initial six-round setup, or about 12 inches of shaped leg fabric.
Try the leg on. The lower edge should sit at the ankle while the cuff rests just below the knee. Add plain rounds if more length is required.
Form the Heel Opening
Position the beginning marker at one side of the ankle.
Heel-opening rnd: Hdc across the front 20 (23, 26) sts. Ch 20 (23, 26). Skip the remaining ankle stitches and continue at the beginning of the next round.
Following rnd: Hdc in each existing front stitch and in each chain across the heel bridge. You should have 40 (46, 52) sts.
The skipped ankle stitches remain unworked until the heel is added.
Crochet the Foot
Continue in raspberry, working one hdc in every stitch around.
From the front edge of the heel opening, work until the foot section measures approximately 5¼ (5¾, 6¼) inches, or until the sock reaches the base of the wearer’s toes.
For a custom fit, try the sock on carefully. Begin the toe when approximately 2–2½ inches remain before the desired finished length.
End at one side of the foot. Place a second marker at the opposite side so the stitches are divided evenly between the instep and sole.
Shape the Contrasting Toe
Change to deep plum.
Every toe round removes four stitches: one decrease at each end of the instep and sole.
Toe decrease rnd: Hdc2tog, hdc across the instep to two stitches before the opposite side marker, and hdc2tog. Repeat the same sequence across the sole.
Repeat the decrease round without plain rounds between decreases until 12 (14, 16) sts remain.
Fasten off with a long tail. Turn the sock inside out, flatten the toe so the side decreases align, and whipstitch the remaining 6 (7, 8) stitch pairs together.
Turn the sock right side out and check that the seam lies across the tips of the toes rather than beneath them.
Crochet the Contrasting Heel
Join deep plum yarn at one side of the heel opening.
Heel rnd 1: Hdc into each skipped ankle stitch and into the underside of each heel-bridge chain. You should have 40 (46, 52) sts.
Place one marker at each side transition.
For every following heel round, work one hdc2tog immediately before and one immediately after each side marker. This removes four stitches per round.
Continue decreasing every round until 12 (14, 16) sts remain.
Fasten off with a long tail. Turn the sock inside out and flatten the heel opening with the decreases positioned at the sides. Whipstitch the remaining 6 (7, 8) stitch pairs together.
If a small gap appears at either top corner of the heel, close it with the yarn tail before weaving in the end.
Make the Five-Petal Flowers
Make ten flowers total:
- Four golden mustard
- Four warm ivory
- Two rich lavender
Each sock receives two mustard flowers, two ivory flowers, and one lavender flower.
For each flower, make an MR.
Repeat the following sequence five times into the ring:
Ch 2, work 2 hdc into the ring, ch 2, sl st into the ring.
Pull the ring closed. Fasten off with a long sewing tail.
Make the Leaves
Make fourteen forest-green leaves, seven for each sock.
Ch 5.
- Sl st in the second ch from the hook.
- Sc in the next ch.
- Hdc in the next ch.
- Work 5 dc in the final ch to turn around the tip.
- Along the opposite side, work hdc, sc, and sl st in the corresponding chains.
Fasten off with a sewing tail.
Make the Vine Stems
Make two forest-green stems.
Ch 45. Beginning in the second ch from the hook, sl st in every ch across.
Fasten off with a long tail. The finished cord should reach from above the ankle to the upper-middle calf with enough flexibility to form a gentle curve.
Make the Second Sock
Repeat every sock instruction using the same size, round counts, and foot measurement.
Before adding the flowers, place the socks side by side with both toes pointing forward. Mark the outer calf of each sock. The floral vines must be positioned on opposite sides so they face outward when worn.
Assembly and Finishing
Pin one vine in a gentle curve from just above the ankle to the upper-middle outer calf. Keep the stem at least 1 inch below the ribbed cuff.
Sew the cord to the sock using small, flexible stitches. Avoid pulling the sock fabric inward.
Arrange five flowers along the stem in this order from top to bottom:
- Golden mustard
- Warm ivory
- Lavender
- Golden mustard
- Warm ivory
Sew through each flower center and add one or two anchoring stitches beneath each petal. Place seven leaves at alternating angles along the vine.
Mirror the arrangement on the second sock. Stand the socks upright or place them on sock forms to confirm that the decorations face outward and begin at equal heights.
Weave in all ends securely. Lightly dampen and shape the socks, then dry them flat.
Tips for Best Results
- Measure the calf before starting the cuff.
- Keep the cuff ribbing firm but comfortably stretchable.
- Mark both side decrease lines before shaping the leg.
- Count after every shaping round.
- Record any added leg or foot rounds for the second sock.
- Try the first sock on before completing the toe seam.
- Keep the heel-chain tension equal to the surrounding hdc stitches.
- Use the same hook and tension for every flower.
- Attach the vine while the sock is lightly stretched.
- Position all appliqués away from the sole and inner leg.
Common Mistakes and Troubleshooting
The socks slide down
The cuff may be too long or too loose. Shorten the ribbed strip before attaching it, or thread soft elastic through the inside of the cuff. The elastic should support the sock without restricting the leg.
The calf is too tight
Remove several shaping rounds or space them farther apart. Maintain enough room to pull the shaped leg over the heel.
The ankle is baggy
Add one or two extra side-decrease rounds, removing two stitches per round. Keep the final ankle count even if you plan to divide it equally for the heel opening.
The foot twists
The side markers may have shifted. Check that the heel opening, toe decreases, and final toe seam remain aligned with the sides of the foot.
The heel has corner holes
Pick up one extra loop at each corner during the first heel round. Decrease those two extra stitches on the following round.
The flower panel puckers
The stem or flowers were sewn too tightly. Remove the tight attachment stitches and resew the panel while the sock is stretched over your hand or a sock form.
The two socks have different leg lengths
Count rounds instead of relying on visual measurements. Check that both cuffs also contain the same number of ribbing rows.
Creative Variations
Replace the raspberry body with royal blue, emerald, terracotta, or rich lavender. Keep the heel and toe darker than the body for a clearly defined color-blocked effect.
Other practical variations include:
- Use one flower color for a monochromatic vine
- Add a second lavender flower and remove one ivory flower
- Shorten the shaped leg for mid-calf socks
- Omit the appliqués for simple color-blocked knee socks
- Embroider the stem directly onto the sock
- Use smaller leaves for a more delicate panel
- Add a narrow stripe immediately below the cuff
- Make the two vines complementary rather than identical
Do not add beads or hard decorations if the socks will be worn inside boots.
How to Use or Style Your Crochet Socks
The socks can be worn with skirts, sweater dresses, leggings, pajamas, or cuffed lounge pants. Their colorful flower panels work best when the outer calves remain visible.
For colder indoor settings, pair them with roomy slippers. Loose rain boots or fashion boots may accommodate the crochet fabric, but test the fit before extended wear.
These socks are not intended for hiking, athletics, or use as protective outdoor footwear. The raised flowers may catch on tight boot linings.
They also make a thoughtful winter gift when the recipient’s calf, ankle, and foot measurements are available.
Care and Maintenance
Follow the care instructions for the selected yarn.
Hand-washing in cool water is the safest option for preserving the shaped legs and floral decorations. Use mild detergent and avoid twisting or wringing.
Press out water with a clean towel. Reshape the socks to their original measurements, arrange the flower petals and leaves, and dry flat.
Store the socks loosely folded rather than hanging them from the cuffs. Reinforce loose appliqués promptly, and inspect the heels and toes periodically for wear.
Frequently Asked Questions
Are these knee socks suitable for beginners?
They require basic stitches, but the calf shaping, fit adjustments, and long matching pair make the project more appropriate for intermediate crocheters or adventurous beginners.
Can I shorten the socks?
Yes. Work fewer plain rounds before beginning the calf decreases, then distribute the required decrease rounds across the shorter leg.
How can I make the upper calf wider?
Lengthen the ribbed cuff and pick up additional body stitches in multiples of two. Add enough shaping rounds to reach the ankle count required for your selected foot size.
Can I use worsted-weight yarn?
Not with the listed counts. Worsted yarn will create substantially larger and thicker socks unless the entire gauge and stitch-count system is recalculated.
Why is the heel added after the foot?
The bridged opening provides a simple, symmetrical heel method and allows the heel to be replaced later if it wears out.
Can I use elastic in the cuff?
Yes. Sew or thread soft elastic around the inside of the cuff without stretching it tightly. It should help the sock stay upright without restricting circulation.
Can I wear these inside regular shoes?
The dense crochet fabric is thicker than a commercial sock. It is better suited to indoor wear, roomy slippers, or loose boots.
How do I mirror the flowers?
Lay both socks with the toes pointing forward, identify each outer calf, and pin the vines before sewing. The stems should curve in opposite directions.
Conclusion
The Cascade Bloom crochet knee socks use measured calf shaping, contrasting heels and toes, and mirrored flower vines to create a warm statement accessory. The cuff-down method makes the leg length easy to adjust, while the bridged heel opening keeps the lower construction manageable.
Choose a resilient DK yarn, record every modification for the second sock, and personalize the flowers with colors that suit your wardrobe or gift recipient.
Related Crochet Projects
- Color-blocked crochet boot socks
- Mid-calf socks with embroidered vines
- Coordinating floral wrist warmers
- A ribbed crochet headband with five-petal appliqués