Cozy Sleeping Dragon Crochet Pattern Idea
A cozy sleeping dragon crochet pattern is a delightful handmade project that combines adorable amigurumi details with the magical charm of a tiny fantasy...
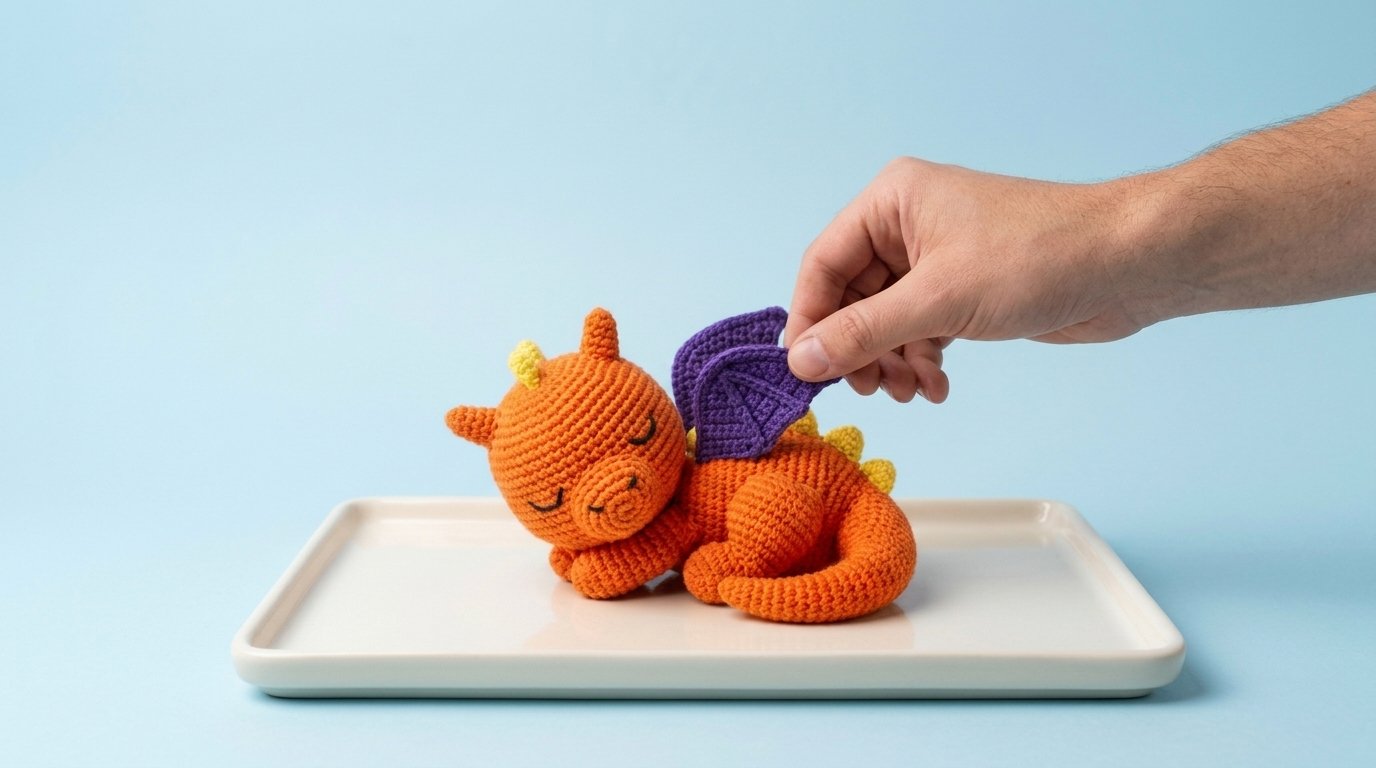
A cozy sleeping dragon crochet pattern is a delightful handmade project that combines adorable amigurumi details with the magical charm of a tiny fantasy creature. With its vibrant tangerine-orange body, folded royal-purple wings, sunny-yellow spikes, and peaceful embroidered eyes, this little dragon looks as though it’s enjoying the sweetest afternoon nap.
The design features a large rounded head resting against two tiny front paws, a softly curved body, and a long tail that curls around the dragon’s side. Two small horns decorate its head, while five golden-yellow spikes run along its back. The purple wings fold gently over the body, adding a beautiful contrast to the bright orange yarn.
This sleeping dragon makes a charming nursery shelf decoration, a thoughtful handmade gift for a dragon lover, or a playful addition to your amigurumi collection. Its relaxed pose and gentle expression give it a personality that’s completely different from a traditional upright crochet dragon.
The project uses familiar amigurumi techniques, including single crochet, increases, decreases, and basic sewing. The wings, horns, paws, and spikes are crocheted separately before being attached to create the finished sleepy dragon.
What Makes This Sleeping Dragon Crochet Design Special?
The most recognizable feature of this dragon is its curled sleeping position.
Instead of sitting upright or standing on four legs, the dragon rests comfortably on its belly with its head tilted forward and its tail curled around its body.
Several details make the design especially charming:
- Tangerine-orange body: A warm, vibrant color creates a cheerful little dragon.
- Oversized rounded head: Soft amigurumi proportions give the dragon an adorable appearance.
- Closed embroidered eyes: Two curved black lines create a peaceful sleeping expression.
- Royal-purple wings: Folded crochet wings rest gently against the upper back.
- Golden-yellow back spikes: Five small pointed spikes add a playful fantasy detail.
- Tiny rounded paws: Short legs tuck naturally beneath the dragon’s body.
- Long curling tail: The flexible tail curves forward to complete the cozy sleeping pose.
- Small crochet horns: Two softly pointed horns decorate the top of the head.
The combination of bright colors, textured stitches, and simple facial details creates an amigurumi character that’s full of personality without requiring complicated construction.
Materials and Supplies
Choose smooth yarn with good stitch definition to make the individual crochet details clearly visible.
Yarn
For a dragon inspired by the pictured design, use worsted-weight cotton or acrylic yarn in three main colors.
| Yarn Color | Purpose | Estimated Amount |
|---|---|---|
| Tangerine orange | Head, body, muzzle, paws, tail, and horns | 150–200 yards |
| Royal purple | Two folded dragon wings | 40–60 yards |
| Golden yellow | Five back spikes and optional horn accents | 15–25 yards |
| Black embroidery floss | Sleeping eyes and tiny smile | Small amount |
These yarn amounts are estimates. Your actual usage will depend on your yarn thickness, crochet tension, and finished size.
Crochet Tools
- 3.5 mm (E/4) crochet hook
- Yarn needle
- Stitch markers
- Small embroidery needle
- Scissors
- Polyester fiberfill stuffing
- Straight pins for positioning pieces
- Measuring tape
- Optional stitch counter
Skill Level and Finished Size
Skill level: Confident beginner to intermediate
Estimated time: 6–9 hours
Approximate finished length: 9–11 inches, including the curled tail
Approximate height: 5–6 inches with the wings folded
The exact size will depend on your yarn, hook size, and stuffing.
This dragon is designed as a soft decorative amigurumi. Use embroidered facial features rather than plastic safety eyes, especially when making handmade decorations that may be handled by children.
Crochet Stitches and Abbreviations
This pattern uses US crochet terminology.
| Abbreviation | Meaning |
|---|---|
| MR | Magic ring |
| ch | Chain |
| sc | Single crochet |
| hdc | Half double crochet |
| dc | Double crochet |
| sl st | Slip stitch |
| inc | Increase: 2 sc in one stitch |
| dec | Invisible single crochet decrease |
| BLO | Back loop only |
| st(s) | Stitch or stitches |
| Rnd | Round |
| FO | Fasten off |
Numbers in parentheses indicate the total stitch count at the end of each round.
Unless otherwise stated, work in continuous spiral rounds. Place a stitch marker in the first stitch of each round to keep track of your progress.
How to Crochet the Sleeping Dragon’s Head
The oversized rounded head is one of the most important features of this design.
Using tangerine-orange yarn and your 3.5 mm crochet hook, begin with a magic ring.
Step 1: Crochet the Rounded Head
Rnd 1: Work 6 sc into a magic ring. (6)
Rnd 2: Inc in each stitch around. (12)
Rnd 3: Repeat (1 sc, inc) six times. (18)
Rnd 4: Repeat (2 sc, inc) six times. (24)
Rnd 5: Repeat (3 sc, inc) six times. (30)
Rnd 6: Repeat (4 sc, inc) six times. (36)
Rnd 7: Repeat (5 sc, inc) six times. (42)
Rnd 8: Repeat (6 sc, inc) six times. (48)
Rnd 9–17: Work 1 sc in each stitch around. (48)
You should now have a large rounded head with enough space for the embroidered sleeping eyes and small snout.
Step 2: Shape and Close the Head
Continue with orange yarn.
Rnd 18: Repeat (6 sc, dec) six times. (42)
Rnd 19: Repeat (5 sc, dec) six times. (36)
Rnd 20: Repeat (4 sc, dec) six times. (30)
Rnd 21: Repeat (3 sc, dec) six times. (24)
Begin adding fiberfill stuffing.
Rnd 22: Repeat (2 sc, dec) six times. (18)
Rnd 23: Repeat (1 sc, dec) six times. (12)
Add more stuffing, distributing it evenly.
Rnd 24: Dec six times. (6)
Fasten off, leaving a yarn tail.
Thread the tail through the front loops of the remaining stitches and pull gently to close the opening.
Weave in the end.
The head should be rounded but slightly soft so you can gently shape it into a relaxed sleeping position.
How to Crochet the Dragon’s Rounded Muzzle
The little dragon has a softly rounded snout that extends from the lower front of its head.
Step 3: Crochet the Muzzle
Using tangerine-orange yarn:
Rnd 1: Work 6 sc into a magic ring. (6)
Rnd 2: Inc in each stitch around. (12)
Rnd 3: Repeat (1 sc, inc) six times. (18)
Rnd 4–6: Work 1 sc in each stitch around. (18)
Fasten off, leaving a long yarn tail.
Add a small amount of stuffing.
Gently flatten the shape into a rounded oval.
Step 4: Attach the Muzzle
Position the muzzle on the lower front of the head.
For the curled sleeping pose, place it slightly toward one side rather than directly in the center.
Use pins to hold it in position.
Sew the open edge securely to the head using the long yarn tail.
The snout should project gently forward.
Avoid overstuffing it, as a small rounded muzzle helps preserve the dragon’s sweet expression.
How to Embroider the Sleeping Dragon’s Face
The peaceful facial expression is what makes this little dragon look so cozy.
Step 5: Embroider the Closed Eyes
Thread your embroidery needle with black or dark-brown embroidery floss.
Position the eyes on the front of the head, slightly above the muzzle.
For the first eye, make a gently curved line using several small embroidery stitches.
Angle the outer end of the line slightly upward.
Repeat on the opposite side.
Both eyes should resemble soft crescent shapes.
Keep the curves simple and avoid making them too long.
The goal is to create a peaceful sleeping expression rather than an exaggerated cartoon face.
Step 6: Add the Tiny Smile
Using the same embroidery floss, create a small curved smile near the upper edge of the muzzle.
Two or three short stitches are enough.
Keep the smile subtle so it complements the closed eyes.
For an extra sweet detail, you can embroider a tiny nostril on each side of the snout.
Secure the embroidery threads carefully and weave the ends into the head.
How to Crochet the Dragon’s Body
The body is a softly elongated oval designed to rest horizontally rather than stand upright.
This shape allows the dragon’s head, wings, paws, and tail to fit together in a curled sleeping position.
Step 7: Crochet the Orange Body
Using tangerine-orange yarn:
Rnd 1: Work 6 sc into a magic ring. (6)
Rnd 2: Inc in each stitch around. (12)
Rnd 3: Repeat (1 sc, inc) six times. (18)
Rnd 4: Repeat (2 sc, inc) six times. (24)
Rnd 5: Repeat (3 sc, inc) six times. (30)
Rnd 6: Repeat (4 sc, inc) six times. (36)
Rnd 7: Repeat (5 sc, inc) six times. (42)
Rnd 8: Repeat (6 sc, inc) six times. (48)
Rnd 9–22: Work 1 sc in each stitch around. (48)
The additional even rounds create an elongated body.
Step 8: Shape and Close the Body
Rnd 23: Repeat (6 sc, dec) six times. (42)
Rnd 24: Repeat (5 sc, dec) six times. (36)
Rnd 25: Repeat (4 sc, dec) six times. (30)
Rnd 26: Repeat (3 sc, dec) six times. (24)
Begin stuffing the body.
Rnd 27: Repeat (2 sc, dec) six times. (18)
Rnd 28: Repeat (1 sc, dec) six times. (12)
Rnd 29: Dec six times. (6)
Fasten off and close the remaining opening.
Gently shape the body into a horizontal oval.
The stuffing should be firm enough to hold the shape but not so tight that the fabric becomes stiff.
How to Attach the Head for a Sleeping Pose
Step 9: Position the Dragon’s Head
Lay the finished body horizontally on your worktable.
Place the head against one front end.
Angle it slightly downward and toward the side where the front paws will rest.
The head should appear to lean comfortably against the body rather than sit upright.
Use several pins to hold the position.
Step 10: Sew the Head Securely
Using orange yarn and a yarn needle, sew the head to the front of the body.
Work several rounds of small attachment stitches through both pieces.
Check the position from the side.
The muzzle should point slightly forward and downward, creating the peaceful resting pose shown in the design.
How to Crochet the Dragon’s Tiny Paws
The four small paws help the dragon look as though it’s curled up for a nap.
Make four matching pieces.
Step 11: Crochet the Rounded Paws
Using orange yarn:
Rnd 1: Work 6 sc into a magic ring. (6)
Rnd 2: Inc in each stitch around. (12)
Rnd 3–6: Work 1 sc in each stitch around. (12)
Rnd 7: Repeat (2 sc, dec) three times. (9)
Fasten off, leaving a long tail.
Add a small amount of stuffing near the rounded end.
Flatten the upper opening slightly.
Step 12: Attach the Front Paws
Position two paws underneath the front of the body.
One paw should rest beneath the dragon’s chin, while the other sits slightly behind it.
Angle the rounded ends forward.
Sew the upper openings securely to the body.
The paws should look relaxed and tucked rather than extended straight outward.
Step 13: Attach the Back Paws
Position the remaining two paws near the lower rear section of the body.
Keep them slightly bent toward the dragon’s belly.
Sew them into place using small, secure stitches.
The finished dragon should now have a compact, curled silhouette.
How to Crochet the Long Curled Dragon Tail
The long tail is one of the most recognizable features of this design.
It begins narrow at the tip and becomes wider toward the body.
Step 14: Crochet the Tail Tip
Using orange yarn:
Rnd 1: Work 4 sc into a magic ring. (4)
Rnd 2–3: Work 1 sc in each stitch around. (4)
Rnd 4: Repeat (1 sc, inc) twice. (6)
Rnd 5–7: Work 1 sc in each stitch around. (6)
Rnd 8: Repeat (2 sc, inc) twice. (8)
Rnd 9–11: Work 1 sc in each stitch around. (8)
Rnd 12: Repeat (3 sc, inc) twice. (10)
Rnd 13–15: Work 1 sc in each stitch around. (10)
Step 15: Continue Shaping the Tail
Rnd 16: Repeat (4 sc, inc) twice. (12)
Rnd 17–19: Work 1 sc in each stitch around. (12)
Rnd 20: Repeat (5 sc, inc) twice. (14)
Rnd 21–23: Work 1 sc in each stitch around. (14)
Rnd 24: Repeat (6 sc, inc) twice. (16)
Rnd 25–27: Work 1 sc in each stitch around. (16)
Fasten off, leaving a long tail for sewing.
Stuff the crochet tail lightly, keeping it flexible.
Avoid packing the tip with too much fiberfill.
Step 16: Shape the Curved Tail
Gently bend the tail into a crescent shape.
Position the wider end near the back of the dragon’s body.
Allow the narrower end to curl forward along the side of the belly.
Sew the wider end securely onto the body.
To keep the tail curled without using wire, add several small hidden stitches where it touches the body.
This helps maintain the rounded sleeping pose while keeping the dragon soft.
How to Crochet the Royal-Purple Dragon Wings
The folded purple wings add beautiful contrast against the orange body.
For this design, make two softly pointed wings and decorate them with raised stitch lines.
Step 17: Crochet the First Purple Wing
Using royal-purple yarn:
Row 1: Chain 3. Work 1 sc in the second chain from the hook and 1 sc in the next chain. Turn. (2)
Row 2: Chain 1, inc in each stitch. Turn. (4)
Row 3: Chain 1, work 1 sc in each stitch across. Turn. (4)
Row 4: Chain 1, inc in the first stitch, work 1 sc in each of the next 2 stitches, then inc in the last stitch. Turn. (6)
Row 5: Chain 1, work 1 sc in each stitch across. Turn. (6)
Row 6: Chain 1, inc in the first stitch, work 1 sc in each of the next 4 stitches, then inc in the last stitch. Turn. (8)
Row 7: Chain 1, work 1 sc in each stitch across. Turn. (8)
Row 8: Chain 1, inc in the first stitch, work 1 sc in each of the next 6 stitches, then inc in the last stitch. Turn. (10)
Row 9: Chain 1, work 1 sc in each stitch across. Turn. (10)
Row 10: Chain 1, inc in the first stitch, work 1 sc in each of the next 8 stitches, then inc in the last stitch. Turn. (12)
Row 11: Chain 1, work 1 sc in each stitch across. (12)
Fasten off, leaving a long yarn tail.
This creates a triangular wing that gradually widens toward its outer edge.
Step 18: Make the Second Wing
Repeat the same instructions to create another purple wing.
Lay both pieces flat and compare their size.
Gently shape the edges with your fingers.
Step 19: Add Decorative Wing Ridges
Using purple yarn and a yarn needle, embroider several curved lines across each wing.
Begin near the narrow base and work outward toward the wider edge.
These lines imitate the raised sections of fantasy dragon wings.
For a more pronounced texture, use surface slip stitches instead of embroidery.
Keep the decorative stitches relaxed so the wings remain flexible.
Step 20: Attach the Folded Wings
Position the wings on the upper back of the dragon.
Place the narrow ends close together near the shoulders.
Angle the wider sections backward.
The pictured dragon has its wings folded rather than fully extended.
To recreate this appearance, gently fold each wing toward the body and secure the lower edge with a few hidden stitches.
Leave the upper portions slightly raised so the purple shapes remain visible.
How to Crochet the Golden-Yellow Back Spikes
The five yellow spikes create a cheerful contrast against the orange body and purple wings.
Step 21: Crochet One Small Spike
Using golden-yellow yarn:
Rnd 1: Work 4 sc into a magic ring. (4)
Rnd 2: Work 1 sc in each stitch around. (4)
Rnd 3: Repeat (1 sc, inc) twice. (6)
Rnd 4: Work 1 sc in each stitch around. (6)
Rnd 5: Repeat (2 sc, inc) twice. (8)
Fasten off, leaving a long yarn tail.
Do not stuff the spike.
Gently pinch the tip to create a pointed shape.
Step 22: Make Five Spikes
Repeat until you have five matching yellow spikes.
You can make the middle spikes slightly larger by adding one extra even round.
Arrange them along the upper back of the dragon, beginning behind the neck and continuing toward the base of the tail.
Step 23: Attach the Spikes
Use a yarn needle to sew the open bases securely onto the orange body.
Space the spikes evenly.
Place the first near the upper back, with the remaining spikes following the curve toward the tail.
Keep them visible beside the folded purple wings.
Avoid attaching the spikes too close together.
A little space between them makes the finished design look more balanced.
How to Crochet the Dragon’s Little Horns
Two tiny horns decorate the upper head and complete the dragon’s magical appearance.
Step 24: Crochet the First Horn
Using orange yarn:
Rnd 1: Work 4 sc into a magic ring. (4)
Rnd 2: Work 1 sc in each stitch around. (4)
Rnd 3: Repeat (1 sc, inc) twice. (6)
Rnd 4–5: Work 1 sc in each stitch around. (6)
Fasten off, leaving a long tail.
The finished horn should be small and pointed.
Step 25: Crochet the Second Horn
Repeat the same instructions for the second horn.
For a playful color variation, you can use golden-yellow yarn for one horn.
Position the horns near the upper sides of the head.
Angle them slightly backward.
Sew both securely into place.
Final Assembly and Finishing Details
Once every piece is attached, place your dragon on a flat surface.
Gently adjust the head so it rests naturally against the front paws.
Check that the body maintains its horizontal, curled shape.
Arrange the tail around the side of the belly and make sure the narrow tip points inward.
Fold the purple wings so they rest comfortably against the upper back.
Straighten the yellow spikes and check that the horns remain visible.
Use a yarn needle to weave any remaining yarn ends into the crochet fabric.
Gently reshape the dragon with your hands.
Your cozy sleeping dragon amigurumi is now ready to display.
Three Tips for a Beautiful Sleeping Dragon
Keep the Head Softly Rounded
The dragon’s oversized head is an important part of its cute appearance.
Stuff it firmly enough to maintain its shape, but avoid stretching the crochet stitches.
A slightly soft head is easier to position in a relaxed sleeping pose.
Don’t Overstuff the Tail
The curling tail should remain flexible.
Too much stuffing can make it stiff and difficult to bend.
Add only small amounts of fiberfill and secure the curve with hidden stitches if necessary.
Fold the Wings Naturally
The purple wings should look relaxed rather than fully spread.
Position them close to the body, with their upper edges slightly raised.
A few carefully placed attachment stitches can help create the soft folded appearance.
Three Creative Sleeping Dragon Variations
Pastel Lavender Sleeping Dragon
Replace the orange body with soft lavender yarn.
Use pale pink for the wings and cream for the back spikes.
This gentle color combination creates a sweet, dreamy dragon that’s lovely for decorative nursery displays.
Forest Green Baby Dragon
Use deep emerald-green yarn for the body and dark olive yarn for the wings.
Add golden-yellow horns and spikes.
The rich colors give the dragon a woodland-inspired appearance.
Mini Sleeping Dragon Amigurumi
Use lightweight cotton yarn and a smaller crochet hook.
Follow the same basic construction with smaller proportions.
The finished miniature dragon can become a cute desk decoration or collectible fantasy character.
Frequently Asked Questions About Crochet Sleeping Dragons
Is this sleeping dragon crochet pattern suitable for beginners?
Confident beginners can make the individual pieces using basic amigurumi techniques. The rounded head, body, and paws use familiar single crochet increases and decreases. Shaping the curled tail and positioning the folded wings require additional patience, making this a good project for crocheters with some previous amigurumi experience.
What yarn works best for a crochet dragon amigurumi?
Worsted-weight cotton or acrylic yarn works well. Cotton provides clear stitch definition and helps the wings and spikes maintain their shape, while acrylic creates a softer, lightweight plushie. Choose a hook that produces tight stitches so the stuffing doesn’t show through.
How do you make a crochet dragon look like it’s sleeping?
The sleeping appearance comes mainly from the embroidered closed eyes and relaxed body position. Angle the head downward, tuck the paws beneath the face, fold the wings close to the body, and curl the tail along the side. These details create a peaceful pose without complicated shaping.
How do you make crochet dragon wings hold their shape?
Use firm crochet stitches and avoid making the wings too loose. Cotton yarn is particularly useful for maintaining structure. Gentle blocking can also help define the wing edges. Sew the bases securely to the body and use small hidden stitches to maintain the folded position.
Can I make this sleeping dragon for a child?
This version is primarily designed as a decorative amigurumi. If adapting it for a child, use embroidered facial features and securely attach all horns, wings, spikes, and other pieces. Avoid sharp internal supports, detachable decorations, and loose threads. Check the finished construction carefully for the intended age.
Make Your Own Cozy Sleeping Dragon Crochet Pattern Idea
A cozy sleeping dragon crochet pattern is a wonderful way to combine colorful yarn, simple amigurumi techniques, and imaginative handmade details.
The bright tangerine-orange body, oversized rounded head, peaceful embroidered eyes, folded royal-purple wings, golden-yellow spikes, and long curled tail create an adorable fantasy creature that looks as though it’s dreaming of magical adventures.
You can personalize the dragon with your favorite yarn colors, experiment with different wing shapes, or make a smaller version for a handmade fantasy collection.
Whether you’re decorating a cozy shelf, creating an amigurumi collection, or preparing a thoughtful handmade gift, this little sleeping dragon is a rewarding crochet project filled with warmth and personality.
Save this cozy sleeping dragon crochet idea to your Pinterest crochet board, gather your favorite colorful yarn, and enjoy creating a sweet handmade dragon that’s ready for a peaceful nap.