Make This Bold Crochet Snake Plant
A crochet snake plant is a beautiful way to bring vibrant greenery into your home without worrying about watering, sunlight, or keeping a real...
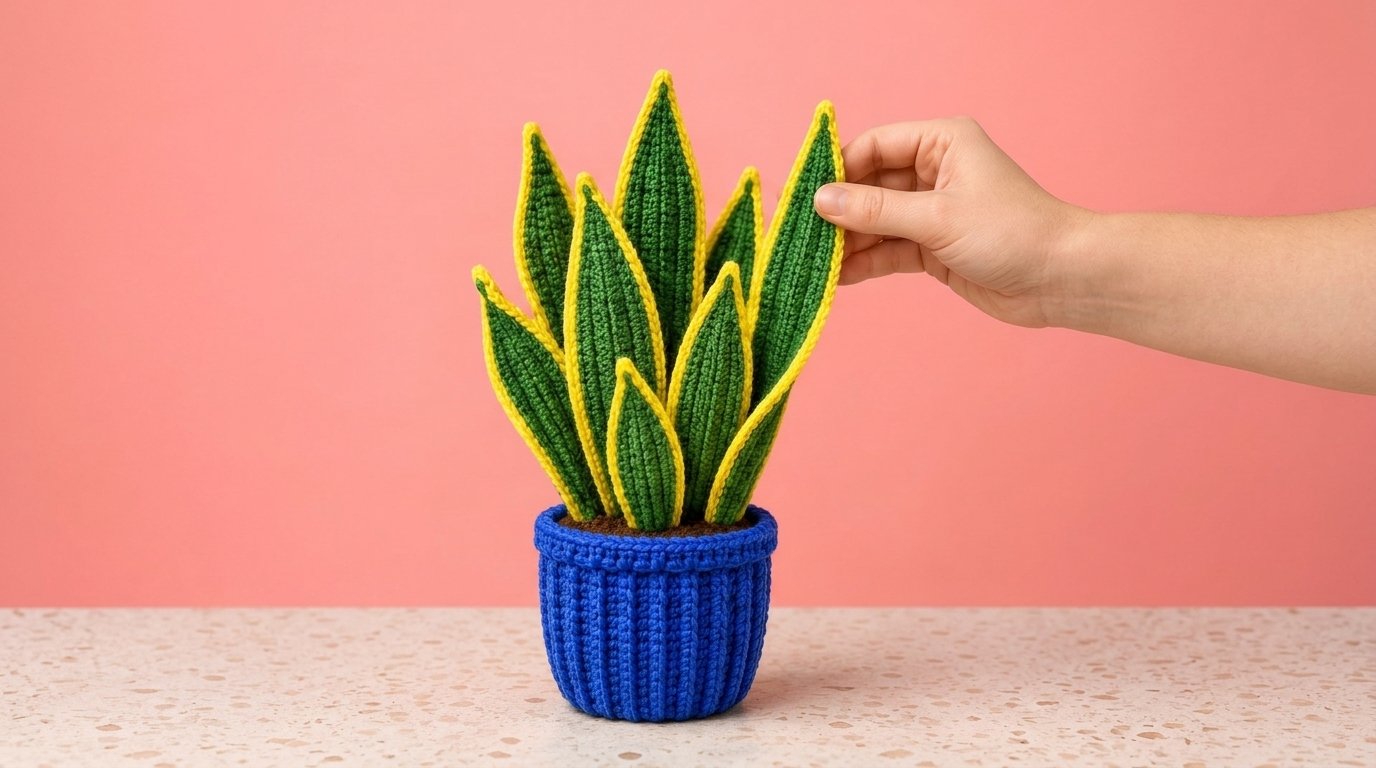
A crochet snake plant is a beautiful way to bring vibrant greenery into your home without worrying about watering, sunlight, or keeping a real plant alive. With its tall jade-green leaves, cheerful yellow borders, and striking royal-blue planter, this handmade plant creates a colorful statement that looks lovely on a shelf, desk, or windowsill.
Inspired by the distinctive upright leaves of a real snake plant, this crochet design features eight pointed leaves in different heights. Each leaf has a textured green surface, raised vertical ribs, and a bright yellow outline. The leaves rise from dark brown crocheted soil inside a compact blue planter with a beautiful ribbed texture.
The contrast between the rich green leaves, lemon-yellow edging, and saturated blue pot makes this project especially eye-catching. It’s a fun alternative to traditional crochet flowers and an excellent choice for anyone who loves handmade botanical decorations.
This crochet snake plant pattern uses basic stitches for the leaves, simple shaping techniques, and textured crochet stitches for the planter. Although the finished arrangement looks detailed, you can complete it one piece at a time.
What Makes This Crochet Snake Plant Special?
Unlike many crochet plant patterns that feature trailing vines or delicate flowers, this snake plant has tall, upright leaves that create a bold architectural shape.
The design is inspired by the natural growth of a snake plant, also known as Dracaena trifasciata. Its recognizable sword-shaped leaves make it a wonderful subject for crochet.
Several details give this handmade version its distinctive appearance:
- Eight pointed green leaves: Different heights create a natural, slightly asymmetrical arrangement.
- Bright yellow leaf borders: A vivid outline highlights the shape of each leaf.
- Raised vertical texture: Decorative stitches imitate the ribs and markings of real snake plant foliage.
- Royal-blue ribbed planter: The saturated blue adds beautiful contrast against the greenery.
- Dark brown crochet soil: A textured soil surface completes the potted arrangement.
- Compact decorative size: The finished plant works well on desks, shelves, and small tables.
The entire project can be made with cotton yarn and a few inexpensive craft supplies.
Materials and Supplies
Choose smooth yarn with good stitch definition so the textured details remain visible.
Yarn
For a plant similar to the pictured design, use DK-weight cotton yarn in four colors.
| Color | Purpose | Estimated Amount |
|---|---|---|
| Jade green | Eight leaves | 150–200 yards |
| Lemon yellow | Leaf borders | 40–60 yards |
| Royal blue | Ribbed planter | 70–100 yards |
| Dark brown | Crochet soil | 20–30 yards |
Actual yarn consumption depends on your gauge, leaf sizes, and the amount of surface detailing.
Crochet Tools
- 3.5 mm (E/4) crochet hook
- 3 mm crochet hook for tighter edging, optional
- Yarn needle
- Stitch markers
- Scissors
- Measuring tape
- Small amount of fiberfill, optional
- Craft foam or floral foam
- Small lightweight plastic container to support the planter
- Covered floral wire or chenille stems, optional for keeping the leaves upright
If you’re using wire, cover and fold over every cut end so it cannot puncture the crochet fabric. A wired version should be treated as a decorative item rather than a toy.
Skill Level and Finished Size
Skill level: Confident beginner to intermediate
Estimated time: 6–9 hours
Finished height: Approximately 9–12 inches, depending on the leaf lengths.
Planter diameter: Approximately 3½–4 inches.
Number of leaves: Exactly eight.
These are approximate measurements. Your finished plant may be larger or smaller depending on your yarn, hook size, and stitch tension.
Crochet Stitches and Abbreviations
This pattern uses US crochet terminology.
| Abbreviation | Meaning |
|---|---|
| MR | Magic ring |
| ch | Chain |
| sc | Single crochet |
| dc | Double crochet |
| sl st | Slip stitch |
| inc | Two single crochet stitches in one stitch |
| dec | Single crochet decrease |
| sc3tog | Single crochet three stitches together |
| BLO | Back loop only |
| FPdc | Front post double crochet |
| BPdc | Back post double crochet |
| st(s) | Stitch or stitches |
| Rnd | Round |
| FO | Fasten off |
The leaves are worked in rows, while the blue planter and brown soil are worked in rounds.
How to Crochet the Green Snake Plant Leaves
The tall, pointed leaves are the main feature of this crochet snake plant.
For an arrangement resembling the pictured design, make eight leaves in three different heights:
- Three tall leaves for the back and center.
- Three medium leaves for the middle.
- Two shorter leaves for the front.
Each leaf is made from two matching crocheted pieces joined together. This creates a thicker leaf that can hold its shape more easily than a single thin layer.
Step 1: Crochet the Base of the First Leaf
Using jade-green yarn and your 3.5 mm hook:
Foundation: Chain 6.
Row 1: Work 1 sc in the second chain from the hook and in each remaining chain. Turn. (5)
Row 2: Chain 1, inc in the first stitch, work 1 sc in each of the next 3 stitches, then inc in the final stitch. Turn. (7)
Row 3: Chain 1, inc in the first stitch, work 1 sc in each of the next 5 stitches, then inc in the final stitch. Turn. (9)
The leaf should now have a slightly wider body than its starting edge.
This creates a narrow base that gradually opens into the central section.
Step 2: Crochet the Straight Leaf Section
Continue with jade-green yarn.
Rows 4–25: Chain 1, work 1 sc in each stitch across. Turn. (9)
These even rows create the long central portion of a tall snake plant leaf.
Maintain consistent tension so the sides remain straight.
The original design features long, slender foliage rather than wide oval leaves, so keep the width narrow.
You can gently curve the finished piece later during assembly.
Step 3: Shape the Pointed Leaf Tip
After completing the straight section, begin decreasing.
Next Row: Chain 1, dec, work 1 sc in each of the next 5 stitches, then dec. Turn. (7)
Next Row: Chain 1, dec, work 1 sc in each of the next 3 stitches, then dec. Turn. (5)
Next Row: Chain 1, dec, work 1 sc in the next stitch, then dec. Turn. (3)
Final Row: Chain 1, sc3tog. (1)
Fasten off, leaving a yarn tail for assembly.
The finished piece should have a long, narrow body and a sharply tapered point.
This creates one side of a tall snake plant leaf.
Step 4: Crochet the Matching Back Piece
Repeat Steps 1–3 to create a second identical green piece.
Place the two pieces together with their wrong sides facing inward.
Align the pointed tips, side edges, and narrow bases.
You now have the two layers needed for one complete leaf.
Step 5: Make Leaves in Three Different Heights
Repeat the leaf construction to create your full collection.
Use the same increase rows and pointed tip instructions for every leaf, but adjust the number of straight rows.
| Leaf Size | Straight Section | Quantity |
|---|---|---|
| Tall | Rows 4–25 | 3 leaves |
| Medium | Rows 4–19 | 3 leaves |
| Short | Rows 4–13 | 2 leaves |
Remember that each leaf requires two matching pieces.
You’ll crochet a total of 16 green pieces to assemble eight complete leaves.
The different lengths create a natural arrangement, with the tallest leaves rising from the center and the shorter ones filling the front of the planter.
How to Add the Raised Green Leaf Texture
The pictured crochet snake plant has visible vertical ridges running along the leaves.
You can recreate this detail using surface crochet or simple embroidery stitches.
Step 6: Create the Central Leaf Rib
Take one green leaf piece and lay it flat with the right side facing upward.
Using a yarn needle and a slightly darker green yarn, work a line of short straight stitches along the center of the leaf.
Begin near the base and continue toward the pointed tip.
Keep the line as straight as possible, following the natural direction of the leaf.
Don’t pull the thread too tightly, or the fabric may bunch together.
Step 7: Add Two Side Ridges
Work two additional lines alongside the central rib.
Position them approximately a few stitches away from the middle.
Keep the lines narrower near the pointed tip so they follow the tapering shape.
You can also work surface slip stitches with your crochet hook for a more pronounced raised texture.
Repeat the decorative stitching on the front-facing piece of each leaf.
This creates the beautiful ribbed appearance that makes the foliage look more realistic.
How to Add the Bright Yellow Leaf Edging
The vivid lemon-yellow borders are one of the prettiest details of this crochet snake plant.
They highlight the pointed leaf shapes and create a striking contrast against the rich green yarn.
Step 8: Join the Two Leaf Layers
Place the two matching green pieces together.
Using green yarn and a yarn needle, sew along both long edges and around the pointed tip.
Leave the narrow base open.
Keep your stitches small and evenly spaced.
If you want the leaf to stand upright without leaning, insert a suitable covered craft stem between the layers before closing the final side.
The support should extend toward the pointed tip without piercing the fabric, with enough length remaining at the base to anchor the leaf in the planter.
For a wire-free version, use firm cotton yarn and keep the leaf layers tightly joined. The taller leaves may still need support from neighboring leaves.
Step 9: Crochet the Yellow Border
Attach lemon-yellow yarn at one side of the leaf base.
Work single crochet stitches evenly up the first long edge.
Continue around the pointed tip, placing a slip stitch at the very end to keep it narrow.
Work single crochet stitches down the opposite long edge.
Fasten off and weave in the yarn tail.
The yellow edging should form a clean outline around the green leaf.
Avoid adding too many stitches around the tip, as this may make the end look rounded instead of pointed.
Step 10: Repeat for All Eight Leaves
Add the yellow border to every leaf.
Lay the completed leaves side by side and compare their shapes.
Gently stretch and smooth any uneven edges with your fingers.
If your yarn allows it, lightly damp-block the leaves before assembly.
Allow them to dry completely.
Your eight green-and-yellow snake plant leaves are now ready to arrange.
How to Crochet the Royal-Blue Ribbed Planter
The compact royal-blue planter gives this design its bold, modern appearance.
The textured vertical ribs make it look like a small decorative ceramic pot, even though it’s made entirely from yarn.
Step 11: Crochet the Planter Base
Using royal-blue yarn:
Rnd 1: Work 6 sc into a magic ring. (6)
Rnd 2: Inc in each stitch around. (12)
Rnd 3: Repeat (1 sc, inc) six times. (18)
Rnd 4: Repeat (2 sc, inc) six times. (24)
Rnd 5: Repeat (3 sc, inc) six times. (30)
Rnd 6: Repeat (4 sc, inc) six times. (36)
Rnd 7: Repeat (5 sc, inc) six times. (42)
Rnd 8: Repeat (6 sc, inc) six times. (48)
The base should form a flat circle.
If necessary, adjust your hook size to help the fabric lie flat.
Step 12: Build the Planter Sides
Rnd 9: Work 1 sc in BLO around. (48)
This back-loop-only round creates a defined corner between the bottom and the sides.
Rnd 10: Chain 2 (does not count as a stitch), work 1 dc in each stitch around, and join with a slip stitch. (48)
The planter should begin rising vertically from the circular base.
Step 13: Create the Vertical Ribbed Texture
For the ribbing, alternate front post and back post double crochet stitches.
Rnd 11: Chain 2, then repeat (1 FPdc around the next stitch, 1 BPdc around the following stitch) all the way around. Join. (48)
Rnd 12–15: Repeat Round 11, working FPdc over the previous FPdc columns and BPdc over the previous BPdc columns.
This creates vertical ridges around the planter.
Keep the stitch tension consistent so the sides remain reasonably straight.
Step 14: Finish the Planter Rim
Rnd 16: Chain 1, work 1 sc in each stitch around. Join. (48)
Rnd 17: Repeat Round 16. (48)
Fasten off and weave in the yarn end.
Gently shape the planter with your hands.
For a stable display, insert a small plastic container or another lightweight, appropriately sized support inside the crocheted pot.
The support helps prevent the planter from collapsing under the weight of the tall leaves.
How to Crochet the Dark Brown Soil
The dark brown yarn soil makes the arrangement look more like a real potted plant.
Step 15: Crochet the Soil Circle
Using dark brown yarn:
Rnd 1: Work 6 sc into a magic ring. (6)
Rnd 2: Inc in each stitch around. (12)
Rnd 3: Repeat (1 sc, inc) six times. (18)
Rnd 4: Repeat (2 sc, inc) six times. (24)
Rnd 5: Repeat (3 sc, inc) six times. (30)
Rnd 6: Repeat (4 sc, inc) six times. (36)
Rnd 7: Repeat (5 sc, inc) six times. (42)
Rnd 8: Repeat (6 sc, inc) six times. (48)
Fasten off, leaving a long yarn tail.
This creates a flat circular soil cover.
Check the diameter against your blue planter.
The soil circle should fit inside the opening without stretching excessively.
How to Assemble the Crochet Snake Plant
Once the leaves, planter, and soil circle are finished, it’s time to create the full arrangement.
Step 16: Prepare the Planter Interior
Place a small piece of floral foam or firm craft foam inside the planter’s support container.
Cut the foam so it fits securely.
The foam will help hold the eight leaves in position.
If necessary, add a small amount of fiberfill around the support to fill empty spaces.
Keep the planter’s base flat so it can stand upright on a table.
Step 17: Arrange the Tallest Leaves
Begin with the three tallest green leaves.
Position one near the center and place the other two slightly behind and to the sides.
Allow the leaves to point upward with subtle differences in angle.
If you’ve used covered floral wire, insert the supported bases into the foam.
For wire-free leaves, sew their bases together into a compact cluster before attaching them to the soil circle.
The tallest leaves should create the main vertical structure.
Step 18: Add the Medium Leaves
Place the three medium-height leaves around the central cluster.
Angle them outward slightly to create fullness.
Avoid arranging every leaf at the same height or spacing.
A naturally asymmetrical arrangement gives the crochet snake plant a more convincing botanical appearance.
Check that the bright yellow edges remain visible from the front.
Step 19: Position the Two Short Leaves
Add the two shortest leaves near the front of the arrangement.
These smaller pieces fill the lower section and help conceal the bases of the taller leaves.
Position one slightly to the left and the other toward the right.
Together, the eight leaves should create a full, upright plant with overlapping layers.
Step 20: Secure the Plant in the Pot
Carefully position the brown crochet soil circle around the clustered leaf bases.
For wire-supported leaves, make small openings in the crochet fabric where necessary and pass the stems through into the foam.
For wire-free leaves, sew the leaf bases securely to the soil circle using green yarn.
Place the finished soil cover inside the blue planter.
Sew it to the inner rim at evenly spaced points, keeping the stitches hidden.
Gently adjust the leaves until the arrangement feels balanced.
The finished plant should have tall foliage rising naturally above the royal-blue pot.
Three Tips for a Beautiful Crochet Snake Plant
1. Keep the Leaves Narrow and Pointed
The recognizable shape of a snake plant comes from its long, sword-like leaves.
Avoid making the pieces too wide or rounding the tips excessively.
A narrow shape with a sharp point creates a more realistic appearance.
2. Use Firm Yarn and Consistent Tension
Smooth cotton yarn works especially well for structured botanical crochet.
It provides clear stitch definition and helps the leaf borders look neat.
If the fabric feels too loose, try a smaller hook.
3. Vary the Leaf Heights and Angles
Real snake plants rarely grow in perfectly symmetrical arrangements.
Position the tallest leaves near the center, medium leaves around the sides, and shorter leaves toward the front.
Slight differences in height and direction create a fuller, more natural display.
Three Creative Crochet Snake Plant Variations
Classic Green Snake Plant
Use dark forest-green yarn for the leaves and pale yellow for the borders.
Choose a cream or terracotta-colored planter for a more traditional botanical appearance.
Mini Crochet Snake Plant
Use lightweight cotton yarn and a smaller hook.
Make shorter leaves and display them in a miniature crochet pot.
This version is lovely for small shelves, desk decorations, or handmade gifts.
Colorful Modern Crochet Snake Plant
Keep the jade-green leaves and bright yellow borders, but change the planter to coral, lavender, or mustard yellow.
The bold color combinations make a cheerful addition to modern home decor.
Frequently Asked Questions About Crochet Snake Plants
Is this crochet snake plant suitable for beginners?
Confident beginners can make the leaves using basic crochet stitches, increases, and decreases. The planter introduces front post and back post double crochet stitches, while assembling the upright leaves requires additional patience.
What yarn works best for a crochet snake plant?
DK-weight cotton yarn is a practical choice because it creates clear stitch definition and helps the leaves maintain their shape. Cotton blends can also work well. For firm, structured leaves, use a hook that produces tight, even stitches.
How do you make crochet plant leaves stand upright?
You can make the leaves from two crocheted layers, use firm yarn, and sew their bases securely. For taller leaves, concealed covered floral wire or a suitable craft support can help maintain their shape. Anchor the supports inside the planter and cover all sharp ends.
Can I make a crochet snake plant without floral wire?
Yes. A wire-free version can be made using tightly crocheted double-layer leaves. However, long leaves may bend or lean, especially with soft yarn. Shorter leaves, tighter stitches, and secure attachment to the soil base can improve stability.
How do you clean a crochet snake plant?
Gently remove dust with a soft brush or a cool, low-power vacuum attachment held slightly away from the yarn. Avoid soaking a plant assembled with cardboard, foam, wire, or other materials that may be damaged by moisture.
Bring Bold Handmade Greenery Into Your Home
This crochet snake plant pattern is a creative way to enjoy the beauty of houseplants without needing water, fertilizer, or a sunny windowsill.
The eight pointed jade-green leaves, vivid yellow borders, raised vertical texture, and royal-blue ribbed planter create a colorful botanical decoration that stands out beautifully.
You can customize the leaf heights, experiment with different yarn colors, or make a smaller version for a compact display.
Whether you’re decorating your craft room, refreshing a bookshelf, or making a thoughtful handmade gift, this crochet snake plant is a rewarding project that combines simple stitches with bold, modern design.
Save this crochet snake plant idea to your Pinterest crochet board, gather your favorite green and yellow yarn, and enjoy creating a handmade plant that stays bright and beautiful throughout the year.