Make This Festive Crochet Poinsettia Pattern
A crochet poinsettia pattern is a beautiful way to bring traditional Christmas colors into your home with flowers that stay bright and cheerful year...
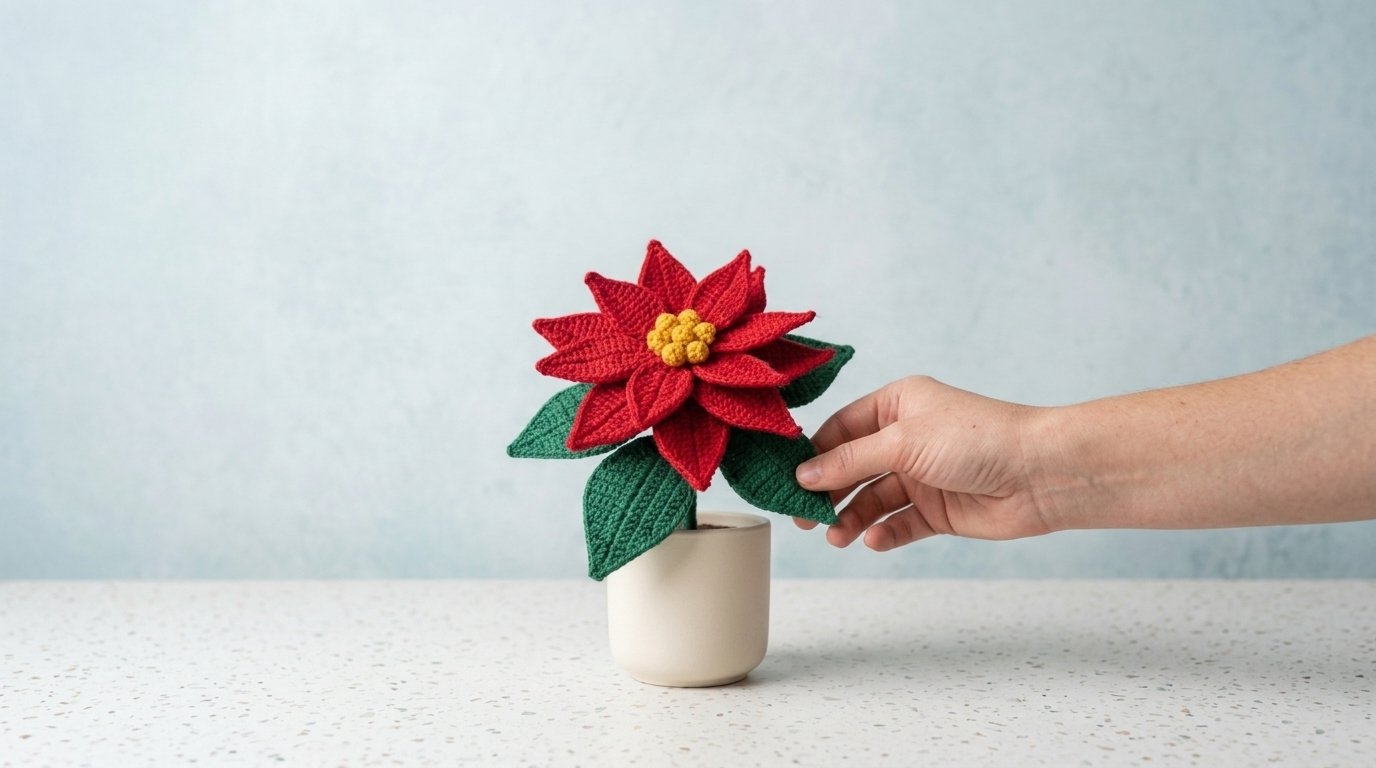
A crochet poinsettia pattern is a beautiful way to bring traditional Christmas colors into your home with flowers that stay bright and cheerful year after year. With its rich red petals, deep green leaves, and textured golden-yellow center, this handmade poinsettia captures the festive charm of one of the most recognizable holiday plants.
The design features layers of pointed red crochet petals arranged around a cluster of tiny yellow buds. Dark emerald-green leaves extend from behind the flower, creating a full botanical appearance. A slender green stem supports the arrangement inside a simple cream-colored flowerpot, giving the finished decoration a clean, elegant look.
This Christmas crochet project makes a lovely centerpiece, a thoughtful handmade gift, or a cheerful addition to a holiday mantel. You can display it alongside candles, evergreen decorations, or other crocheted winter flowers.
Although the finished poinsettia looks detailed, its individual pieces use familiar crochet stitches. If you’re comfortable with single crochet, increases, decreases, and basic sewing, you can create this festive flower one piece at a time.
What You Need for This Crochet Poinsettia Pattern
You only need a few yarn colors and basic craft supplies to create this beautiful Christmas flower.
Materials and Supplies
- Red yarn: Approximately 60–90 yards of worsted-weight cotton yarn for the pointed flower bracts.
- Dark green yarn: Approximately 30–50 yards for the leaves and stem.
- Golden-yellow yarn: A small amount for the textured flower center.
- Crochet hook: 3.5 mm (E/4), or a hook that produces firm stitches with your yarn.
- Yarn needle: For sewing the flower pieces together.
- Scissors: For cutting yarn and trimming loose ends.
- Stitch markers: Optional, for keeping track of rows.
- Fiberfill stuffing: Optional, for supporting the flower center.
- Small flowerpot: A cream or neutral-colored pot approximately 3–4 inches wide.
- Floral foam: For supporting the finished flower inside the pot.
- Floral wire or a sturdy craft stem: Optional, for helping the flower stand upright.
- Hot glue gun: For securing the pot arrangement.
- Green floral tape: Optional, for covering the stem support.
Skill Level and Finished Size
Skill level: Confident beginner to intermediate
Estimated time: 3–5 hours
Finished flower diameter: Approximately 6–8 inches
Finished height: Approximately 8–10 inches, including the pot.
These measurements are estimates. The finished size depends on your yarn, crochet hook, tension, and number of flower pieces.
Cotton yarn is particularly useful for this project because it creates clear stitch definition and helps the pointed bracts maintain their shape.
Crochet Stitches and Abbreviations
This pattern uses US crochet terminology.
| Abbreviation | Meaning |
|---|---|
| MR | Magic ring |
| ch | Chain |
| sc | Single crochet |
| sl st | Slip stitch |
| hdc | Half double crochet |
| dc | Double crochet |
| inc | Work 2 sc in the same stitch |
| dec | Single crochet decrease |
| sc3tog | Single crochet 3 stitches together |
| st(s) | Stitch or stitches |
| RS | Right side |
| FO | Fasten off |
The poinsettia is made from separate pointed bracts, green leaves, and a small center. You’ll join the pieces to create a full, layered flower before attaching it to the stem.
How to Crochet the Red Poinsettia Bracts
The rich red sections are the most eye-catching part of this Christmas flower.
Although they’re often called petals, the colorful red parts of a real poinsettia are actually modified leaves called bracts.
For this crochet version, you’ll create two layers of pointed red bracts. The larger pieces form the outer layer, while smaller pieces add fullness around the center.
Step 1: Crochet the First Large Red Bract
Using red yarn and a 3.5 mm crochet hook:
Row 1: Chain 2. Work 1 sc in the second chain from the hook. Turn. (1)
Row 2: Chain 1, work 3 sc in the stitch. Turn. (3)
Row 3: Chain 1, inc in the first stitch, work 1 sc in the next stitch, then inc in the final stitch. Turn. (5)
Row 4: Chain 1, inc in the first stitch, work 1 sc in each of the next 3 stitches, then inc in the final stitch. Turn. (7)
Rows 5–10: Chain 1, work 1 sc in each stitch across. Turn. (7)
Row 11: Chain 1, dec, work 1 sc in each of the next 3 stitches, then dec. Turn. (5)
Row 12: Chain 1, dec, work 1 sc in the next stitch, then dec. Turn. (3)
Row 13: Chain 1, sc3tog. (1)
Fasten off, leaving a long yarn tail.
The finished piece should resemble an elongated pointed leaf, wider in the middle and tapered toward both ends.
Gently shape the bract with your fingers.
Step 2: Make Six Large Red Bracts
Repeat the same instructions until you have six matching pieces.
Try to maintain consistent tension so the bracts are approximately the same size.
Place the finished pieces on a flat surface and arrange them in a circle.
The narrow bases should meet near the center, while the pointed outer ends extend outward.
Allow the edges to overlap slightly.
This forms the first layer of the crochet poinsettia.
Step 3: Crochet the Smaller Red Bracts
The smaller red pieces create a second layer and give the flower its full appearance.
Using red yarn:
Row 1: Chain 2. Work 1 sc in the second chain from the hook. Turn. (1)
Row 2: Chain 1, work 3 sc in the stitch. Turn. (3)
Row 3: Chain 1, inc, work 1 sc, then inc. Turn. (5)
Rows 4–7: Chain 1, work 1 sc in each stitch across. Turn. (5)
Row 8: Chain 1, dec, work 1 sc, then dec. Turn. (3)
Row 9: Chain 1, sc3tog. (1)
Fasten off, leaving a long tail.
Make five smaller bracts.
These pieces will sit slightly above the larger red layer, creating a dimensional flower with overlapping points.
Step 4: Add Texture to the Red Bracts
The pictured poinsettia has beautiful raised stitch details that resemble natural leaf veins.
You can create a similar appearance using surface slip stitches.
Take one finished red bract and identify its center line.
Using a crochet hook and matching red yarn, work a loose line of surface slip stitches from the narrow base toward the outer tip.
For additional texture, use a yarn needle to add two or three short diagonal stitches extending outward from the central line.
Keep the stitches relaxed so the bract doesn’t pucker.
Repeat on the remaining red pieces.
The subtle raised lines help the poinsettia look more detailed and realistic.
How to Crochet the Green Poinsettia Leaves
The dark green leaves provide contrast and help frame the bright red flower.
For an arrangement similar to the picture, make four or five green leaves.
Step 5: Crochet the First Green Leaf
Using emerald-green yarn, follow the large red bract instructions from Rows 1–13.
The resulting green leaf will have the same pointed shape.
For additional length, work two extra even rows in the widest section before beginning the decreases.
Fasten off, leaving a long yarn tail for assembly.
Step 6: Make Additional Green Leaves
Repeat the leaf pattern until you have four or five pieces.
For a natural appearance, make some leaves slightly longer than others.
Arrange them around the red flower to see how the colors work together.
The green leaves should extend beyond the red bracts without covering the flower center.
Step 7: Add Green Leaf Veins
Using a yarn needle and matching or slightly lighter green yarn, embroider a central line along each leaf.
Add several short diagonal stitches pointing toward the leaf edges.
These details help create the textured botanical appearance shown in the design.
Avoid pulling the embroidery yarn too tightly.
Gently flatten and shape the leaves after adding the veins.
How to Crochet the Yellow Poinsettia Center
A real poinsettia has small yellow-green flowers clustered at the center of the colorful bracts.
For this handmade version, you’ll create several tiny golden-yellow crochet buds.
Step 8: Crochet the Small Yellow Buds
Using golden-yellow yarn:
Rnd 1: Work 5 sc into a magic ring. (5)
Rnd 2: Work 1 sc in each stitch around. (5)
Fasten off, leaving a long yarn tail.
Thread the tail through the front loops of the five stitches and gently draw them together.
This creates a tiny rounded bud.
Make six or seven yellow buds.
The buds should be small enough to cluster together without covering too much of the red flower.
Step 9: Assemble the Yellow Center
Using a yarn needle, join the small yellow buds into a compact cluster.
Arrange them close together, allowing a few to sit slightly higher than the others.
Secure the buds with several small stitches at their bases.
The finished center should resemble a little group of golden berries or flower buds.
Set it aside while you assemble the red bracts.
How to Assemble the Crochet Poinsettia Flower
This is where all the individual pieces begin to look like a beautiful Christmas poinsettia.
Step 10: Create the Flower Base
Using green yarn:
Rnd 1: Work 6 sc into a magic ring. (6)
Rnd 2: Inc in each stitch around. (12)
Rnd 3: Repeat (1 sc, inc) six times. (18)
Join with a slip stitch.
Fasten off, leaving a long yarn tail.
This small circle provides a foundation for arranging the flower pieces.
Step 11: Attach the Green Leaves
Place the green circular base on your worktable.
Arrange the green leaves around the outside, positioning their narrow bases toward the center.
Space them evenly, allowing the pointed ends to extend outward.
Sew the leaves securely to the base using their yarn tails.
Keep the attachment stitches close to the center.
The outer portions of the leaves should remain free so they can bend naturally.
Step 12: Attach the Large Red Bracts
Position the six large red bracts over the green leaves.
Arrange them in a circular pattern, overlapping their narrow bases.
Try placing the red points between the green leaves rather than directly on top of them.
Use a yarn needle and matching red yarn to sew the bract bases onto the flower foundation.
Keep the outer edges free.
The red bracts should form a full star-shaped flower.
Step 13: Add the Smaller Red Layer
Place the five smaller red bracts over the larger pieces.
Rotate the arrangement so their pointed ends fall between the outer bracts.
This staggered positioning creates more depth and prevents the flower from looking completely flat.
Sew the smaller bracts securely around their bases.
Gently lift some of the edges to create the layered appearance seen in the picture.
Step 14: Attach the Yellow Center
Position the golden-yellow bud cluster in the middle of the red flower.
Use a yarn needle to sew the cluster securely through the underlying flower base.
Check that the buds sit firmly without pulling the red bracts inward.
Gently adjust the surrounding pieces.
The combination of textured red bracts, deep green leaves, and tiny yellow buds should now resemble a festive poinsettia in full color.
How to Make the Crochet Poinsettia Stem
The finished flower needs a sturdy stem to stand upright inside its decorative pot.
Step 15: Crochet a Green Stem Cover
Using dark green yarn:
Foundation: Chain 5 and join with a slip stitch to form a small ring.
Rnd 1: Work 1 sc into each chain around. (5)
Continue working single crochet stitches in continuous rounds until the tube measures approximately 5–7 inches long.
Fasten off, leaving a long yarn tail.
This creates a narrow crochet tube that can cover a suitable craft stem.
Step 16: Add Support to the Stem
Choose a sturdy floral stem or an appropriate piece of floral wire.
Fold over and cover any sharp wire ends completely.
Slide the green crochet tube over the support.
If necessary, secure the covering with small stitches or floral tape.
Position the upper end against the underside of the poinsettia flower.
Sew the green base of the flower securely around the covered stem.
For additional stability, use a small felt circle underneath the flower as reinforcement.
If you prefer not to use wire, you can make the poinsettia as a flat decoration for a wreath, garland, or gift package instead.
How to Display Your Crochet Poinsettia in a Pot
The simple cream-colored pot in the picture creates a lovely contrast with the rich holiday colors.
Step 17: Prepare the Flowerpot
Choose a small ceramic or terracotta pot.
Cut a piece of floral foam to fit snugly inside.
If the pot is lightweight, add a few clean stones to the bottom before inserting the foam.
This helps prevent the finished flower from tipping forward.
Secure the floral foam inside the pot using a small amount of hot glue, if appropriate for the pot material.
Allow the glue to cool completely.
Step 18: Secure the Flower Stem
Insert the lower end of the supported crochet stem into the floral foam.
Position the flower so it stands upright with a slight natural tilt.
Check the balance from the front and sides.
If the flower leans too far, adjust the stem position or add additional support inside the pot.
Cover any visible foam with dark brown felt, decorative stones, or a small circle of crocheted fabric.
Your potted crochet poinsettia is now ready to display.
Three Tips for a Beautiful Crochet Poinsettia
Choose Yarn That Holds Its Shape
Smooth cotton yarn works especially well for poinsettia bracts because it creates clear stitch definition and helps the pointed pieces maintain their shape.
If your yarn is very soft, gentle blocking can help the bracts lie neatly.
Shape the Flower Before Final Assembly
Arrange all the red and green pieces on a flat surface before sewing.
Experiment with their angles and overlapping positions.
A little time spent arranging the layers can make the finished flower look much more natural.
Keep the Flower Center Small
The tiny golden-yellow buds should complement the red bracts rather than dominate the design.
Use fine stitches and keep the cluster compact.
A smaller center allows the beautiful pointed red shapes to remain the main attraction.
Three Creative Crochet Poinsettia Variations
White Christmas Poinsettia
Replace the red yarn with soft ivory or creamy white.
Keep the dark green leaves and golden-yellow center.
This elegant variation looks beautiful in neutral holiday arrangements and winter centerpieces.
Traditional Deep Red Poinsettia
Use rich burgundy yarn for the outer bracts and bright Christmas red for the smaller inner layer.
The two shades create depth while maintaining a classic festive appearance.
Mini Crochet Poinsettia Ornament
Use lightweight cotton yarn and a smaller crochet hook.
Make fewer bracts and shorten the stem, or leave it off entirely.
Add a reinforced hanging loop to create a small decoration for a Christmas tree, wreath, or handmade gift.
Frequently Asked Questions
Is this crochet poinsettia pattern suitable for beginners?
Confident beginners can make this project if they’re comfortable with single crochet stitches, increases, decreases, and basic sewing. The individual bracts and leaves are straightforward, although arranging and attaching all the pieces requires some patience.
What yarn works best for a crochet poinsettia?
Worsted-weight cotton yarn is a good choice because it provides firm stitch definition and helps the pointed bracts maintain their shape. Cotton blends can also work well. Choose a hook that produces a neat fabric without large gaps.
How do you make crochet poinsettia petals hold their shape?
Use firm stitches, keep your tension consistent, and gently block the finished pieces if your yarn allows it. You can also reinforce the flower base or use concealed craft wire for a display piece, making sure sharp ends are completely covered.
Can I use crochet poinsettias for Christmas wreaths?
Yes. Crochet poinsettias make beautiful decorations for Christmas wreaths, garlands, table centerpieces, and gift packages. Simply leave off the long stem and sew the flower securely onto your chosen base.
Make a Festive Crochet Poinsettia for Christmas
This crochet poinsettia pattern is a lovely way to bring traditional holiday colors into your home with a handmade decoration that can be enjoyed year after year.
The layered red bracts, deep green leaves, tiny golden-yellow buds, and simple cream-colored pot create a cheerful Christmas flower that looks beautiful on a mantel, shelf, or holiday table.
You can customize the design with different yarn colors, make a miniature ornament, or crochet several poinsettias for a larger holiday arrangement.
Whether you’re decorating your home or preparing a thoughtful handmade gift, this festive crochet flower is a rewarding project that combines simple stitches with beautiful botanical details.
Save this crochet poinsettia idea to your Pinterest Christmas crochet board, gather your favorite holiday yarn colors, and enjoy creating a handmade flower that stays bright throughout the festive season.