Crochet Flower Bag Charm Idea
A crochet flower bag charm is a beautiful little accessory that can instantly add color and personality to your favorite handbag, backpack, or tote....
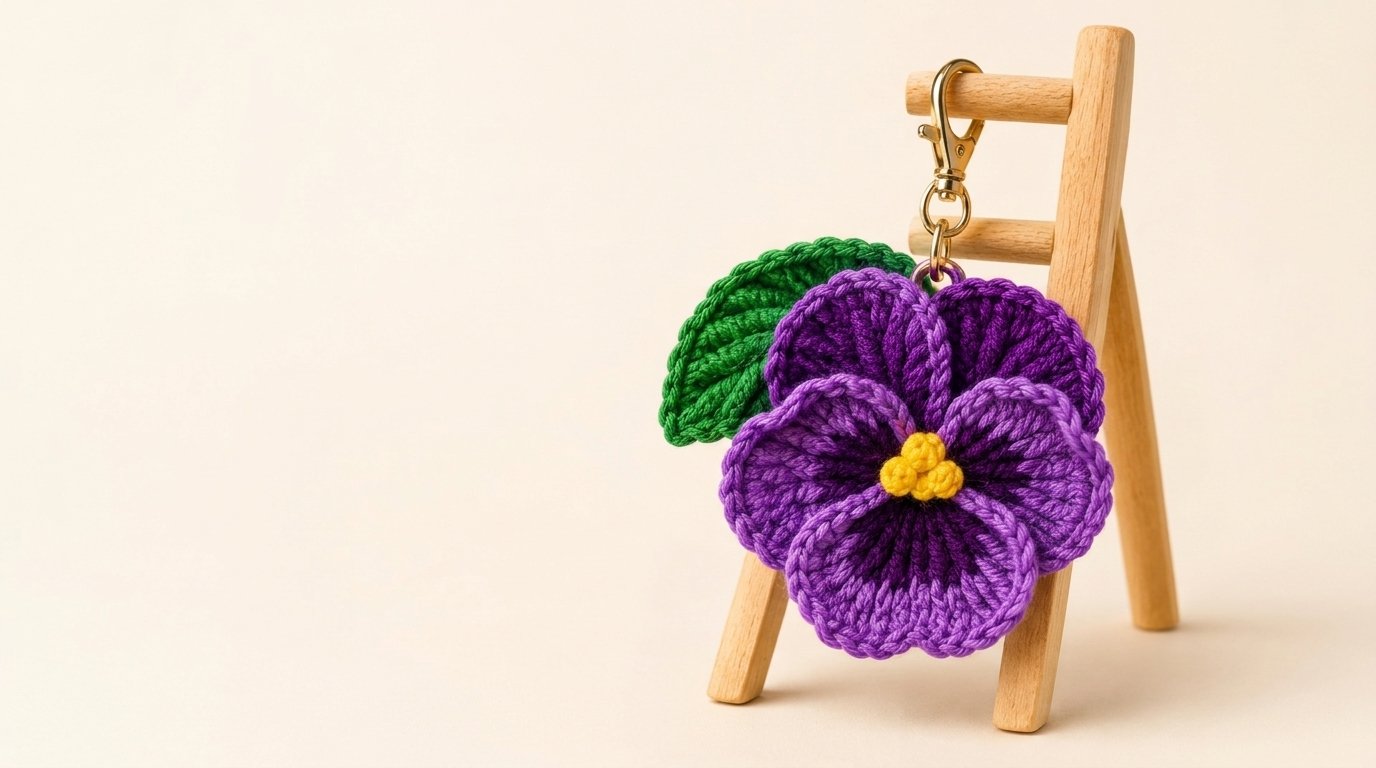
A crochet flower bag charm is a beautiful little accessory that can instantly add color and personality to your favorite handbag, backpack, or tote. With its layered purple petals, bright yellow center, rich green leaf, and elegant gold clasp, this handmade flower charm brings a cheerful botanical touch to an everyday accessory.
Inspired by the delicate shape of a pansy, this design combines deep violet and soft lavender petals to create a lovely three-dimensional flower. The small cluster of golden-yellow stitches in the center adds contrast, while the textured green leaf gives the flower a natural, finished appearance.
One of the best things about this crochet project is that you only need small amounts of yarn. It’s an excellent way to use leftover cotton yarn while practicing basic stitches and simple flower assembly.
You can attach the finished charm to a purse, use it as a decorative keychain, or make several in different colors as thoughtful handmade gifts.
What You Need for a Crochet Flower Bag Charm
This small crochet project requires just a few materials and basic crochet tools.
Materials and Supplies
- Deep purple yarn: Lightweight cotton yarn for the upper flower petals.
- Lavender yarn: A lighter purple shade for the front and lower petals.
- Golden-yellow yarn: A small amount for the raised flower center.
- Emerald-green yarn: For the decorative leaf.
- Crochet hook: 3 mm (D/3), or a suitable size for your yarn.
- Yarn needle: For attaching the petals and weaving in ends.
- Scissors: For cutting yarn.
- Gold lobster clasp: One small swivel clasp designed for bag charms or keychains.
- Metal jump ring: For connecting the flower to the clasp.
- Small jewelry pliers: For opening and closing the jump ring.
- Stitch marker: Optional, for keeping track of rounds.
Skill Level and Finished Size
Skill level: Confident beginner
Estimated time: 45–90 minutes
Approximate flower diameter: 3–4 inches
Leaf length: Approximately 1½–2 inches
Finished charm length: Approximately 4–5 inches, including the clasp.
The exact finished size will depend on your yarn thickness, crochet tension, and hook size.
Cotton yarn is an excellent choice because it gives the petals clear stitch definition and helps the flower maintain its shape.
Crochet Stitches and Abbreviations
This project uses US crochet terminology.
- MR: Magic ring
- ch: Chain
- sc: Single crochet
- hdc: Half double crochet
- dc: Double crochet
- sl st: Slip stitch
- inc: Two single crochet stitches in the same stitch
- st(s): Stitch or stitches
- FO: Fasten off
The flower is constructed from five separate petals attached to a small circular base. This approach makes it easier to arrange the petals into a layered pansy shape.
How to Crochet the Purple Flower Petals
The most distinctive feature of this crochet flower bag charm is its beautiful arrangement of overlapping purple petals.
Instead of making every petal identical in color and position, you’ll create two darker upper petals and three lighter petals for the front.
Step 1: Crochet the First Dark Purple Petal
Using deep purple cotton yarn and a 3 mm crochet hook:
- Chain 9.
- Work 1 sc in the second chain from the hook.
- Work 1 hdc in the next chain.
- Work 1 dc in each of the next 4 chains.
- Work 1 hdc in the next chain.
- Work 1 sc in the final chain.
You now have eight stitches along one side of the foundation chain.
Rotate your work so you can crochet into the unused loops on the opposite side.
Work 1 sc, 1 hdc, 4 dc, 1 hdc, and 1 sc into the corresponding eight chain loops.
Join with a slip stitch near the starting point.
Fasten off, leaving a long yarn tail for sewing.
The finished petal should form an elongated oval with a softly rounded outline.
Step 2: Make the Second Upper Petal
Repeat the same instructions using deep purple yarn.
Try to maintain consistent tension so both upper petals are similar in size.
Lay the two pieces beside each other.
The upper edges should overlap slightly when arranged into the flower.
For additional texture, you can work a surface slip stitch line along the center of each petal using matching purple yarn.
This creates a subtle raised ridge that resembles the stitch definition shown in the design.
Step 3: Crochet Three Lavender Petals
Switch to lavender yarn.
Make three more petals using the same basic pattern.
These will form the two side petals and the larger lower petal.
For the lower petal, you can add an extra round of single crochet around the outside edge if you want it to appear slightly fuller.
Work one stitch into each stitch around the edge, adding an extra stitch at the widest curves if necessary to keep the piece flat.
Fasten off and leave yarn tails for assembly.
You should now have five petals:
- Two deep purple upper petals.
- Two lavender side petals.
- One lavender lower petal.
Arrange them loosely on your worktable before continuing.
How to Make the Flower Center
The small golden-yellow center provides a bright focal point and helps bring the purple petals together.
Step 4: Crochet a Small Purple Base
Using deep purple yarn:
Round 1: Work 6 sc into a magic ring. (6)
Round 2: Work 2 sc in each stitch around. (12)
Join with a slip stitch.
Fasten off, leaving a long tail.
This small circle will serve as the foundation for attaching the petals.
Step 5: Assemble the Five Petals
Place the circular base flat with the right side facing upward.
Position the two deep purple petals at the upper section, overlapping their narrow ends slightly.
Place one lavender petal on each side.
Finally, position the fifth lavender petal at the bottom center.
The petals should form a slightly asymmetrical flower resembling a pansy.
Using a yarn needle and matching purple yarn, sew the narrow ends of the petals onto the circular base.
Use several small stitches to secure each piece.
Keep the outer sections of the petals free so they can remain slightly raised.
This creates the beautiful three-dimensional appearance of the finished flower.
Step 6: Add the Yellow Flower Center
Using golden-yellow yarn, create a small cluster of French knots directly over the joined petal bases.
Thread a yarn needle with yellow yarn.
Bring the needle up through the center of the flower.
Wrap the yarn around the needle twice, then insert the needle close to the original point.
Hold the working thread gently while pulling the needle through.
Repeat to make approximately five or six small knots.
Arrange the knots close together so they resemble a tiny cluster of golden stamens.
If you prefer not to use embroidery knots, you can crochet a small yellow circle using six single crochet stitches in a magic ring and sew it over the center instead.
How to Crochet the Green Leaf
The rich green leaf sits behind the purple flower and adds a fresh botanical detail.
Step 7: Crochet the Leaf Shape
Using emerald-green yarn:
- Chain 11.
- Work 1 sc in the second chain from the hook.
- Work 1 hdc in the next chain.
- Work 1 dc in each of the next 6 chains.
- Work 1 hdc in the next chain.
- Work 1 sc in the final chain.
Rotate your work and crochet along the opposite side of the foundation chain.
Work 1 sc, 1 hdc, 6 dc, 1 hdc, and 1 sc into the corresponding chain loops.
Join with a slip stitch and fasten off, leaving a long tail.
Gently shape the leaf into a pointed oval.
Step 8: Add Texture to the Leaf
Thread your yarn needle with green yarn.
Work a simple line of straight embroidery stitches down the center of the leaf.
Add a few short diagonal stitches extending outward from the central line.
These small details imitate leaf veins and create a more realistic appearance.
For extra definition, use a slightly darker green shade for the vein stitches.
Step 9: Attach the Leaf Behind the Flower
Turn your purple flower over.
Position the green leaf behind the upper-left side of the flower, allowing most of the leaf to extend beyond the petals.
This creates the layered floral appearance shown in the design.
Using the yarn tail from the leaf, sew its base securely to the back of the flower.
Keep the attachment stitches hidden from the front.
Avoid sewing the entire leaf flat against the petals. Leaving its outer section free adds depth and movement.
How to Turn the Flower Into a Bag Charm
Once your crochet flower is assembled, it’s time to attach the gold hardware.
Step 10: Make a Strong Hanging Loop
Using a short length of green or purple cotton yarn, create a small reinforced hanging loop at the back of the flower.
Pass the yarn through several stitches near the upper edge of the flower base.
Form a loop approximately ½ inch long.
Secure the ends with several tight stitches and weave them into the back of the flower.
For additional strength, repeat the loop with a second strand of yarn.
Make sure the loop is attached to the central base rather than only to the edge of a single petal.
Step 11: Attach the Gold Clasp
Open your metal jump ring using jewelry pliers.
Slide the ring through the reinforced yarn loop.
Attach the lobster clasp to the same jump ring.
Carefully close the ring, making sure the ends meet without leaving a gap.
Give the clasp a gentle pull to check that the connection feels secure.
Avoid relying on hot glue for the metal hardware. A properly secured yarn loop and closed metal ring provide a more reliable attachment for regular use.
Step 12: Finish and Shape the Flower
Check the flower for loose yarn ends.
Weave them into the back using a yarn needle.
Gently arrange the petals so the darker purple sections sit behind the lighter ones.
Adjust the green leaf so it remains visible.
If the petals curl unevenly, lightly dampen them and shape them with your fingers.
Allow the flower to dry completely before attaching it to your bag.
Your handmade crochet flower bag charm is now ready to use.
Three Tips for a Beautiful Crochet Flower Bag Charm
Choose Yarn With Clear Stitch Definition
Smooth cotton yarn works particularly well for small crochet accessories.
It helps the petals maintain their shape and makes the decorative stitches more visible.
Avoid very fuzzy yarn if you want the detailed petal texture to stand out.
Layer the Petals Carefully
The flower looks more natural when the petals overlap instead of sitting in a perfectly flat circle.
Place the darker petals toward the back and allow the lavender petals to curve gently forward.
Reinforce the Hardware Connection
Bag charms are frequently handled and may catch on clothing or other objects.
Check that the jump ring is fully closed and the hanging loop is securely stitched.
For a charm you’ll use every day, reinforcing the yarn loop with extra stitches is worth the effort.
Three Creative Crochet Flower Bag Charm Variations
Pink Cherry Blossom Bag Charm
Replace the deep purple yarn with soft pink and the lavender yarn with pale blush.
Use a golden-yellow center and a fresh green leaf.
The result is a delicate spring-inspired accessory that looks beautiful on cream or neutral handbags.
Yellow and Orange Flower Charm
Use bright yellow yarn for the petals and warm orange for the flower center.
Add a deep green leaf for contrast.
This cheerful variation is ideal for summer bags and colorful handmade gifts.
Blue and Lavender Pansy Charm
Create the upper petals in royal blue and the lower petals in soft lavender.
Keep the golden-yellow center and emerald-green leaf.
This combination creates a striking floral charm with a cool, vibrant color palette.
Creative Ways to Use Your Crochet Flower Charm
Although this design is intended as a bag charm, there are several ways to enjoy it.
Attach it to the zipper of a canvas tote to add a small handmade detail.
Clip it onto a backpack for a playful floral accent.
Use it as a decorative keychain, provided the hardware is strong enough for everyday handling.
You can also make matching flower charms in different colors and give them as small handmade gifts.
For a thoughtful presentation, place the finished charm inside a small kraft gift box with tissue paper and a simple ribbon.
Frequently Asked Questions
Is this crochet flower bag charm suitable for beginners?
Yes. Confident beginners who know how to chain, single crochet, half double crochet, and double crochet can make this project. The individual petals are straightforward, while assembling the layered flower provides useful practice with sewing crochet pieces together.
What yarn is best for crochet bag charms?
Lightweight cotton yarn is an excellent choice because it’s durable, smooth, and holds small decorative shapes well. Cotton blends can also work, especially when you want a slightly softer finished flower.
How do you keep a crochet flower bag charm from losing its shape?
Use firm stitches, avoid oversized hooks, and secure the petals carefully during assembly. Gentle blocking can help shape the petals. Store the charm without placing heavy objects on top of it, and reshape the petals with your fingers when needed.
Make a Colorful Crochet Flower Bag Charm
A crochet flower bag charm is a fun, affordable way to turn leftover yarn into a beautiful handmade accessory.
The combination of layered purple petals, a golden-yellow center, a textured emerald-green leaf, and polished gold hardware creates a cheerful decoration that adds personality to almost any handbag.
Once you’ve made your first flower charm, try experimenting with different color combinations or creating several matching accessories for friends and family.
Save this crochet flower bag charm idea to your Pinterest crochet board, gather your favorite colorful yarn scraps, and enjoy making a small floral accessory filled with handmade charm.